
Learn How to
Make an Outdoor Brick Bench
#TigerStrypesBlog
You can call them bricks, or blocks…whatever you want. I have seen things like this in home improvement store catalogs, and always wanted to make some for my yard. Well, with Spring almost upon us here in the mountains of AZ, I thought “what better of a time?”
The bricks are very inexpensive, but the wood (if you’re using redwood), can be pricey. I wanted to just buy the best stuff, so it would last longer and work well in our mountain weather. I started out with a plan of attack…I got my husband to take me to the home improvement store, bought all of the products that we needed, had everything set in the yard, ready to go – and then the weather decided to do this:

This year, we’ve only had only about 3 days of snow, and this just happened to be one of them. Great timing, right? So after waiting for the snow to melt, and the ground to dry – it was time to get started. Like I said, pretty easy, just some measuring, keeping things square, etc. Don’t worry, you can do it!! If you don’t have the tools, you can always just buy the shorter ones, or have the guys at the store cut them for you.
Take a look at the tutorial below, and leave me a comment about what you think. I sure hope that you like it!! I hope you have a blessed day, and please be sure to comment and share this project on your social media channels – thanks so much!!
Learn How to Make an #outdoor Brick Bench for your #yard #home #DIY - Find out more at Click To Tweet
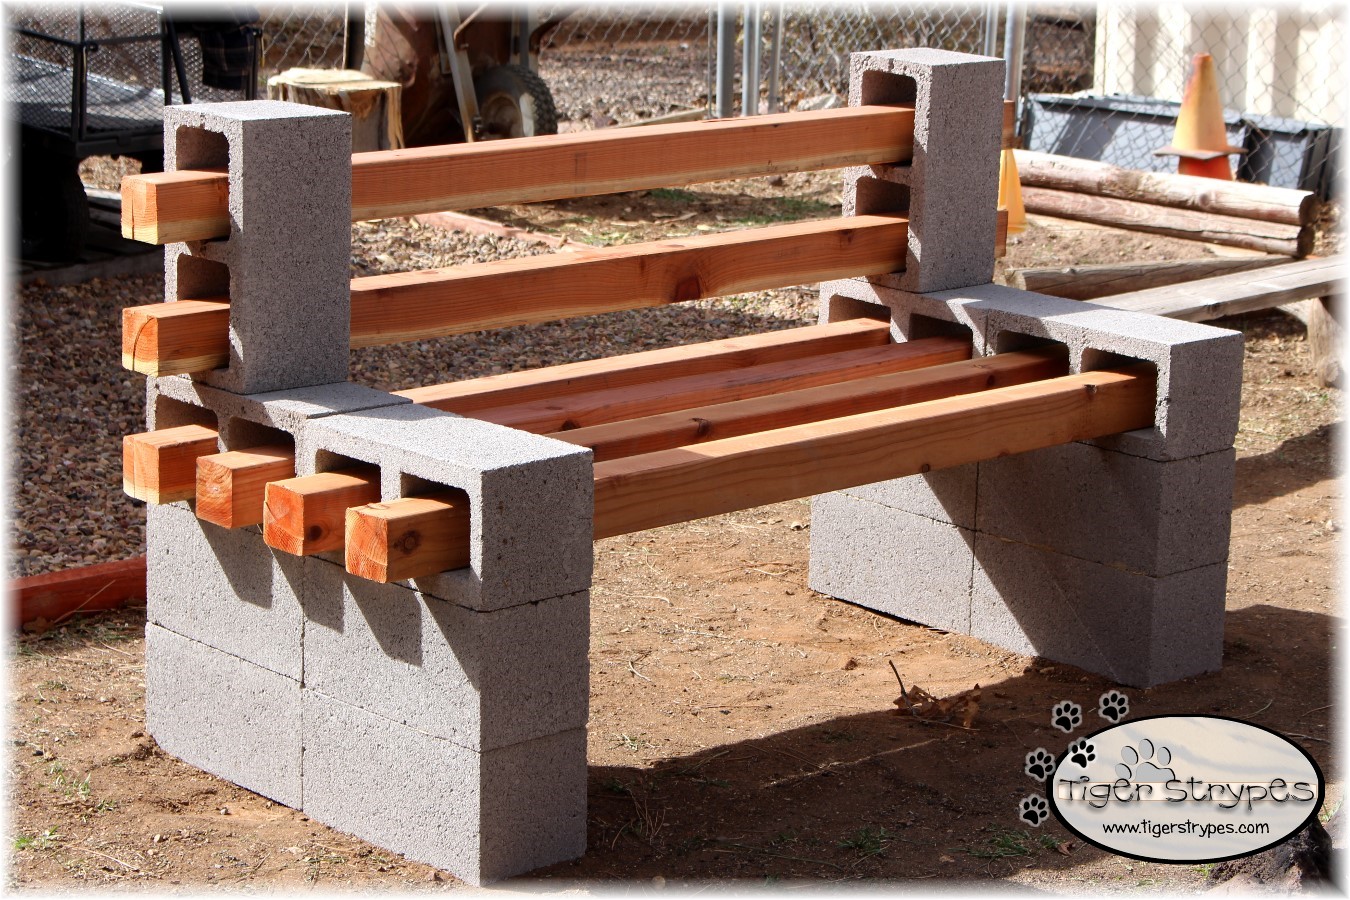
 Make an Outdoor Brick Bench
Materials/Tools Used:
- Fourteen (14) Standard Cored Concrete Bricks/Blocks
- Three (3) 4′ x 4′ x 12′ Redwood Pieces
- Tools (Saw, Level, Pencil, Etc.)
- Liquid Nail Adhesive
- Cushions
- & Time!
Instructions for the Outdoor Brick Bench:
I started out by asking my husband if he wanted to help me with a project. You all know that “look” right? ha/ha He said sure, since he knew that I’d been wanting to do this for awhile now. We headed to the home improvement store and bought the bricks and wood pieces, and got to work!
To start with, we measured and cut the Redwood pieces in half (ended up being cheaper to buy the larger pieces). Measure twice, cut once – remember that! 🙂


When that was done, we sanded the edges to smooth them out, and got to work. Once you have found the place where you’d like them to go, you can kind of do a trial set up with the materials.
Using one of the other boards for measurement, we set the bricks in the area that we wanted them to make sure it would all line up when the wood was installed. Moving this whole thing after it’s been put together would definitely be a chore! It’s better to have a plan beforehand.

Starting with two (2) bricks that you glue together in the center, you then add some more glue to the top of them. Now you can stack two (2) more on top of those. These two should also be glued together in the center. It takes some puzzle work, but you’ll get it.


When those are secure, you then flip two (2) bricks on their sides and glue those in place. Again, being sure to glue them together in their center, as well.

After those are secure, you can place one brick standing up, a few inches from the rear of the bottom stack of the bricks. This will end up being the back, so be sure to put it in the right place. 🙂 We figured having it a bit forward, would make it more stable, than all of the way to the back. Positioning is totally up to you.

When all of the bricks are dry, you can then start with the wood. Just feed each of the pieces through the holes in the bricks, to create the seating area (as well as back rest). You’ll most likely be moving them around to space them when you’re done, so you don’t have to be too specific on how they go in.


When that was all done, we just let them set overnight to make sure that all of the adhesive was completely dry. We felt it was better to do that, than to lean back and end up on the ground behind them. Good choice, right? :/


I ended up wanting to make them a bit more comfortable, so I found some cushions on sale to add to the seat part. Made a world of difference. You can customize them however you wish, and even add a back cushion, if you want to get super comfy.

I hope you like it! Please take a minute to leave me a comment. Let me know what you would do different, what you would add, and where you would put them! Be sure to tweet, pin, share, etc. – thanks!!
“God reigns over the nations; God is seated on his holy throne.” -Psalm 47:8
 HERE ARE SOME OF MY PREVIOUS PROJECTS:
 |
 |
 |
 |
 |
 |
[…] found some great Mercury Row Timothea Steel Side Tables to put next to my OUTDOOR BRICK BENCHES that I had made for a blog post just recently. Extra places to set drinks and food while enjoying […]
These look so sturdy!! I like the addition of the pad as well. I can see this being a family favorite for along time.
Thanks Shelley, that’s why I really like them…they will last a long time. 🙂
That is a super cute idea! I love how simple it looks, which is perfect for the backyard and the cushion really makes it look nice!
Thank you, Leah. We just wanted something that would work in the area of a fire pit and horseshoes game. These seemed to be the best choice and will be there for some time! 🙂
How stinkin’ creative is that?! That’s pretty cool – love the addition of the cushion. 🙂
Thanks Lynda – it was a bit more comfy than just the wood! 🙂
If I had a back yard I would definitely attempt to have someone make this for me–uh–two thumbs here. I really like the way they look and I probably would put a cushion on the back as well!
These are pretty easy, Michele – you could totally do it. Hardest part was waiting for the glue to dry!
Oh I love this! It even looks simple enough to do ourselves and would be perfect for our firepit area!
That’s why we wanted them – the evenings are getting better for outdoor fun. They were really easy to make.
Such a creative idea! It looks awesome and very neatly put together. I also love the beautiful cushion seat you made for on it.
Thanks Gladys – they were easy to make and are pretty comfy for outdoors. Plus, they won’t blow away! 🙂
How clever! I love how this turned out, we may have to make one for our backyard!
Thanks Jenn – they were pretty easy to make! 🙂
What a great idea! I love how it turned out. I need one for my front yard!
Thanks LaVonne. They are pretty easy to make and definitely sturdy! 🙂 Share a pic if you build one.