
Spring Craft Blog Hop #3
“TigerStrypes Blog’s Spring Veggies Decor”
Welcome to the third in a four-part spring craft blog hop challenge for the spring season! This hop will run from March 18th – May 25th and will be the longest and biggest of the hops. We’re challenging you to create a craft project that reflects Easter, recycled crafts, Earth Day, Mother’s Day, Teacher’s Day, May Day, Cinco De Mayo or a General Spring theme.
Please join us in this challenge and link-up your crafty creation at the bottom of this post and have it shared on 19 blogs!

Meet all 19 hosts!
Each host will be sharing their own craft to kick off the Spring Craft Blog Hop challenge, so make you visit each host to see their fabulous creations!
*Please follow your hosts on at least one or more social media platforms of your choice. Let us know you’re following from #SCBH2015*
 Erlene @My Pinterventures Pinterest/Twitter/Instagram/FB/G+
- Rachel @Craving Some Creativity Pinterest/Twitter/FB/G+
- Jessica @Live Randomly Simple Pinterest/Twitter/Instagram/FB/G+
- Misty @The Lady Prefers 2 Save Pinterest/Twitter/FB/G+
- Shirley @Intelligent Domestications Pinterest/Twitter/Instagram/FB/G+


- Tee @Beauteeful Living Pinterest/Twitter/FB/
- Beverly & Gloria @Across the Boulevard Pinterest/Twitter/FB/G+/G+
- Amanda @The Kolb Corner Pinterest/Twitter/Instagram/FB/G+
- Renee @Creative Mama Messy House Pinterest/Twitter/Instagram/FB/G+
- Jamie @Tiger Strypes Pinterest/Twitter/Instagram/FB/G+

- Marlys @This and That Pinterest/Twitter/Instagram/FB/G+
- Christie @Sparkles of Sunshine Pinterest/Twitter/FB/G+
- Sarah @Creative Ramblings Pinterest/Twitter/Instagram/FB/G+
- Shana @Technotini Pinterest/Twitter/Instagram/FB
- Lauren @Mom Home Guide Pinterest/Twitter/FB/G+

- Kimberly @Five Little Chefs Pinterest/Twitter/Instagram/FB/G+
- Laurie @My Husband Has Too Many Hobbies Pinterest/FB/G+
- Roxanne @The Honeycomb Home Pinterest/Twitter/Instagram/FB/G+
- Sofia @Fun with a Message Pinterest/Twitter/FB/G+
Grab a button and help us spread the word!

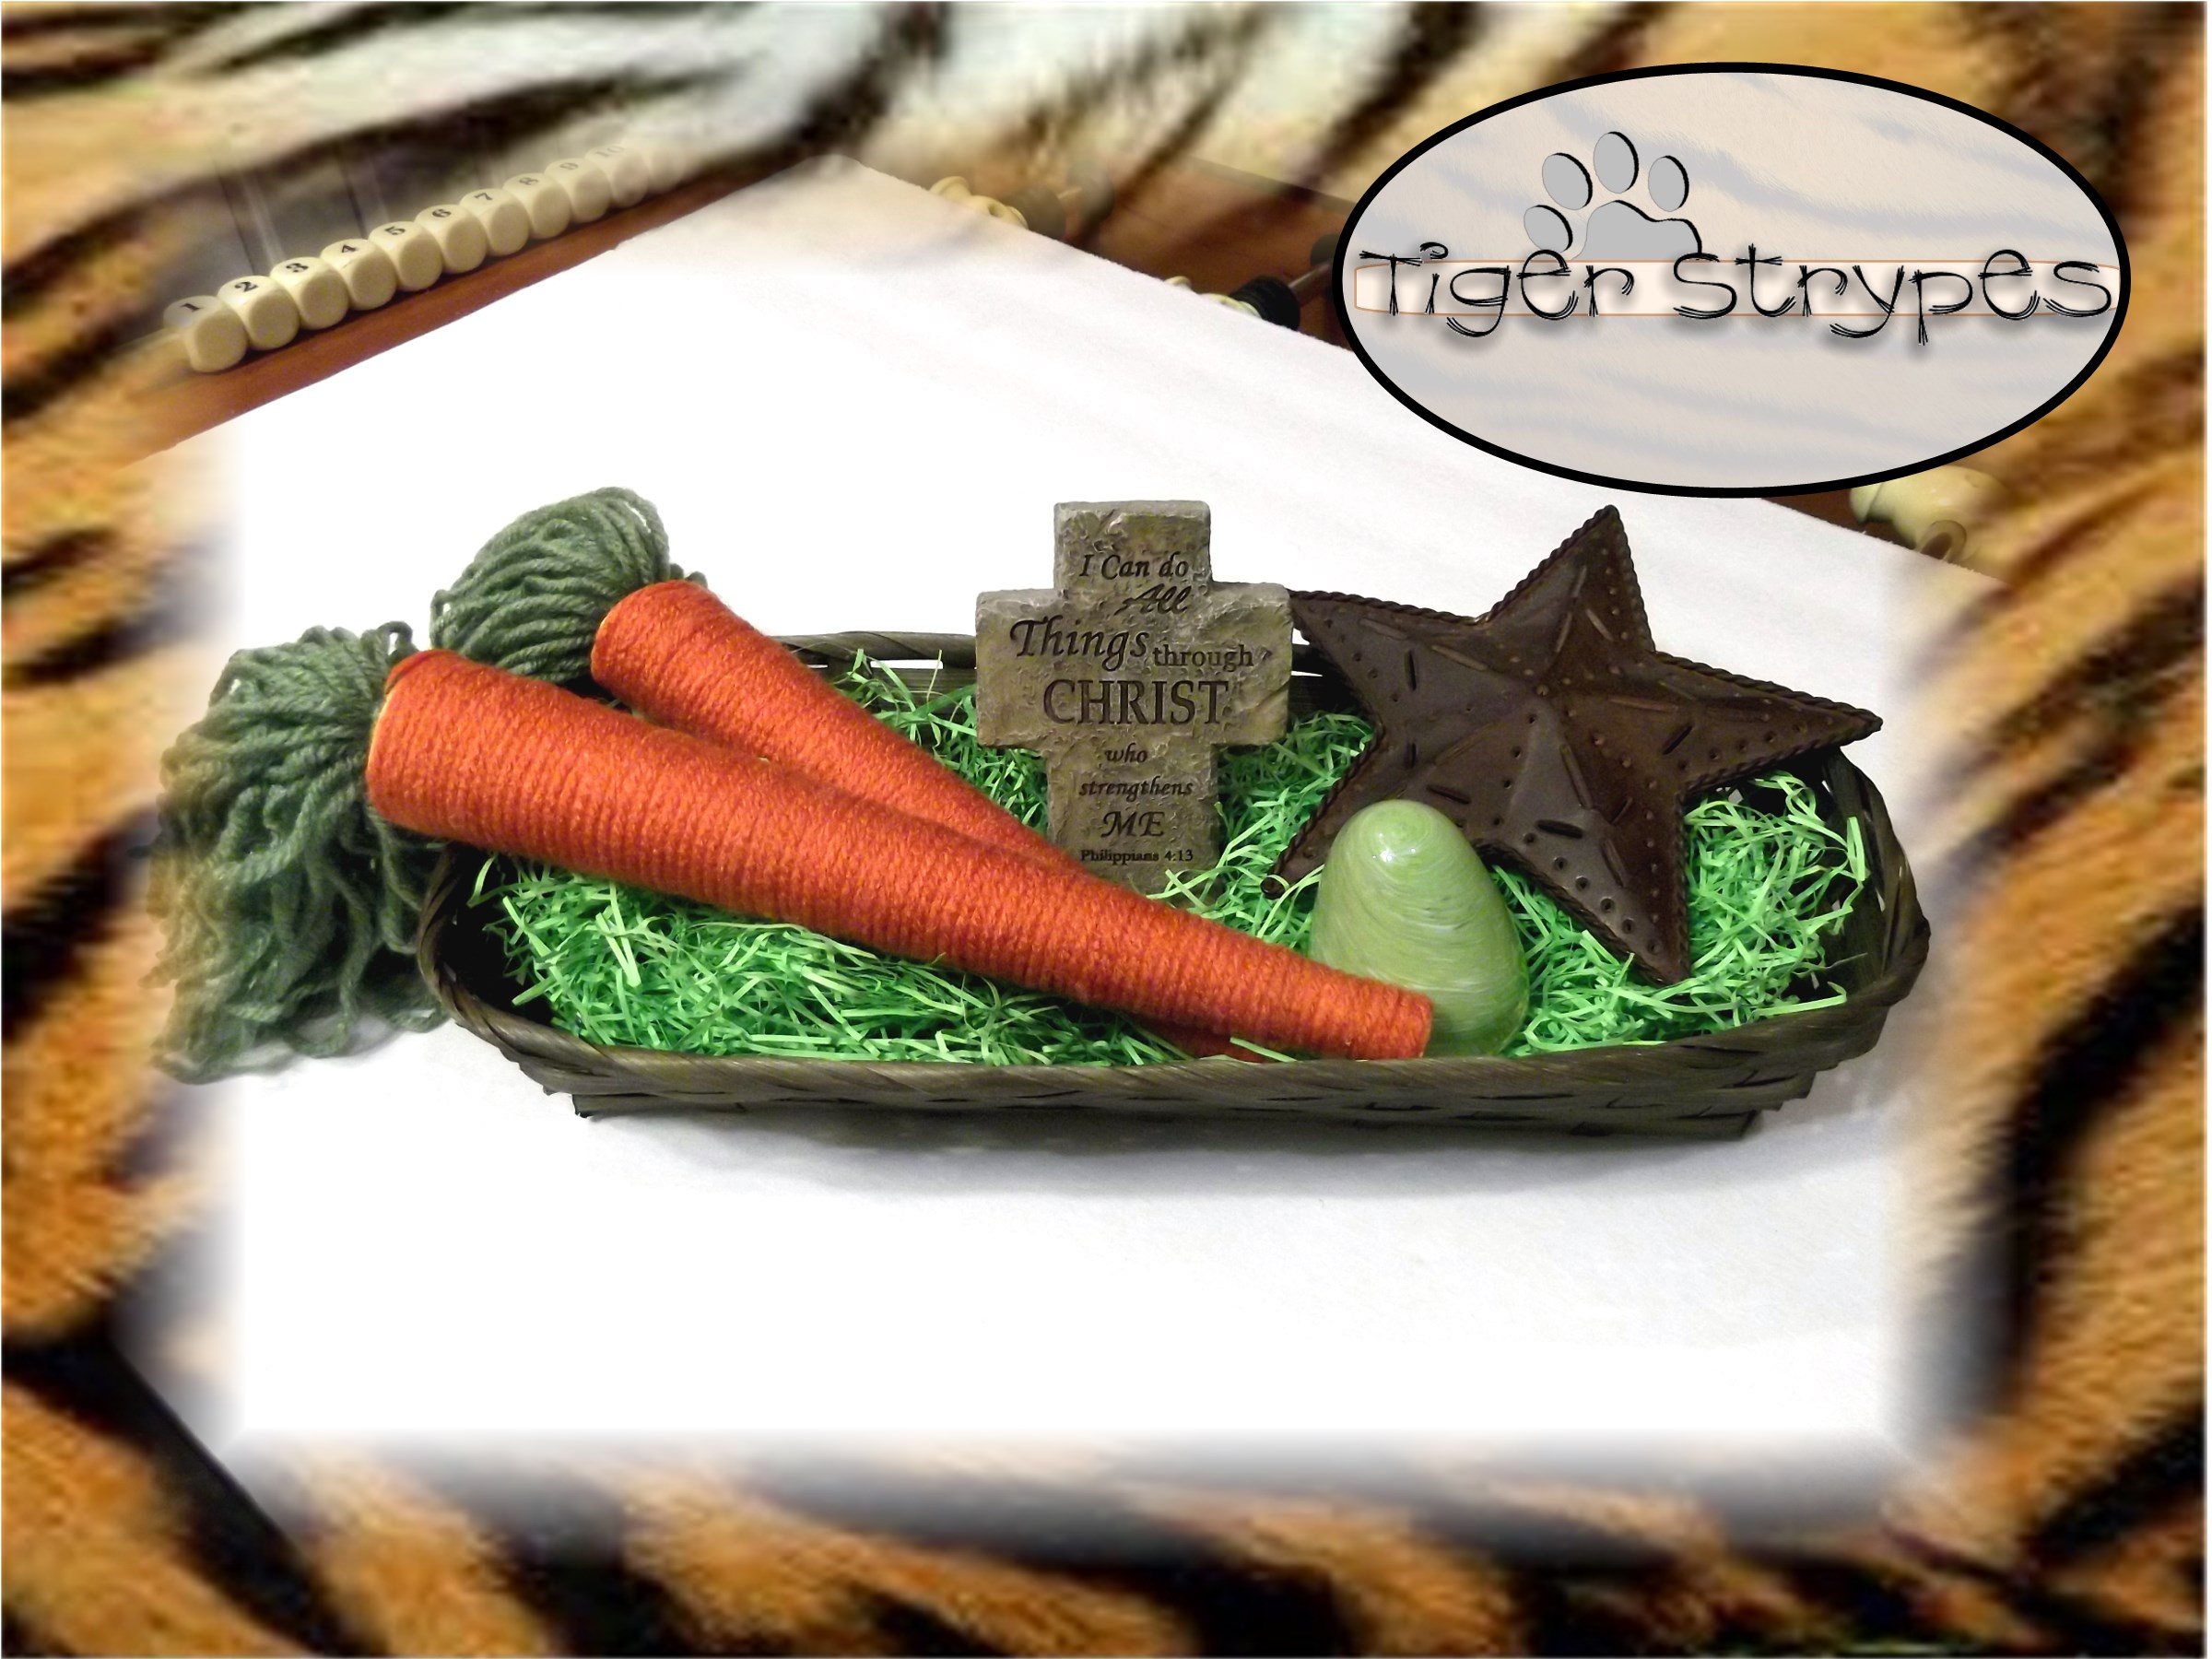
Spring Veggies Decor
Materials/Tools Needed:
- Yarn (Orange & Green)
- Scissors
- Glue
- Orange Paper
- & Time!
Instructions:
Start by folding the corner of the paper to the edge to form a square shape and cut the top portion off. This will make it easier to roll and form the carrot shape.
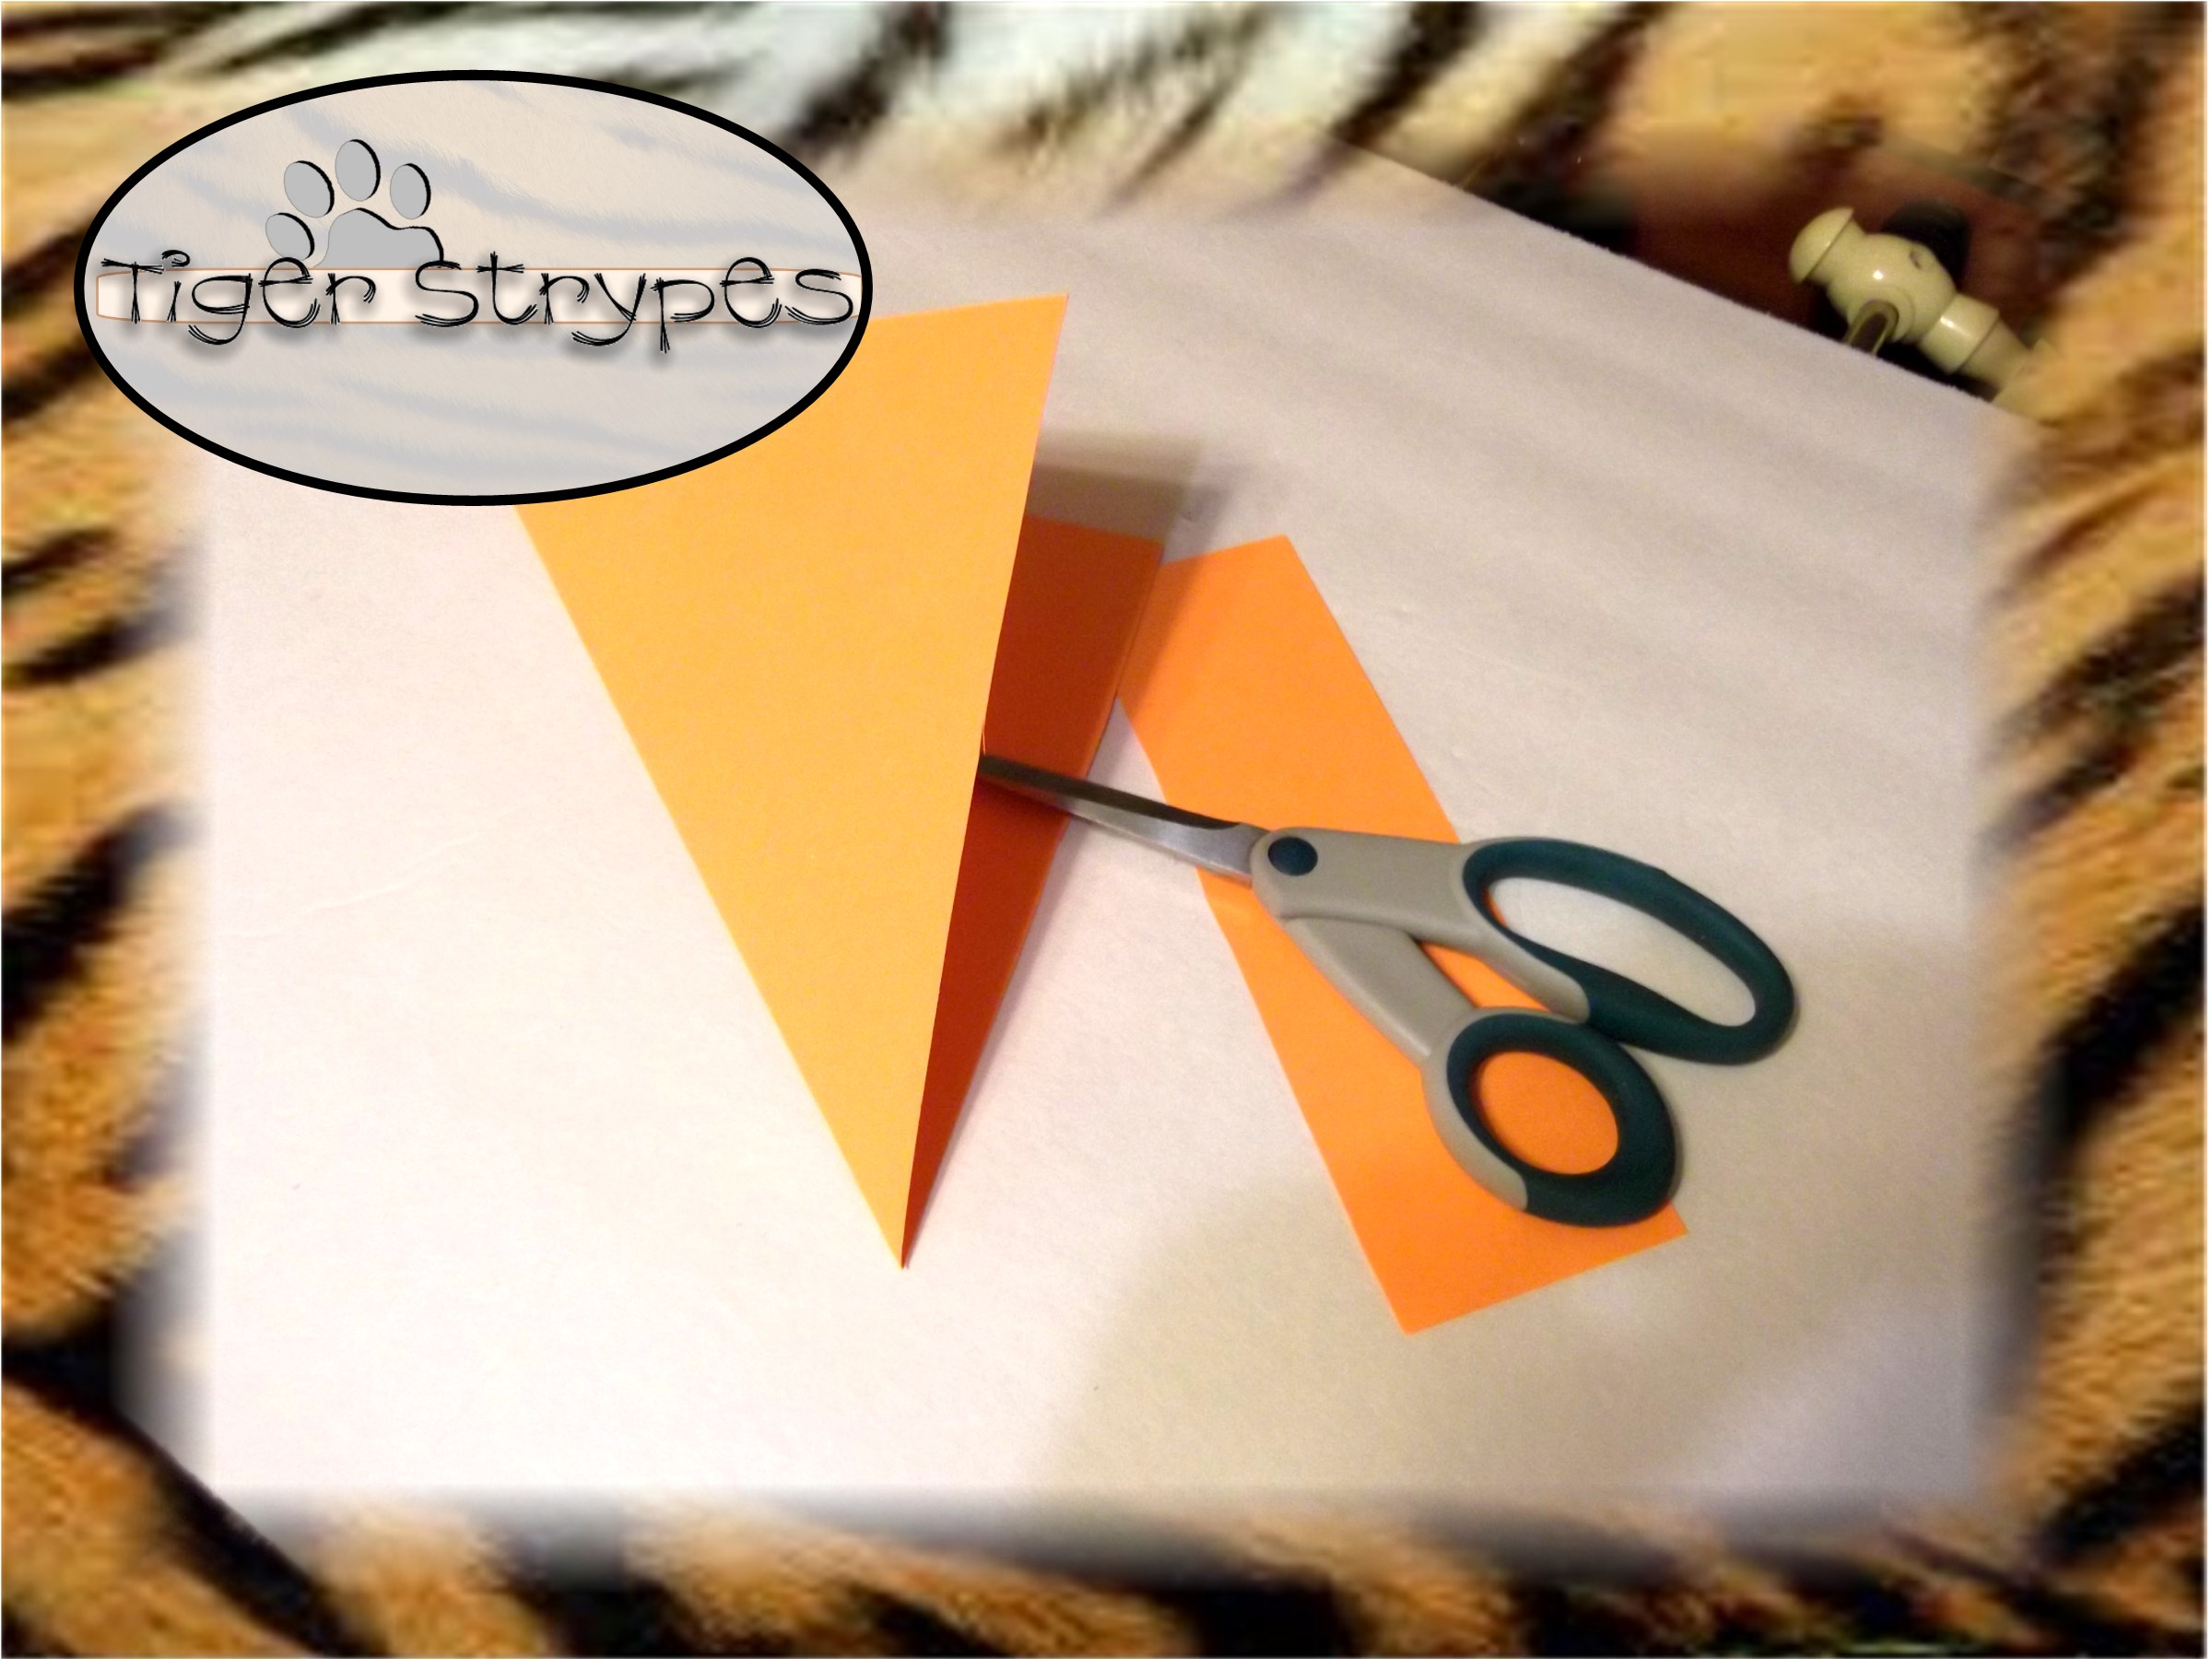
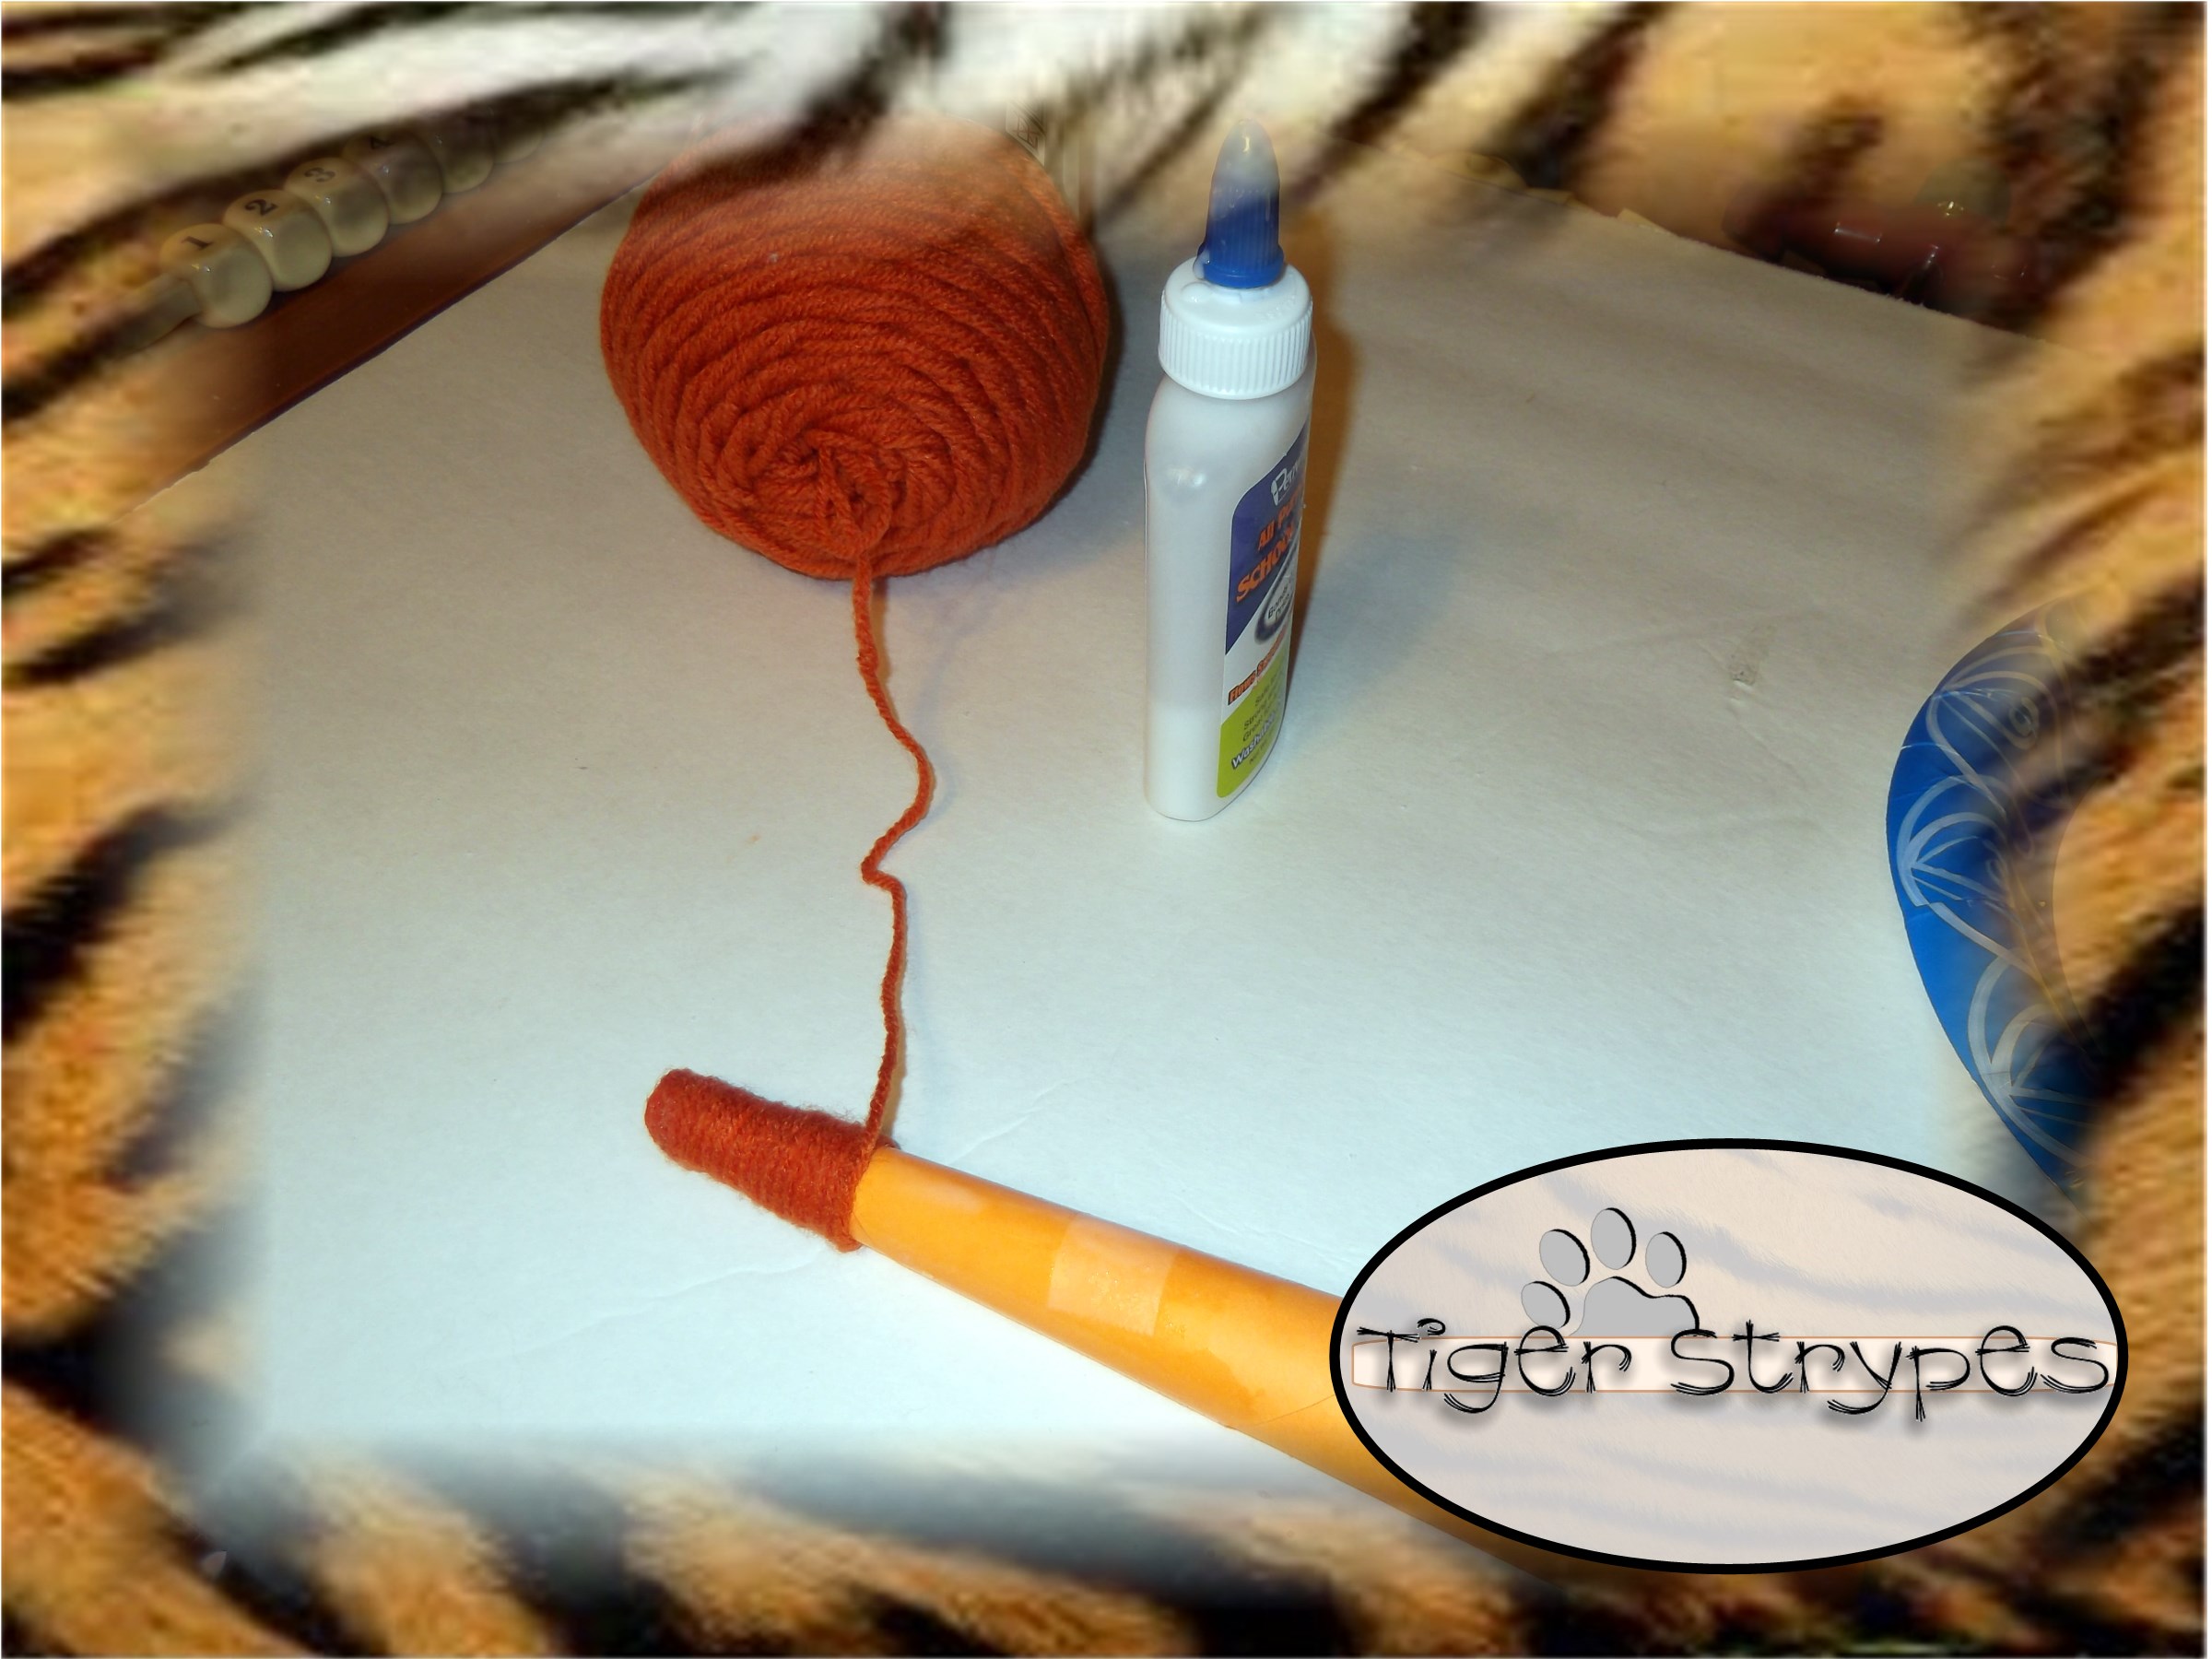
Next, roll the paper up into a carrot form and once you have it in the shape you want, use some tape to secure the edge. Doesn’t matter what it looks like, since the yarn will be glued over the top of this and hide the tape.

Once you have it secured, use a foam brush or whatever you use to start putting glue on the “carrot”.
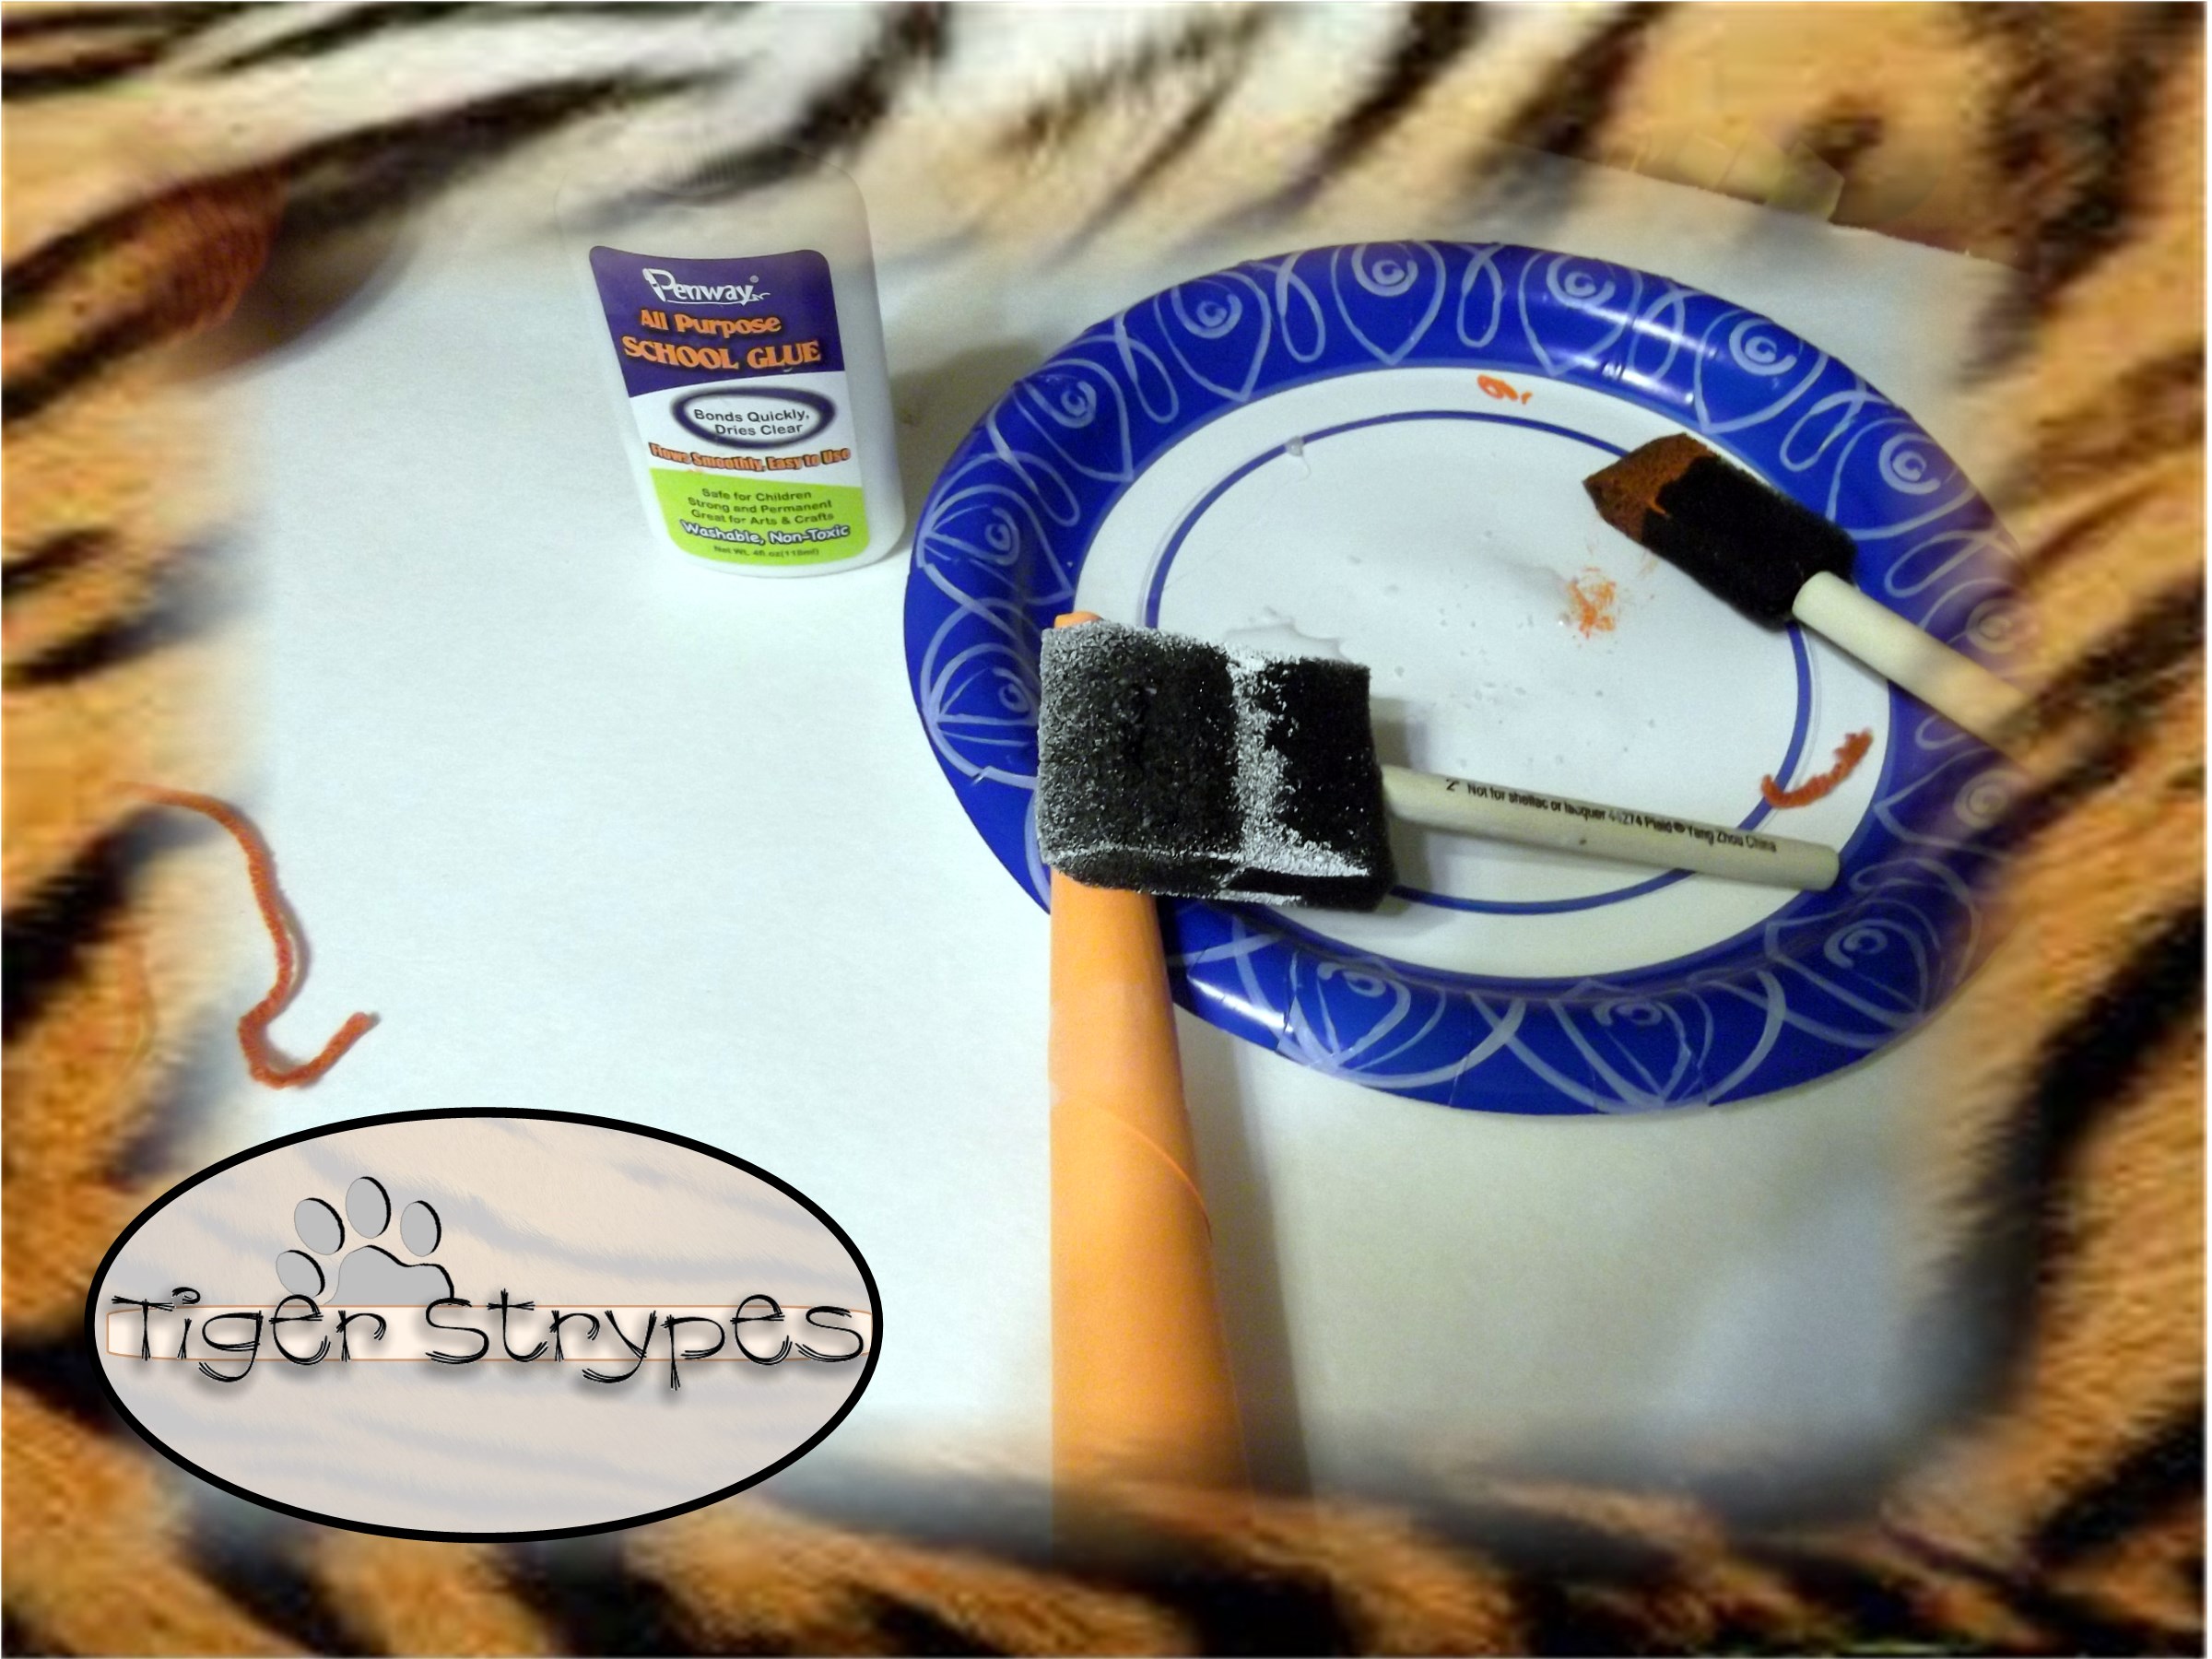
You can just glue as you go to keep things from getting messy, just be sure to have the yarn on straight and semi-tight. When you finish the covering, just snip the yarn at the end and secure it into place with glue.
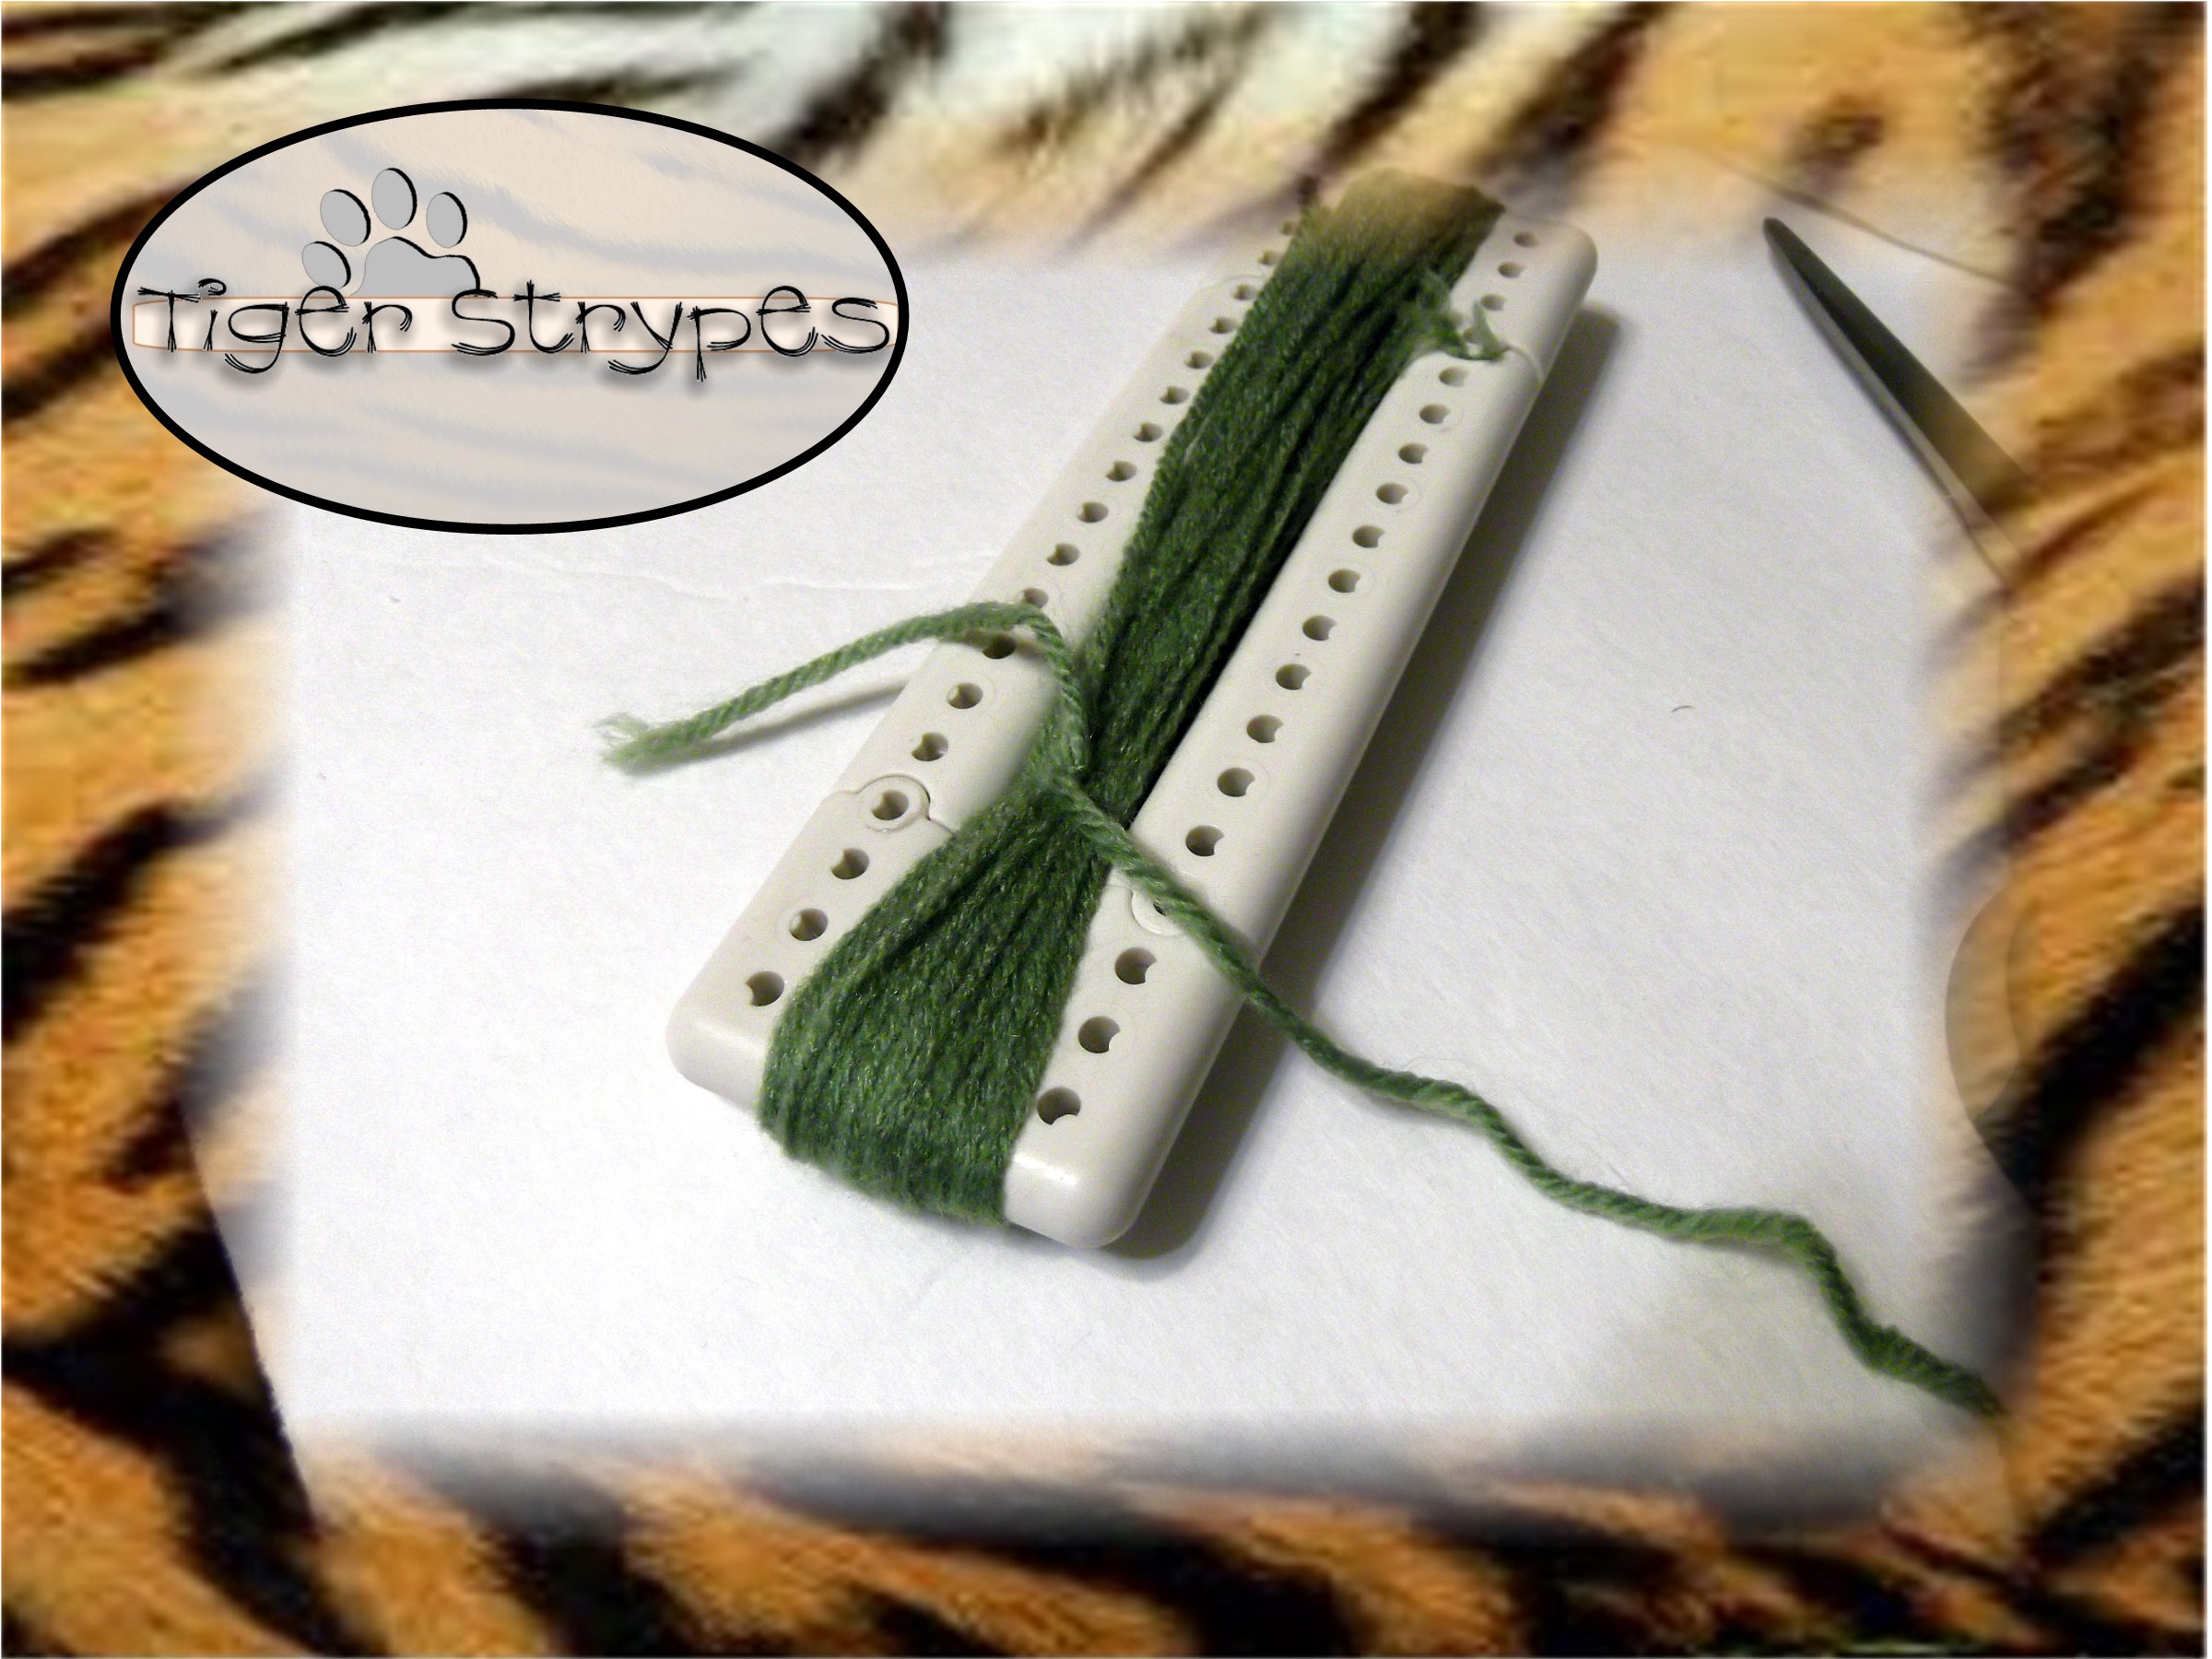
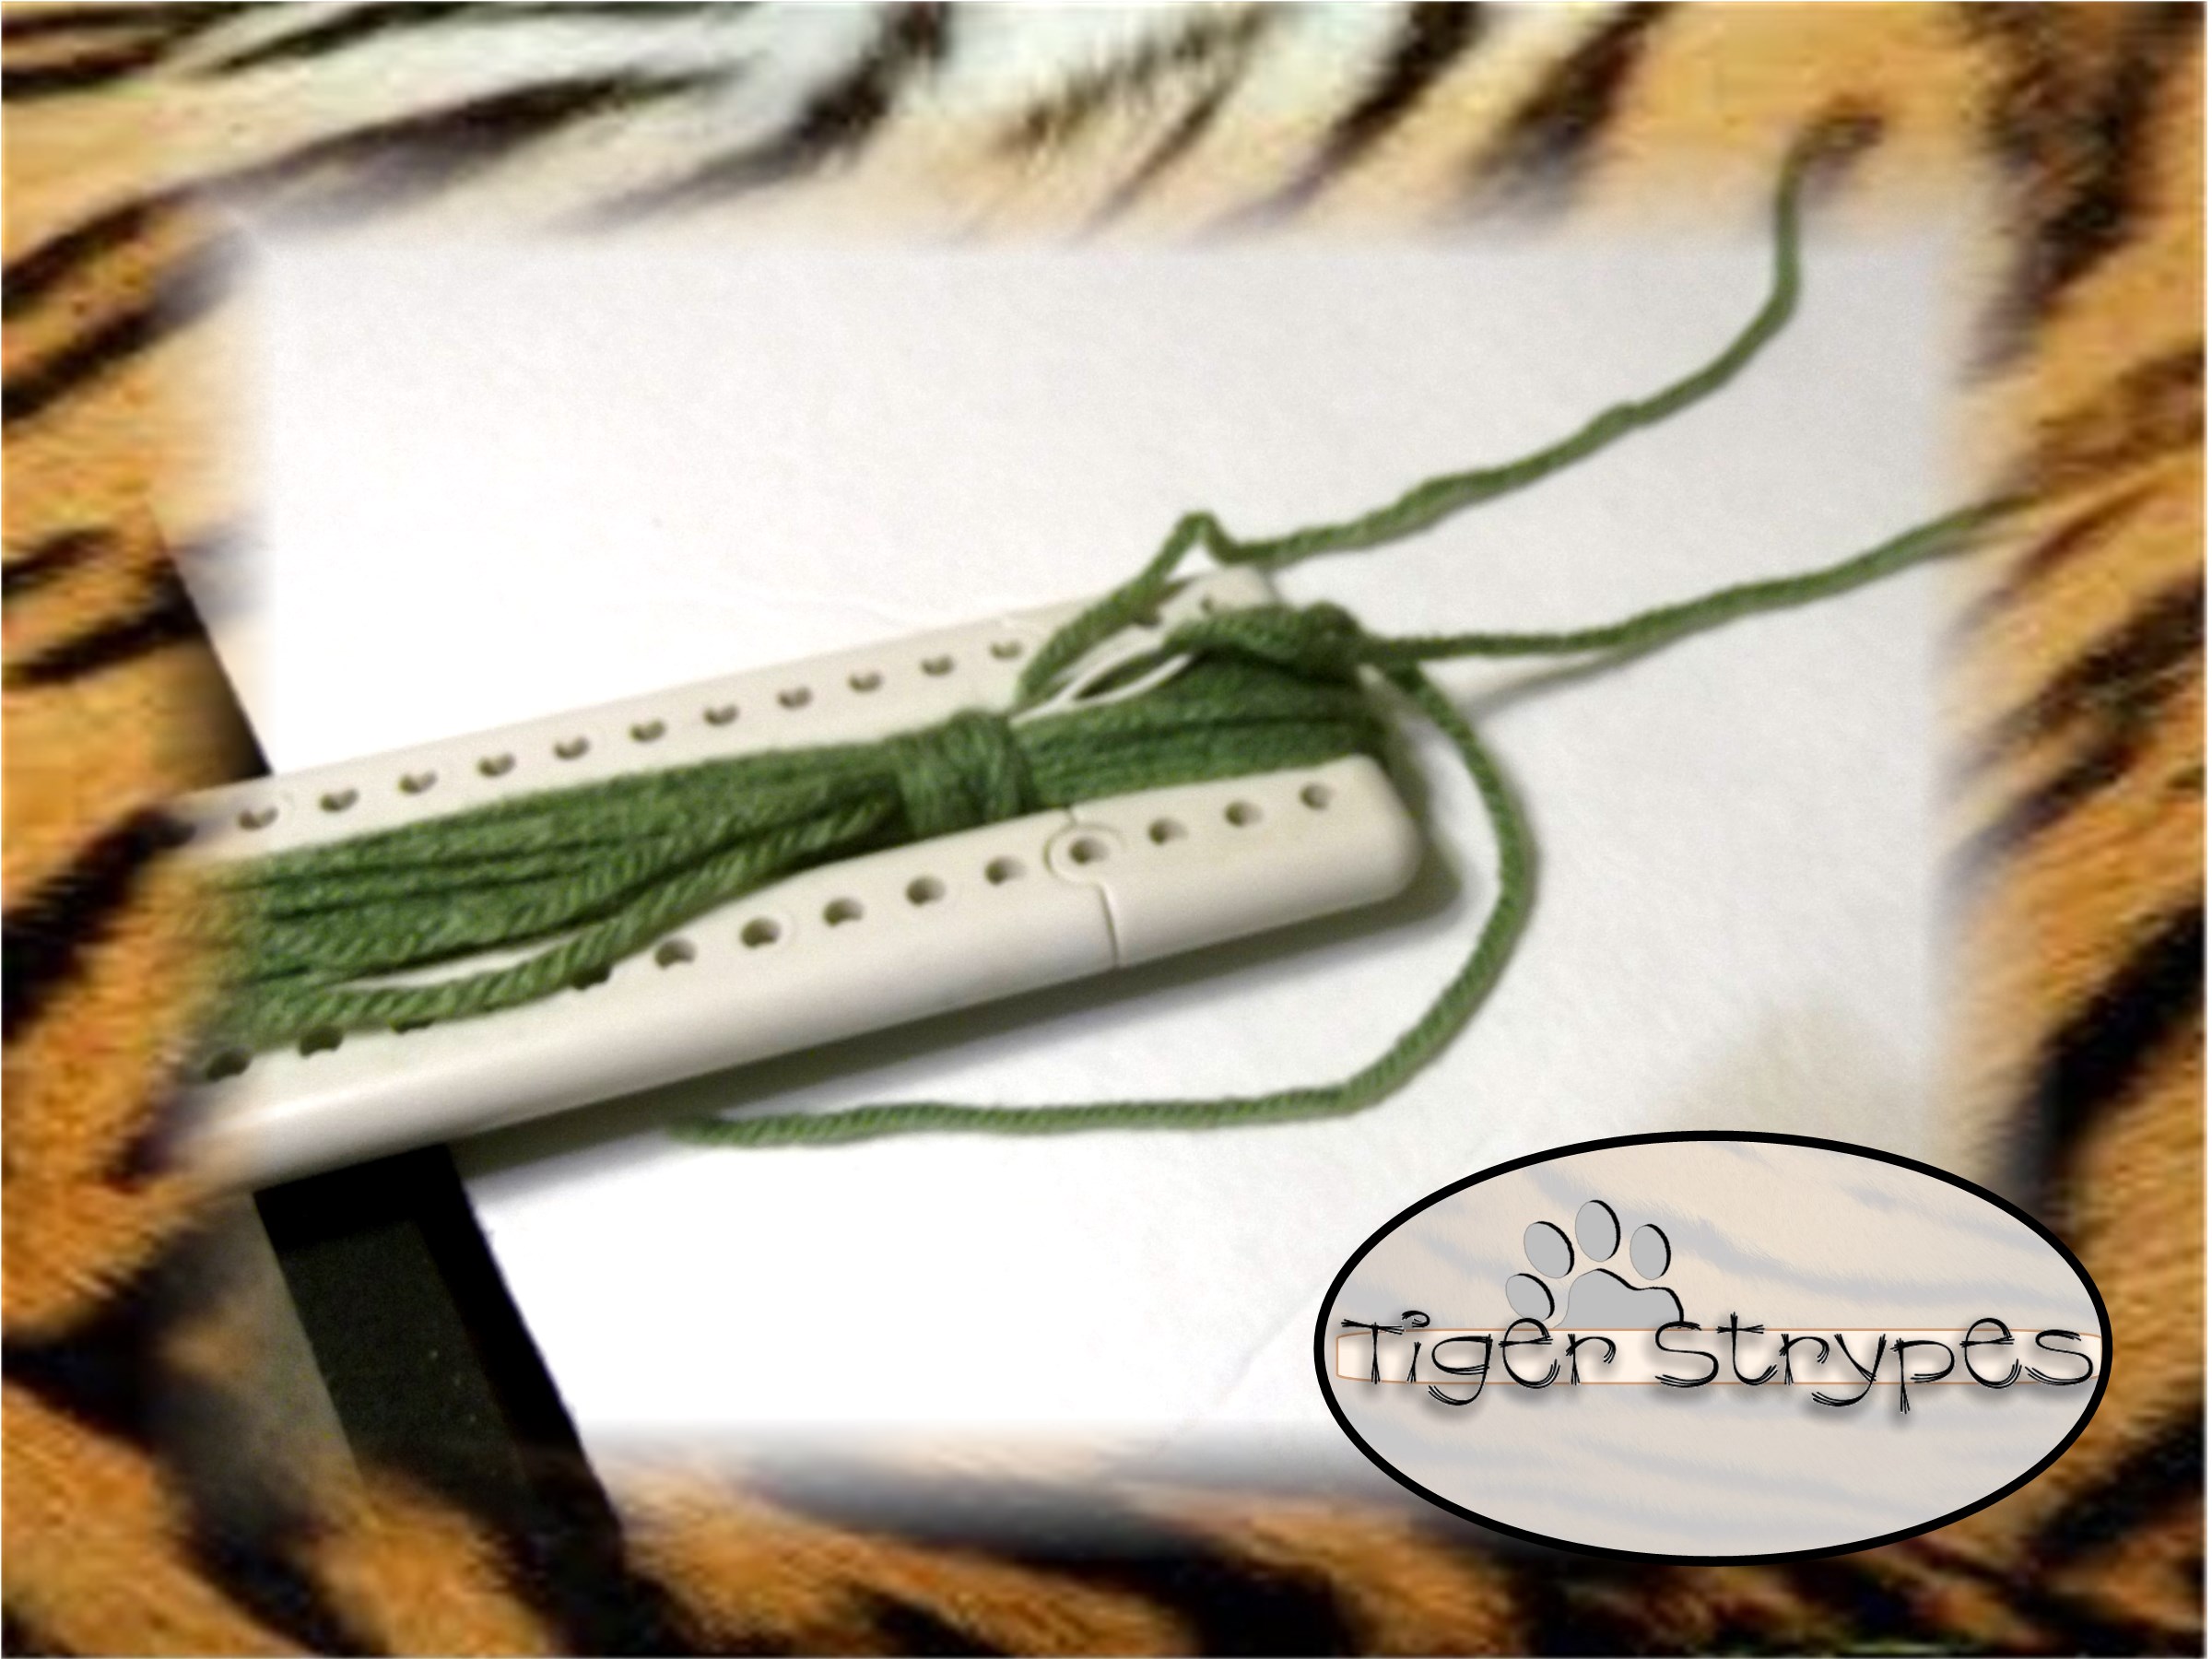
When you’ve finished with the orange portion, you can begin on the “leafy greens” tassel for your carrot top. Start by either cutting out a piece of cardboard in the length you wish, or do it with whatever tools you use. I used my “Martha Stewart Knitting Kit” and made it easy with that. Wrap your green yarn around the piece, using a pretty good amount of yarn to make this heft. You want your end piece to be large enough to fit in the top of the carrot when you’re done, so use that as a sizing tool. Once you have it wrapped as much as you want, cut it at the top with your scissors.

After that, use another piece of yarn to secure the main one at the bottom. Make sure you tie this very tight and leave a bit of the yarn to blend into the tassel. Cut the end about 36″ to 48″, since you’ll need the extra to secure this bottom piece.
Next, use a large plastic craft needle to take that excess yarn and circle it around where you knotted. Be sure to make this pretty tight. When you have an amount you feel is acceptable, thread your needle from the bottom up and then trim your thread to match the height of the yarn piece. Trim off the other side (beginning of the yarn) that has been secured into this looping to hide it.
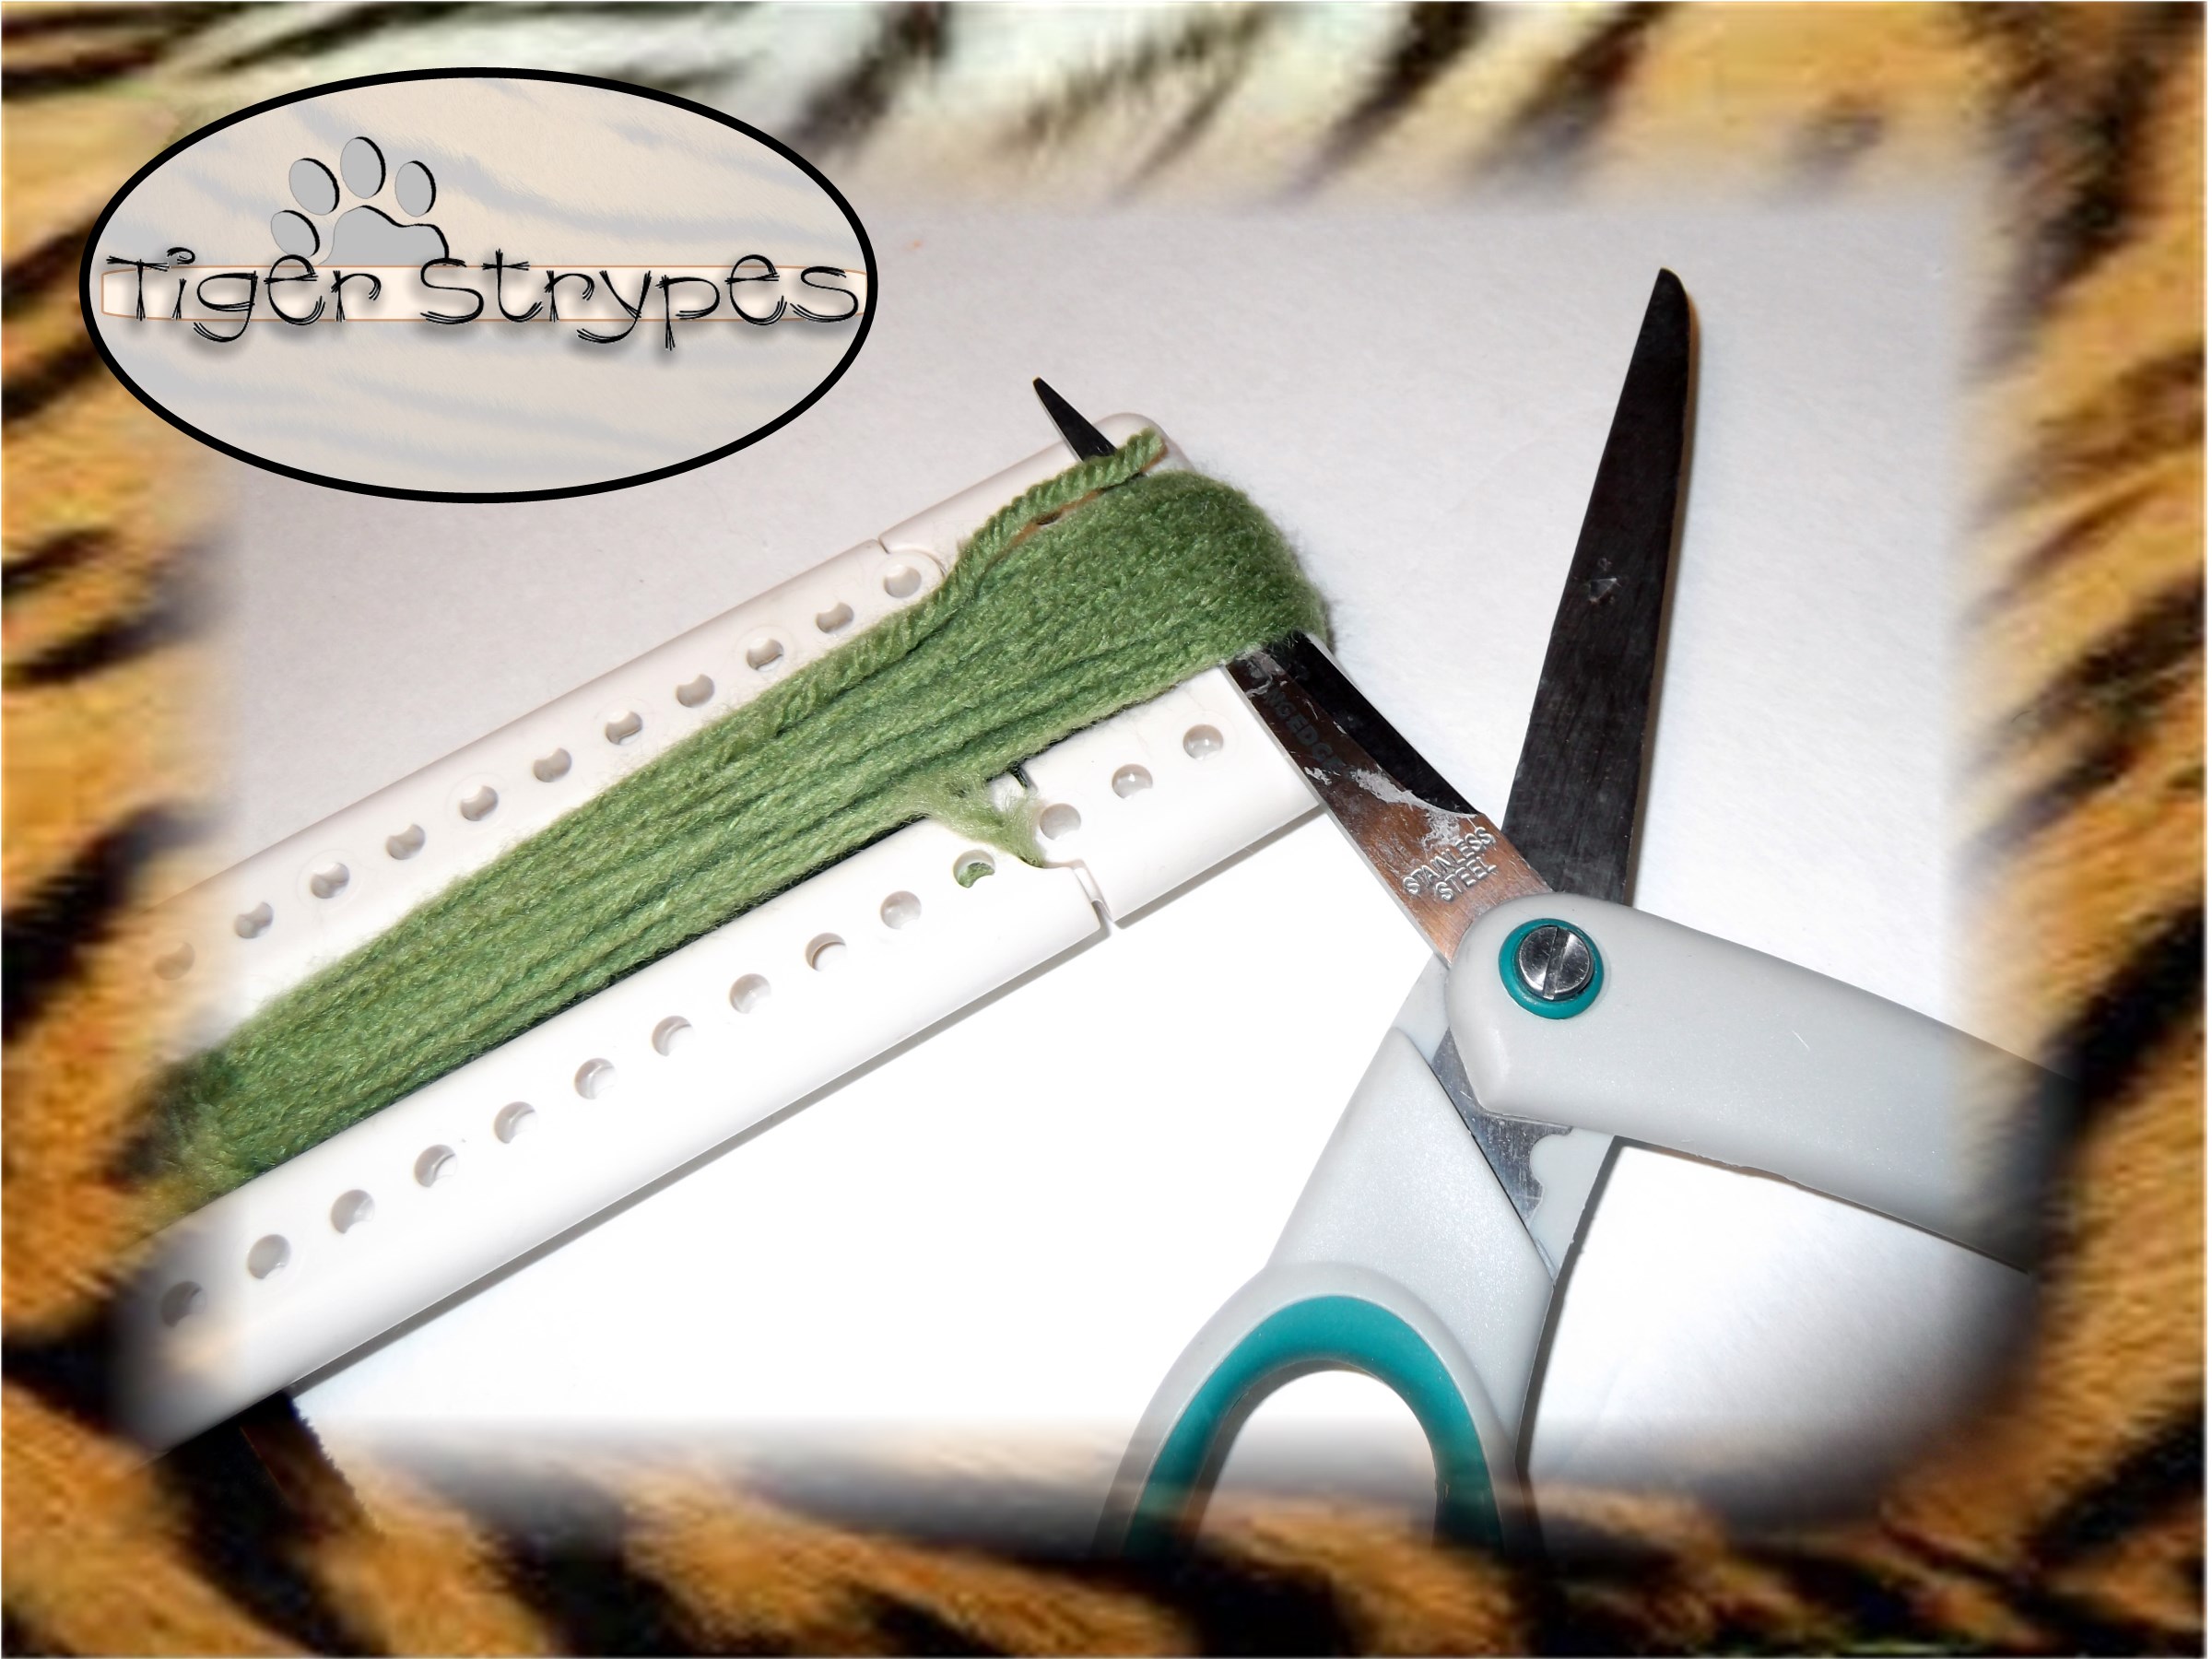
Once you have all of this done, you can use your scissors to cut at the top of the piece to make your carrot top.
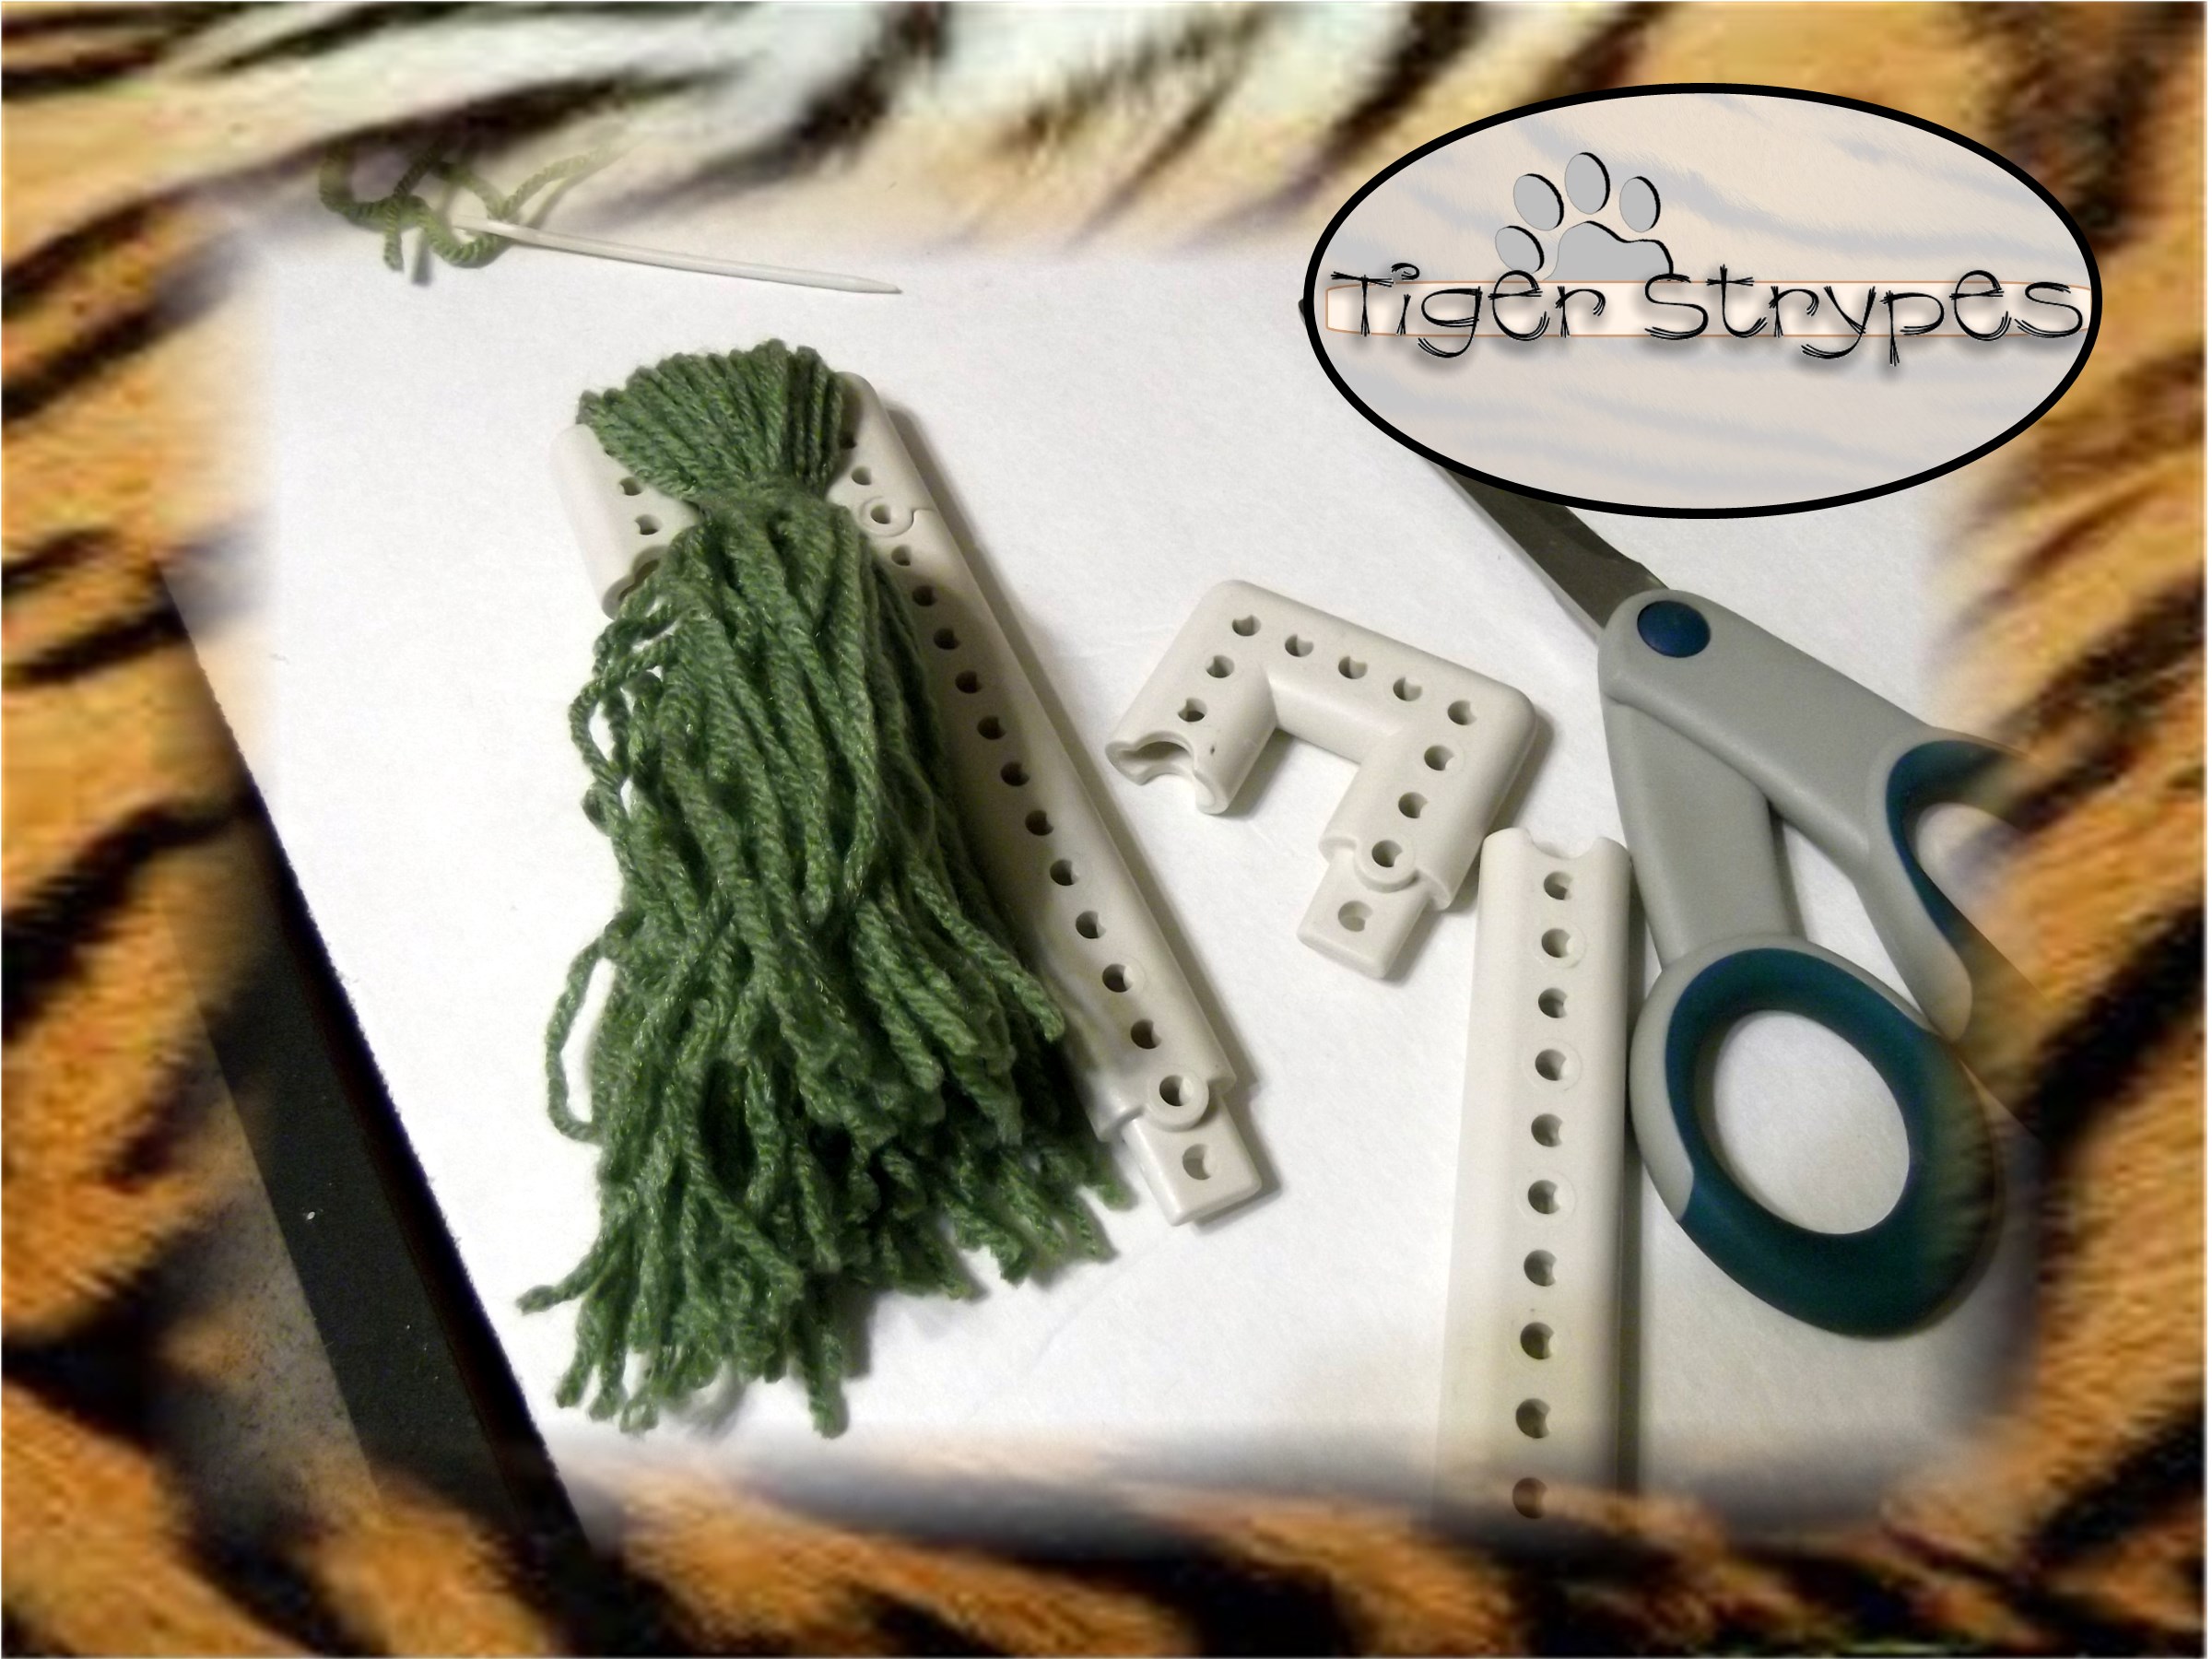
Next, take apart the loom, or you can cut the piece of cardboard to free up the bottom part. Just pull it off cautiously and be sure not to pull the yarn too hard to mess up your tassel. When you get it off, you can trip the top portion to be equal, or leave it where it’s a bit off, for a more natural look – your call.
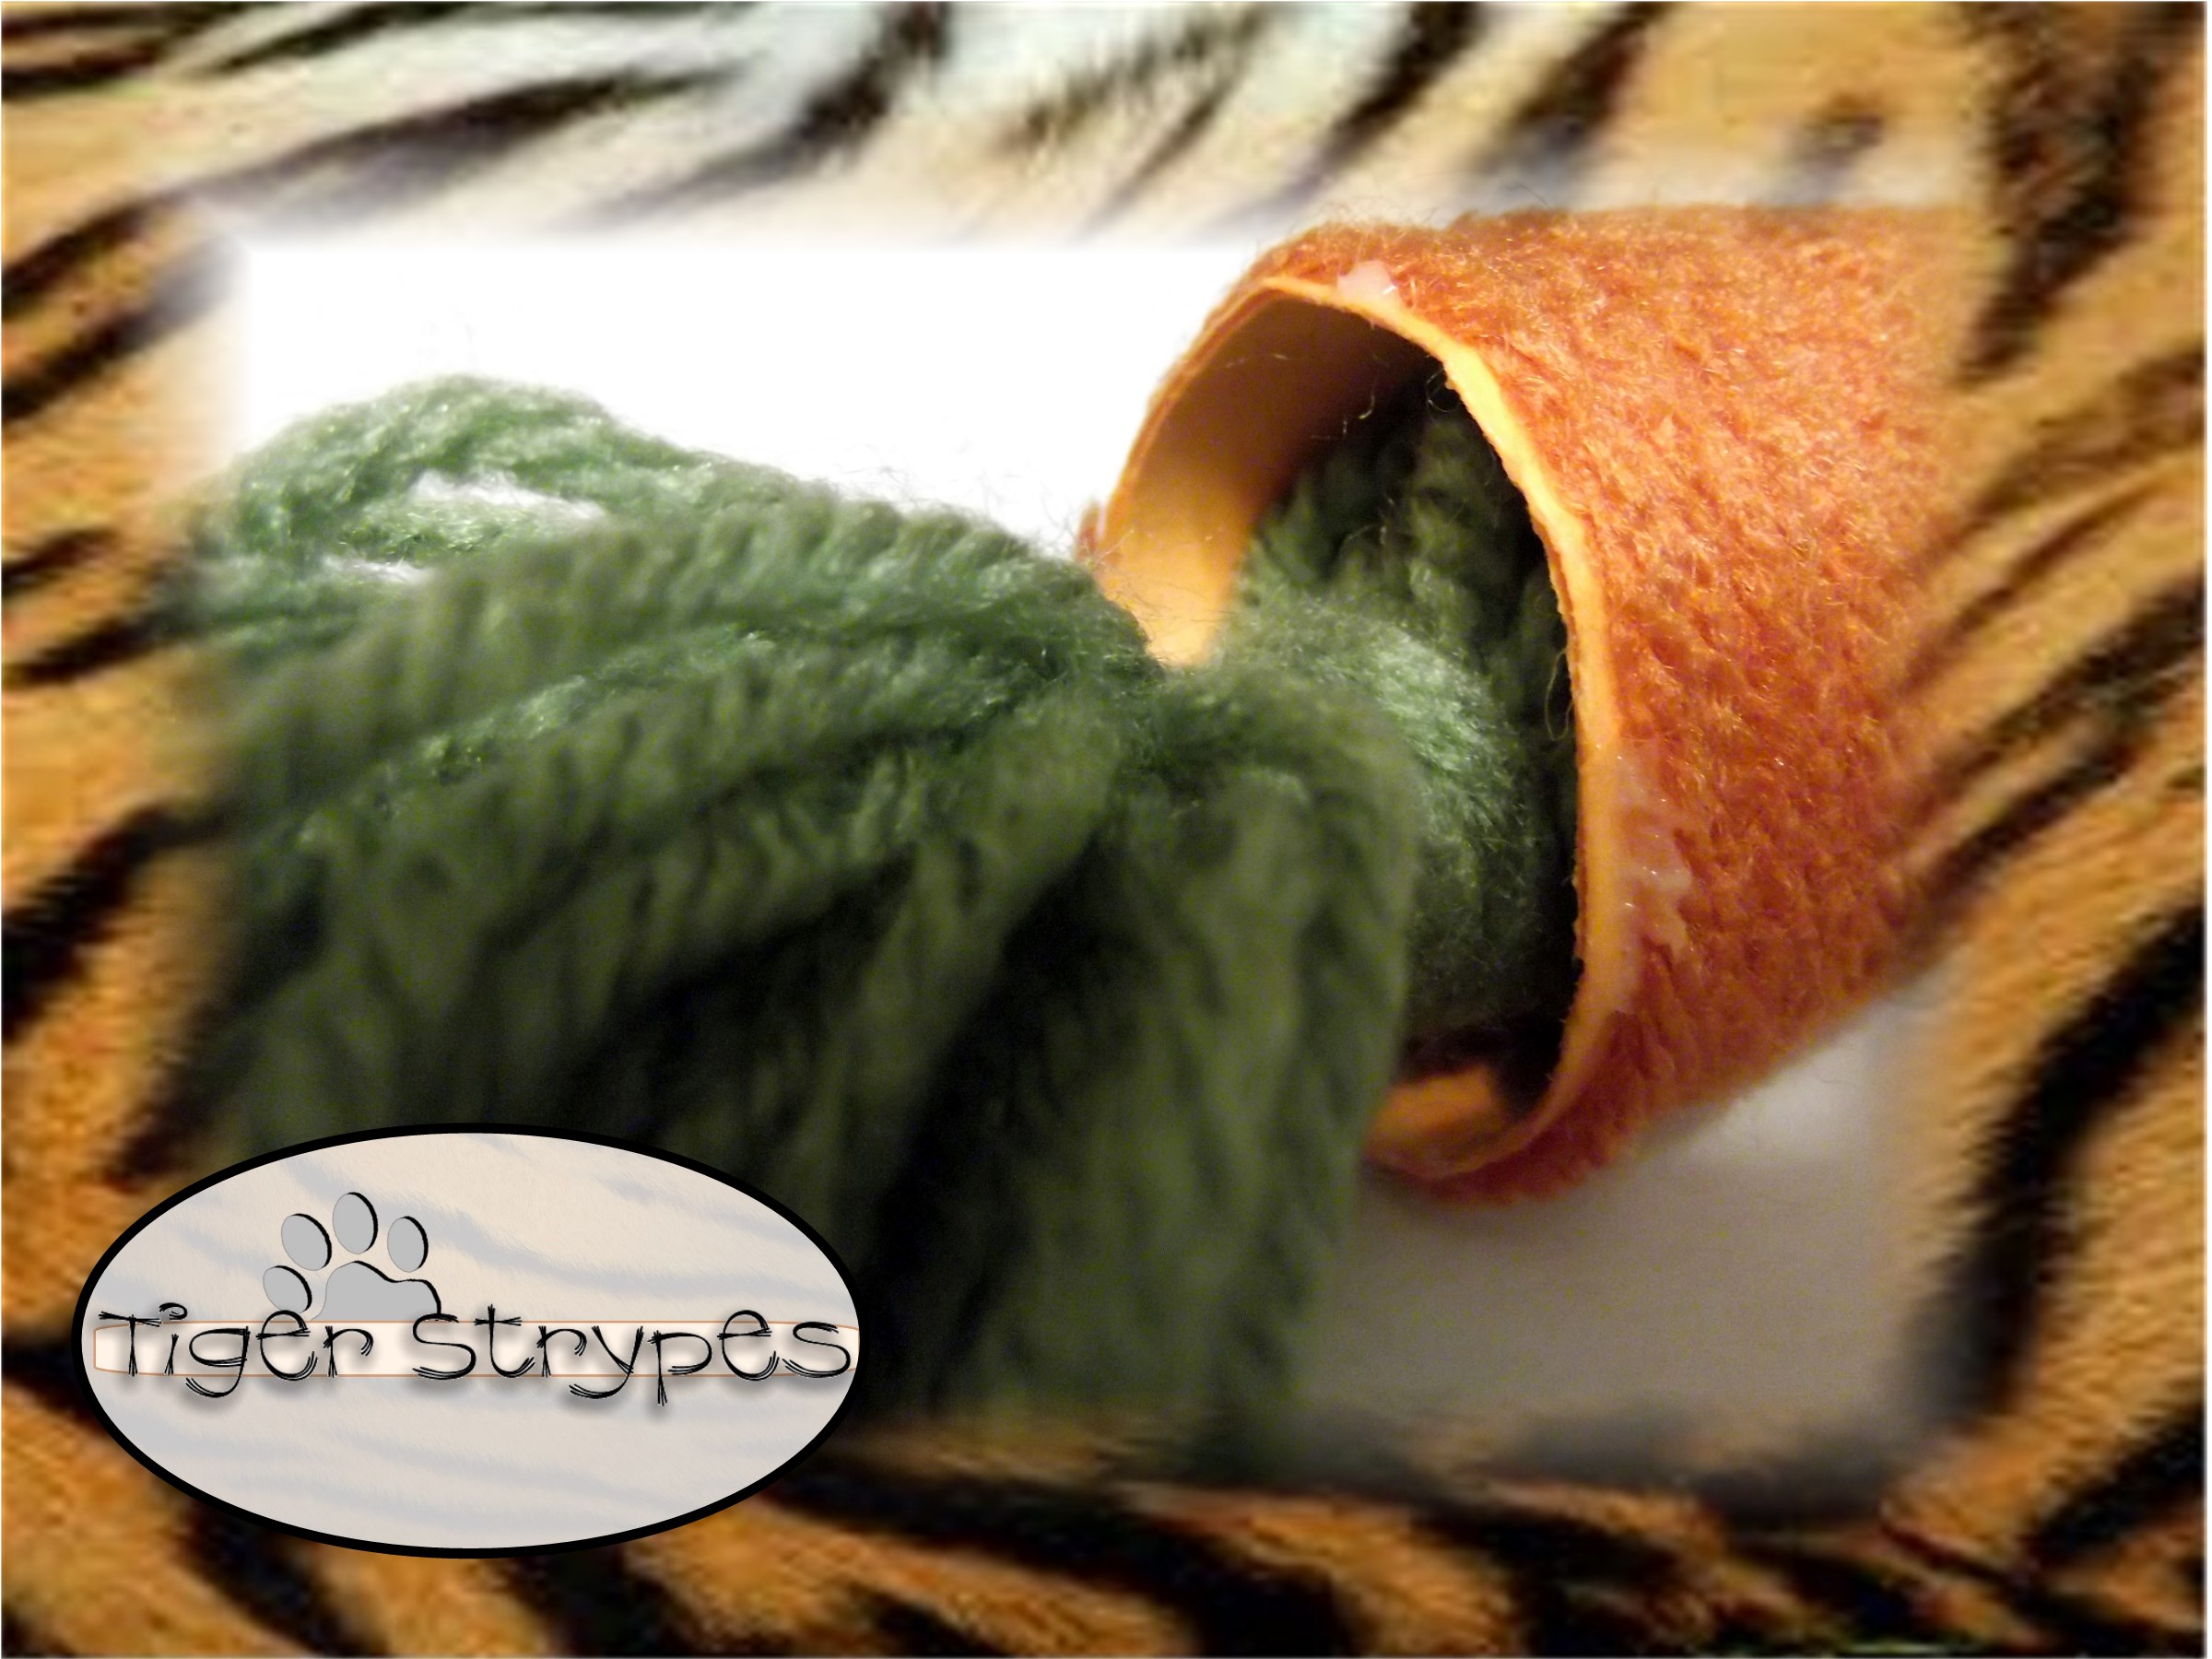
Next, insert the rounded bottom of the tassel into the top of the carrot piece. Use glue inside of the carrot top to secure. If you’ve made your tassel large enough, you might not even need to do this part. I had to use my plastic needle to push it in. If you have kids that might be pulling this, though, you might want to secure it, just in case.
That’s it, now you can make however many you like and decorate around your home for Spring time. These could even be used all year long in a basket of veggies in your kitchen, etc.
I sure hope you like it! Please take a minute to leave me a comment and let me know what you would do different, or what you would add, etc. Be sure to tweet, pin, share, etc. – thanks!!
All pictures and text are my own and have not been copied in any way. I, Jamie Tomkins, own and operate Tiger Strypes Blog located at www.TigerStrypes.com. From time to time you’ll hear about my real life experiences or creations with products and/or services from companies and individuals. Let it be known that I have no affiliation with these said companies, and have not received compensation for reviewing or using their service/product. The information that I give regarding the product/service is based off my own personal experience, I do not guarantee that your experience will be the same.
Spring Craft Blog Hop #3 focuses on Easter, Mother’s Day, Teacher’s Day, Earth Day, Cinco De Mayo, May Day, recycled crafts, or a General Spring themed crafts.
RULES:
- Link-up your craft or DIY tutorial that fit the themes of the Spring Craft Blog Hop. Links that do not fit the themes will be deleted.
- DO NOT link-up food or recipes.
- DO NOT link-up round-ups unless all the craft posts are yours.
- DO NOT link-up Etsy items or things for sale
- Link directly to your post and not your blog.
Show us what you’ve created and be seen on 19 blogs!
If you would like to help host the next Spring Blog Hop 4- Sign-up HERE
[Tweet “Join the Spring Craft Blog Hop! Share your craft on 19 blogs! #SCBH2015”]


You always have the cutest crafts. I love that trendy carrot. It’s so much fun to hop to the different posts. So many talented bloggers!
These are such creative activities for the season. I am so excited that spring is finally here.
That is one cute carrot craft Jamie! Love all the crafty ideas I see in the link up too.
What a fun hop with so many creative people! I love those carrots too!
I truly love this craft! So clever and simply perfect for display! Bookmarking to explore all the other terrific crafts, too.
All of these ideas are so creative. I’m so excited about finally being able to usher in spring.
I love this idea. You can make carrots any size you want 🙂
No gardening required!! 🙂