
This site contains affiliate links. Please see below for more information.
Dollar Store Bunny Craft for Easter
#TigerStrypesBlog #Easter #Bunny #Upcycle #Craft
I saw something like this on Pinterest awhile back, and thought it would be fun to try. Most of the items were bought at the local dollar store, so it’s pretty cheap & cheerful to make!! If you’re like me, you already might have half of the stuff in your craft supplies, so it’ll be even less expensive. With Spring almost here in the mountains, and Easter just around the corner, I figured that this would be fun to make and decorate the house with. Pretty easy to do, and will last for years to come. You can use up extra material and make the face part any way you want, so the options are endless.
I sure hope that you like the tutorial, and pray that you have a blessed day!
Please be sure to comment, and share this craft on your social media channels – thanks so much!!
Learn How to Make a #DollarStore Bunny #Craft for #Easter! #Fun #Family #DIY for the #Spring! #TigerStrypesBlog - Find out more at Share on X
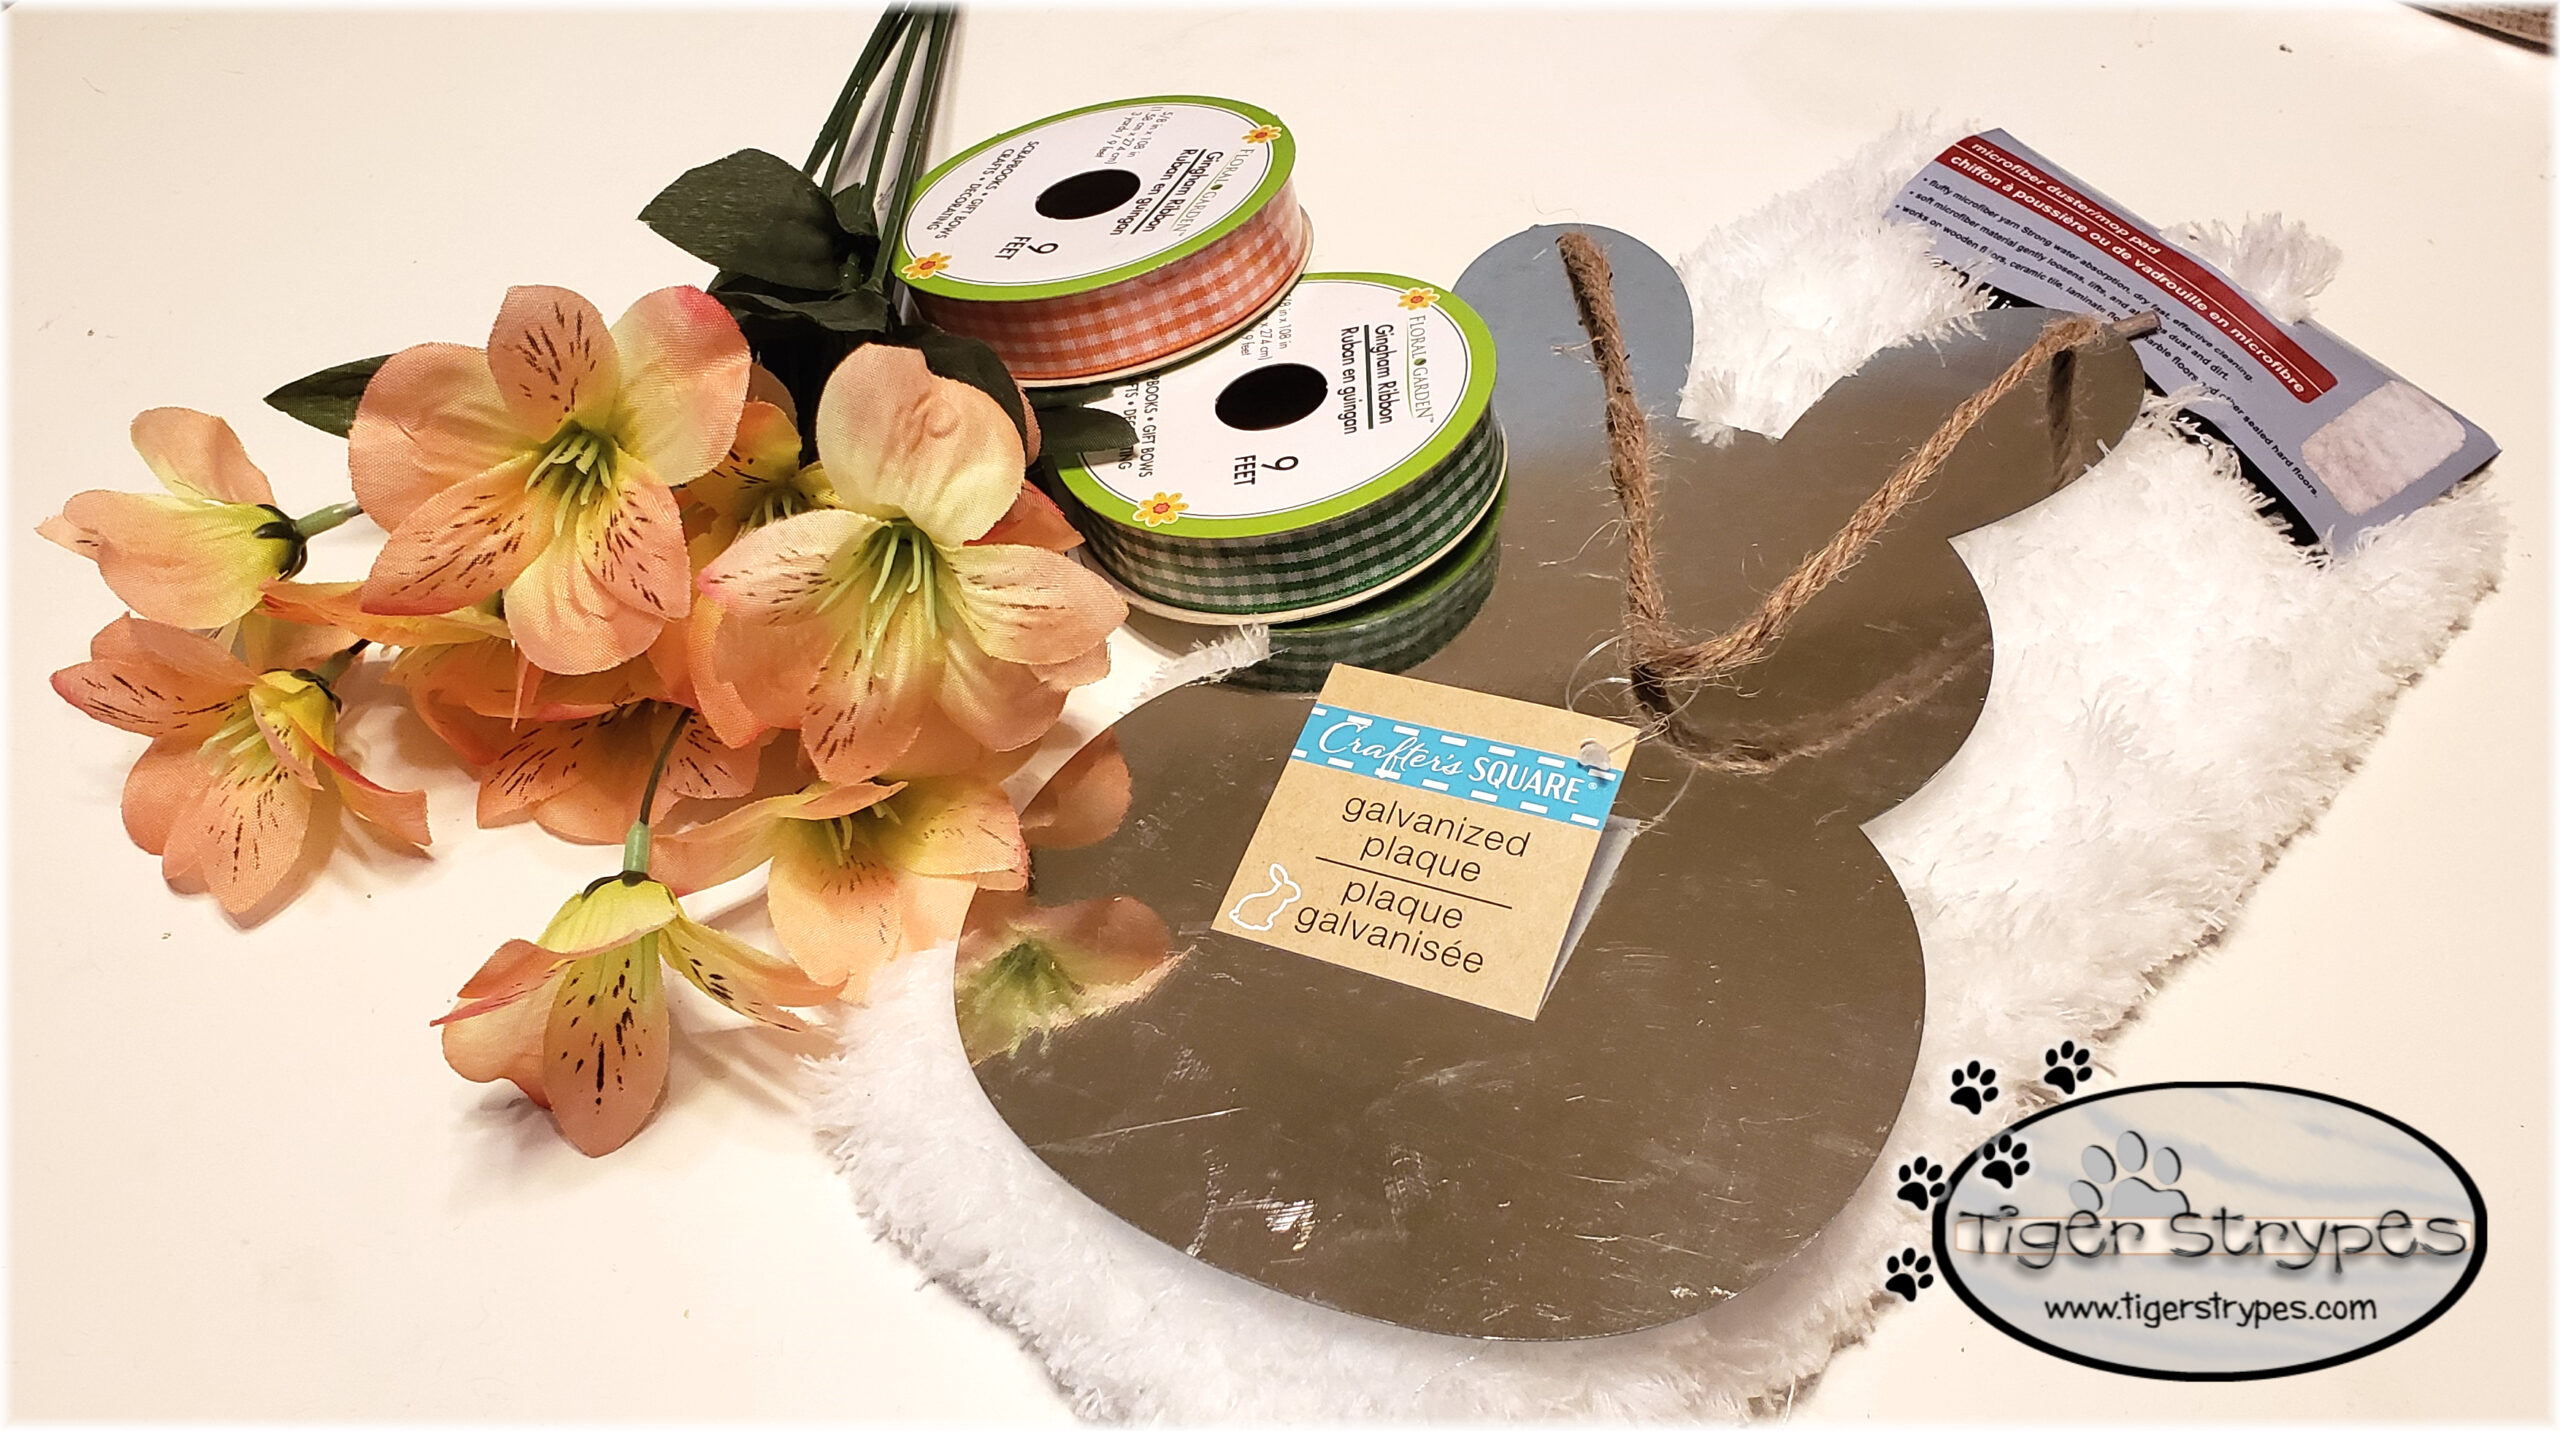
Materials/Tools Used:
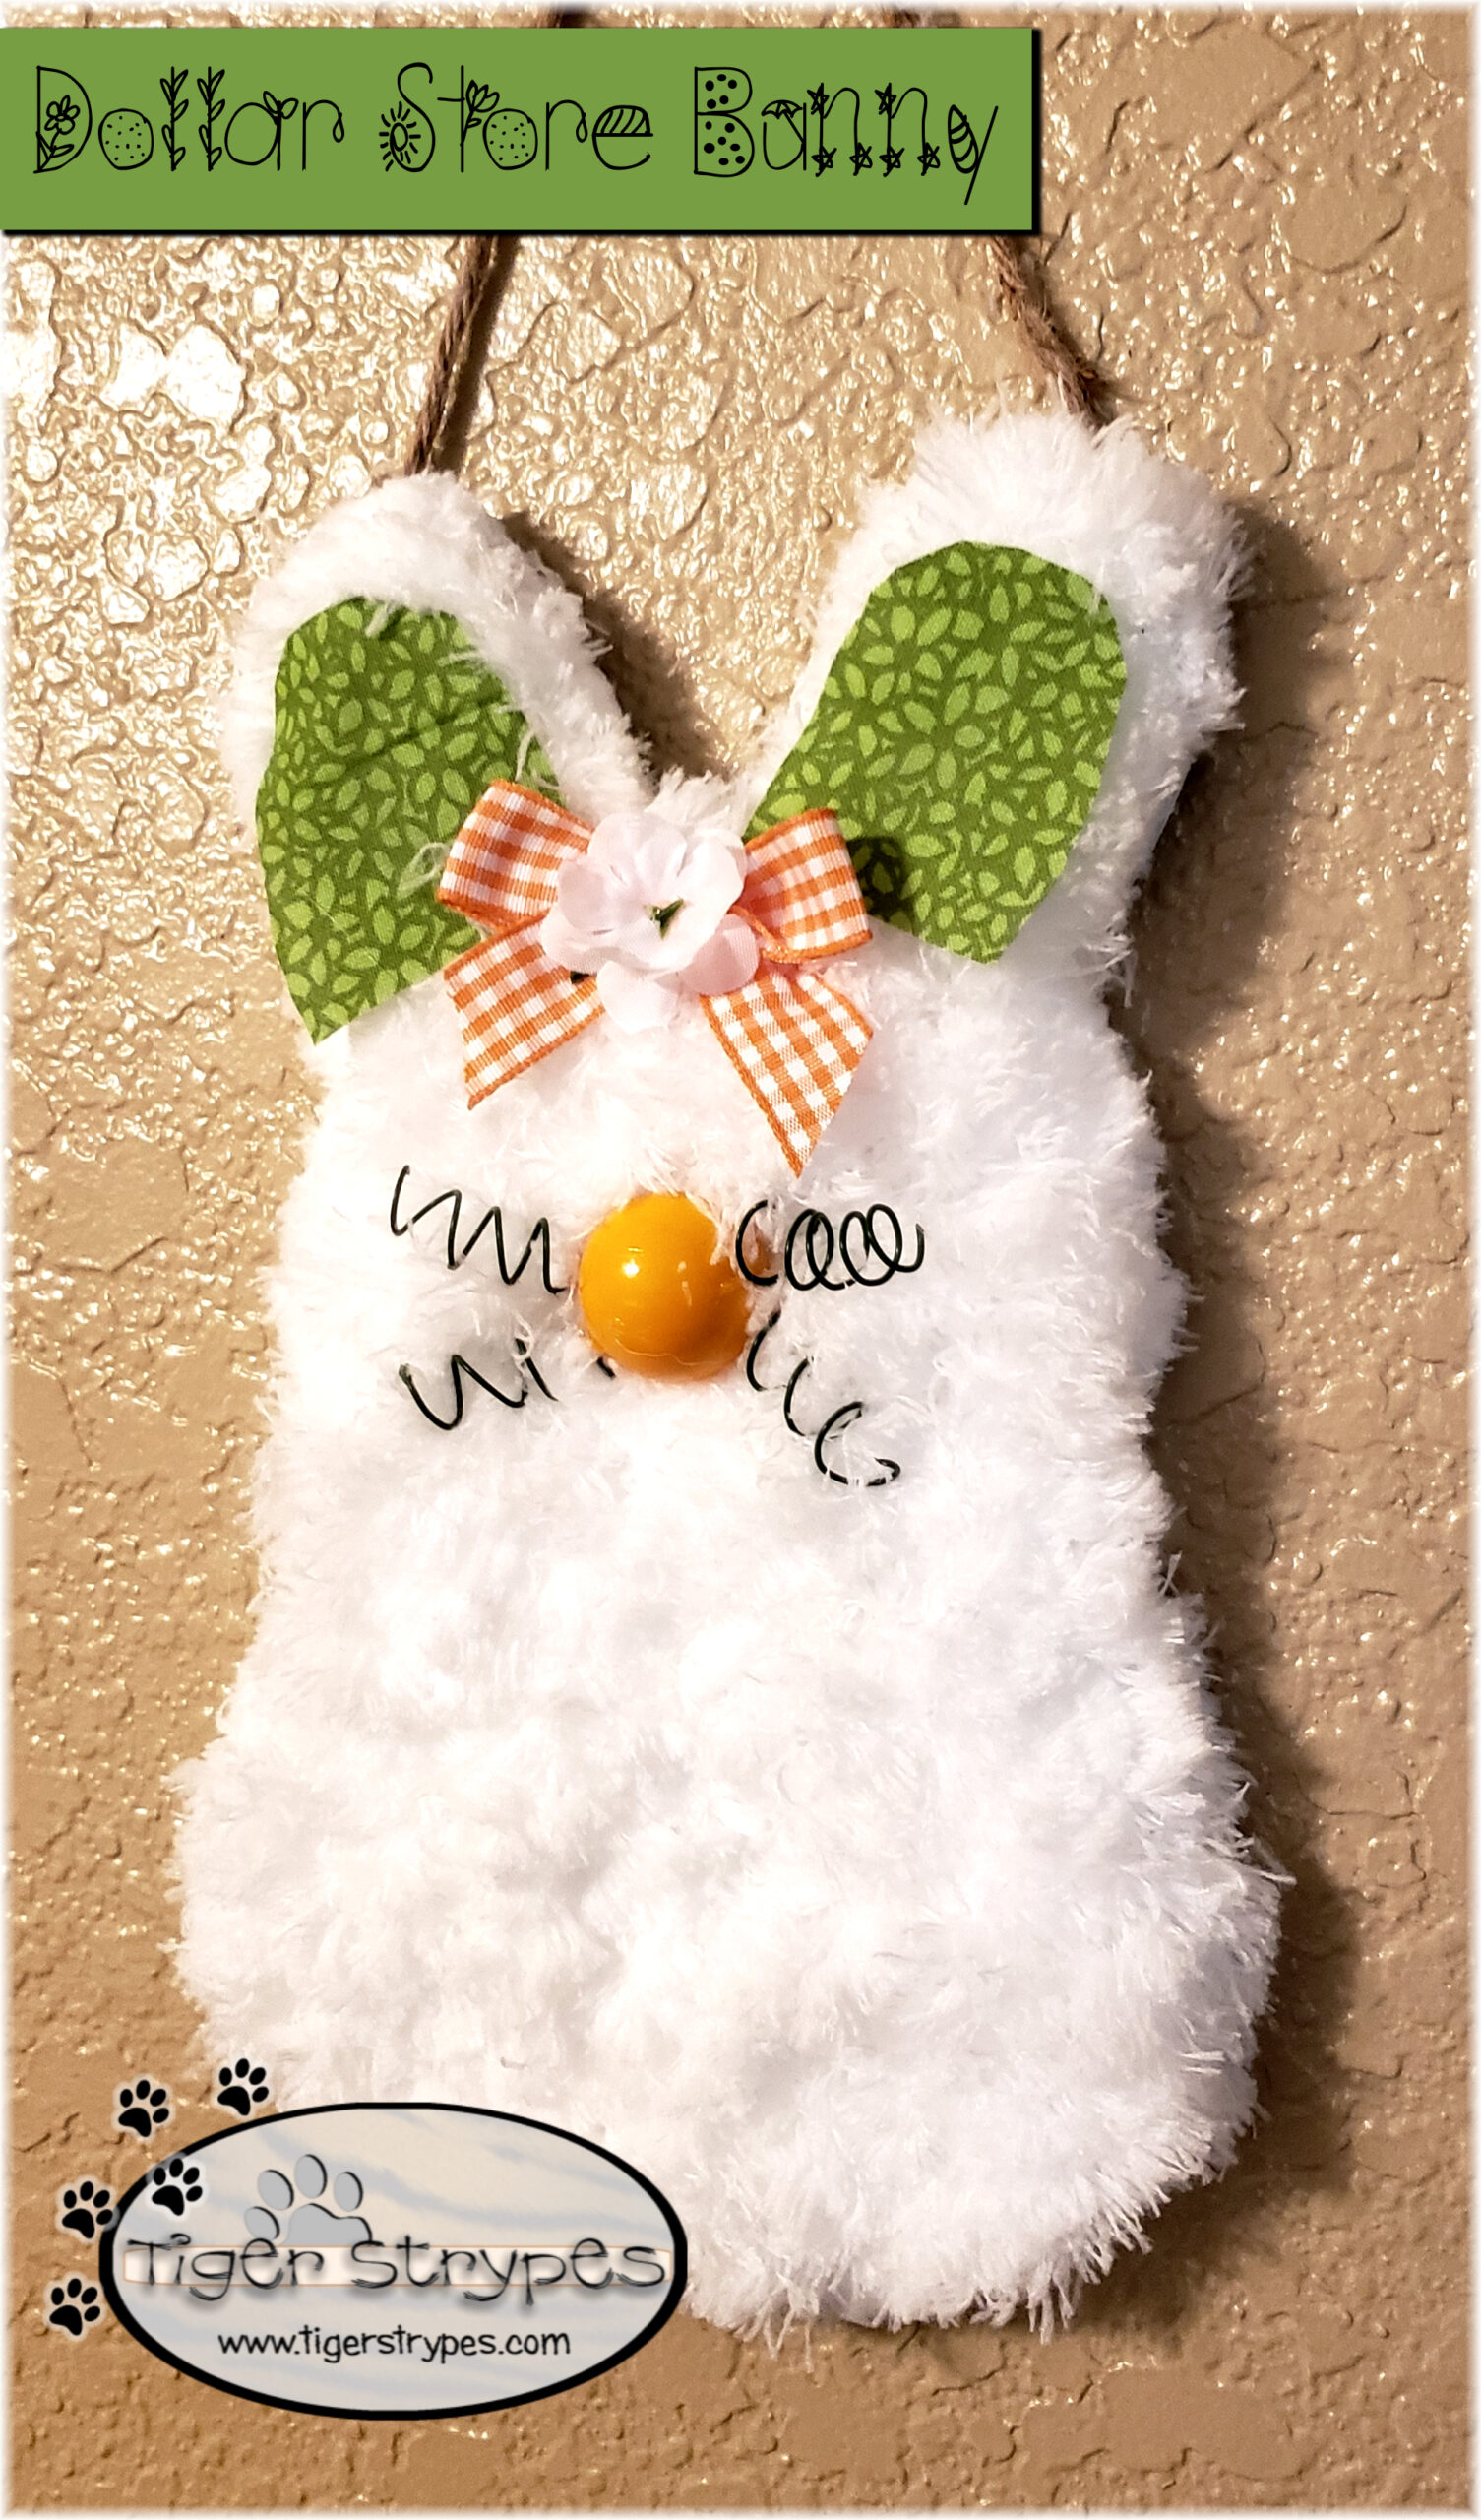
- Flat Metal Plaque (Bunny Shaped)
- Mop Refill Pad
- Ribbon
- Scrap Fabric
- Artificial Flowers
- Craft Wire
- Scissors
- & Time!
Instructions for the Dollar Store Bunny Craft:
I started by heading to the local dollar store, and buying a few of the products from the list above. Like I said, I already had some at home, and was able to use up scraps and extra pieces, saving even more money.
Let’s get the project going, by adding some glue to the metal bunny shape. I made sure to have the rope it’s attached to on the side I wanted opposite of the glue. If you’re not picky like me, don’t worry about that part.

When you have an amount of glue that you’re happy with, be sure to transfer it to the mop refill quickly. It dries quickly and you might need to add more to spaces missed, etc. Be careful when you transfer, as the glue is hot and when it touches the metal, that gets a bit warm, as well.
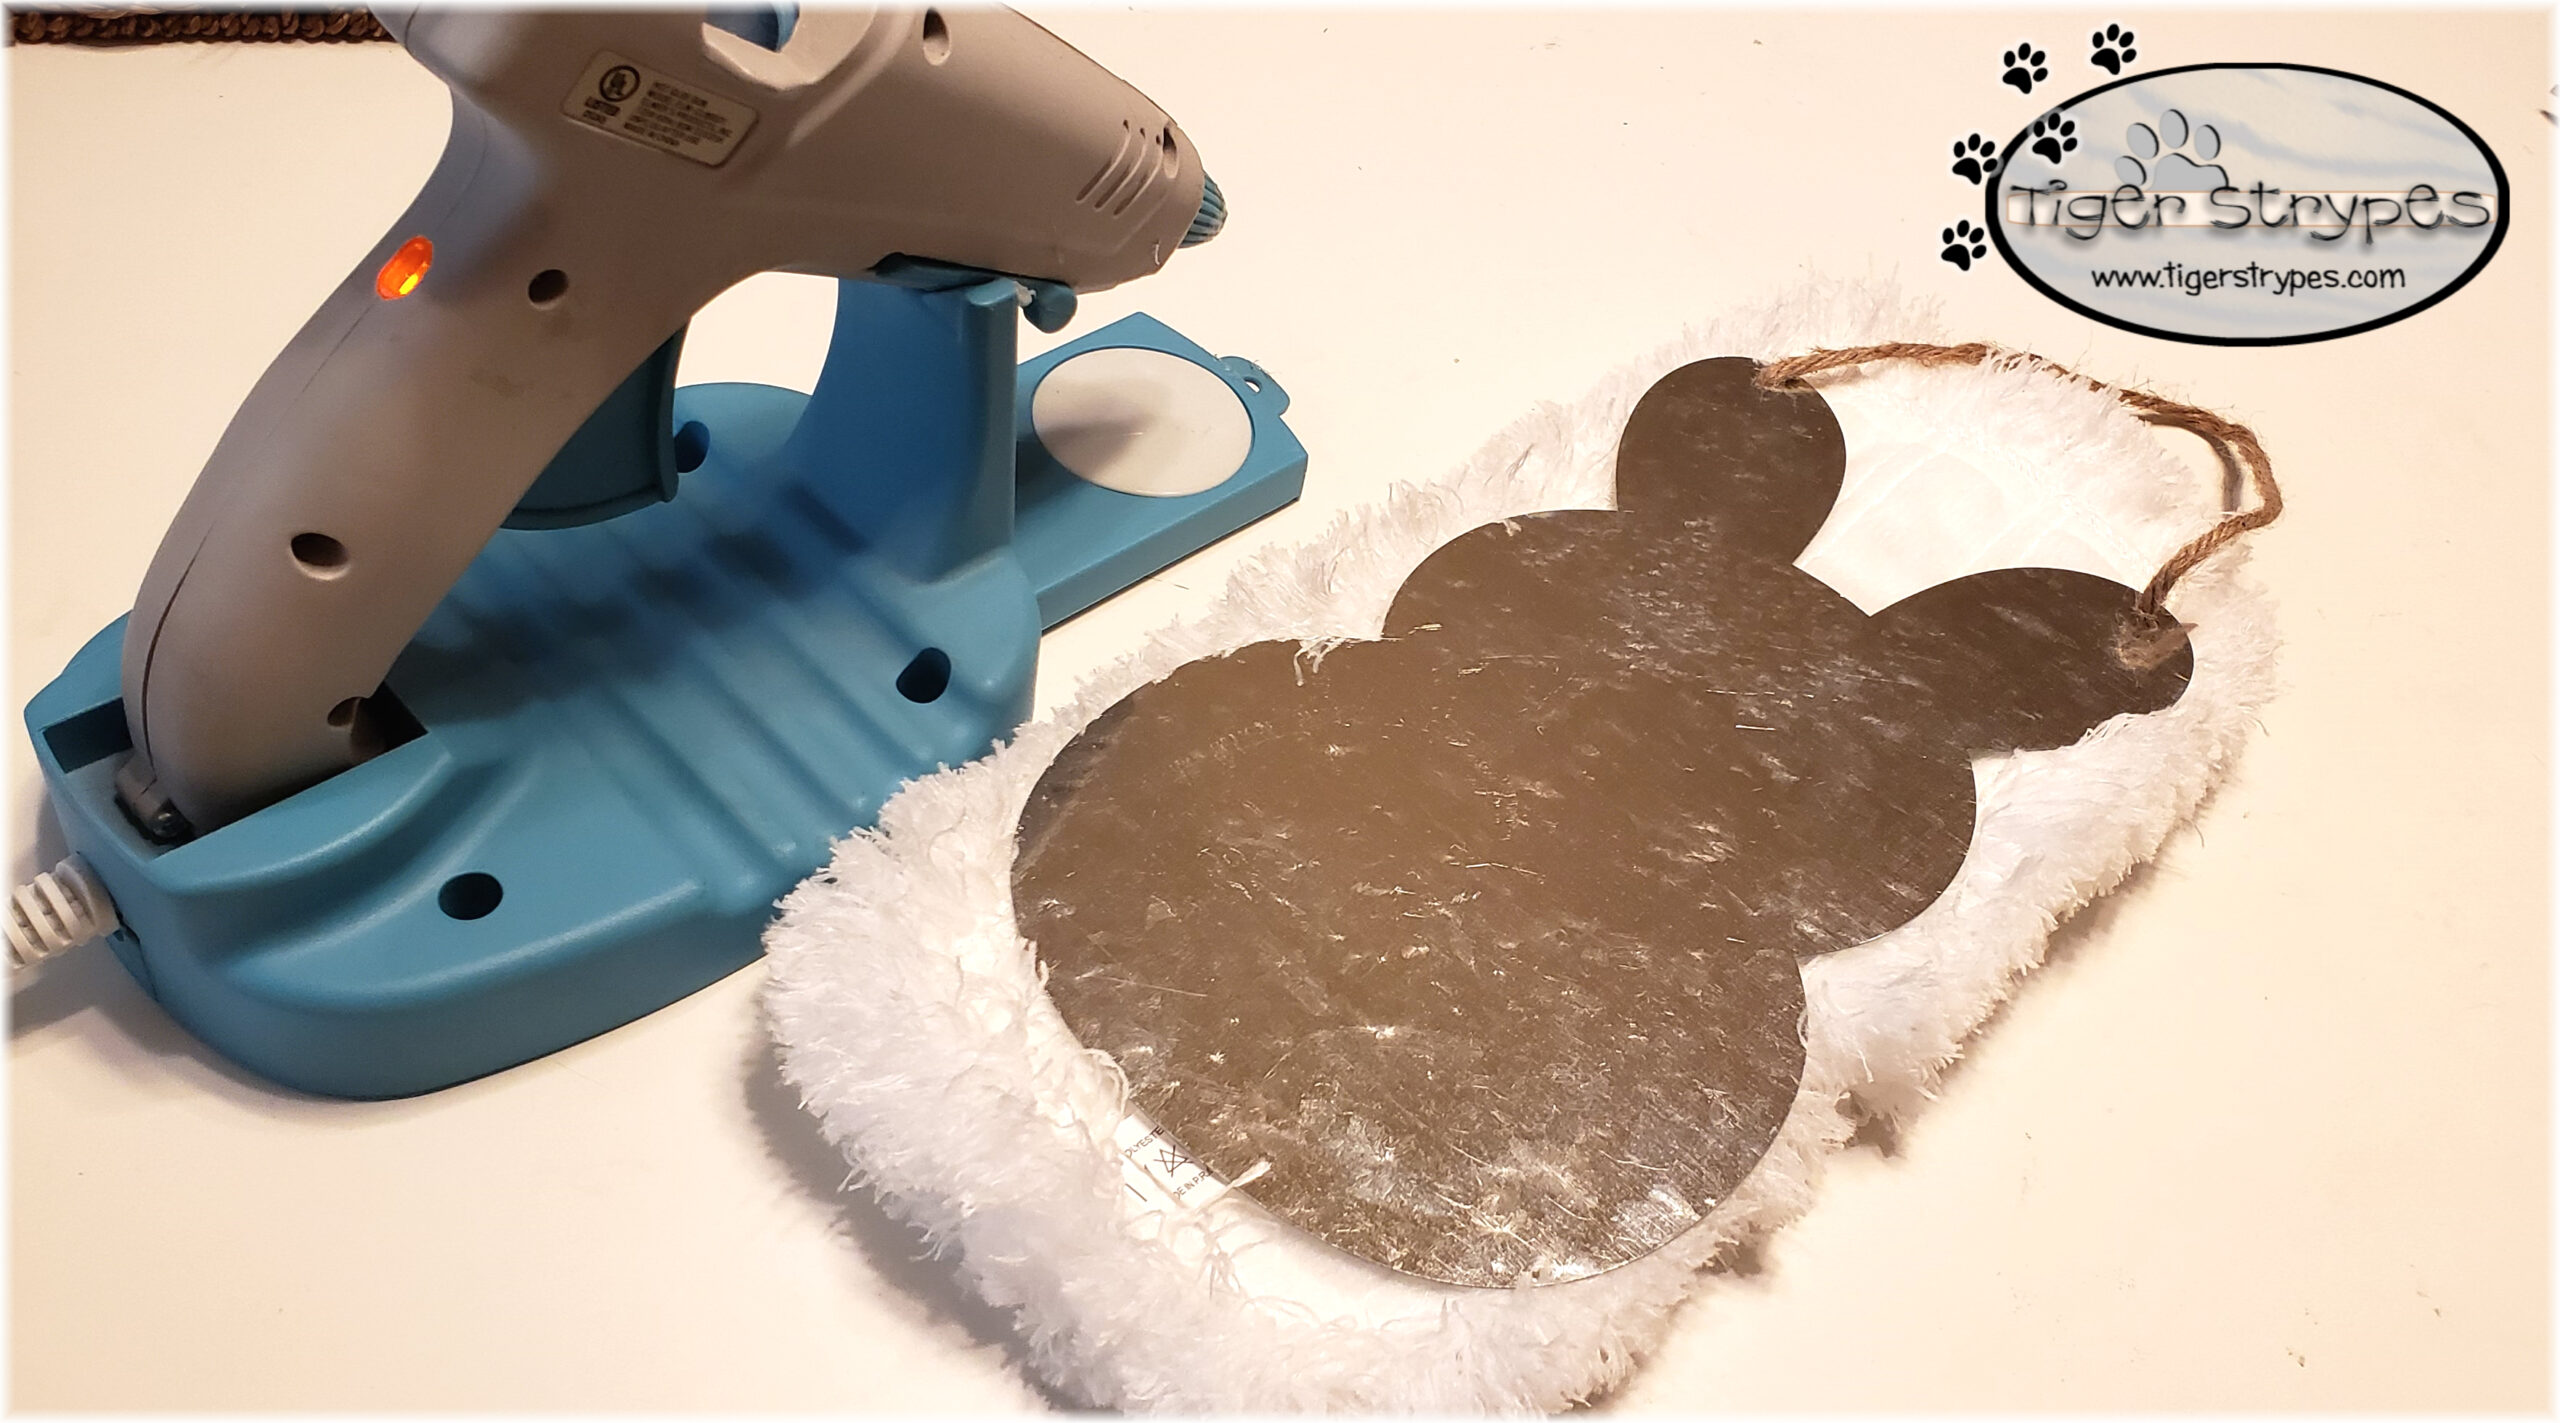
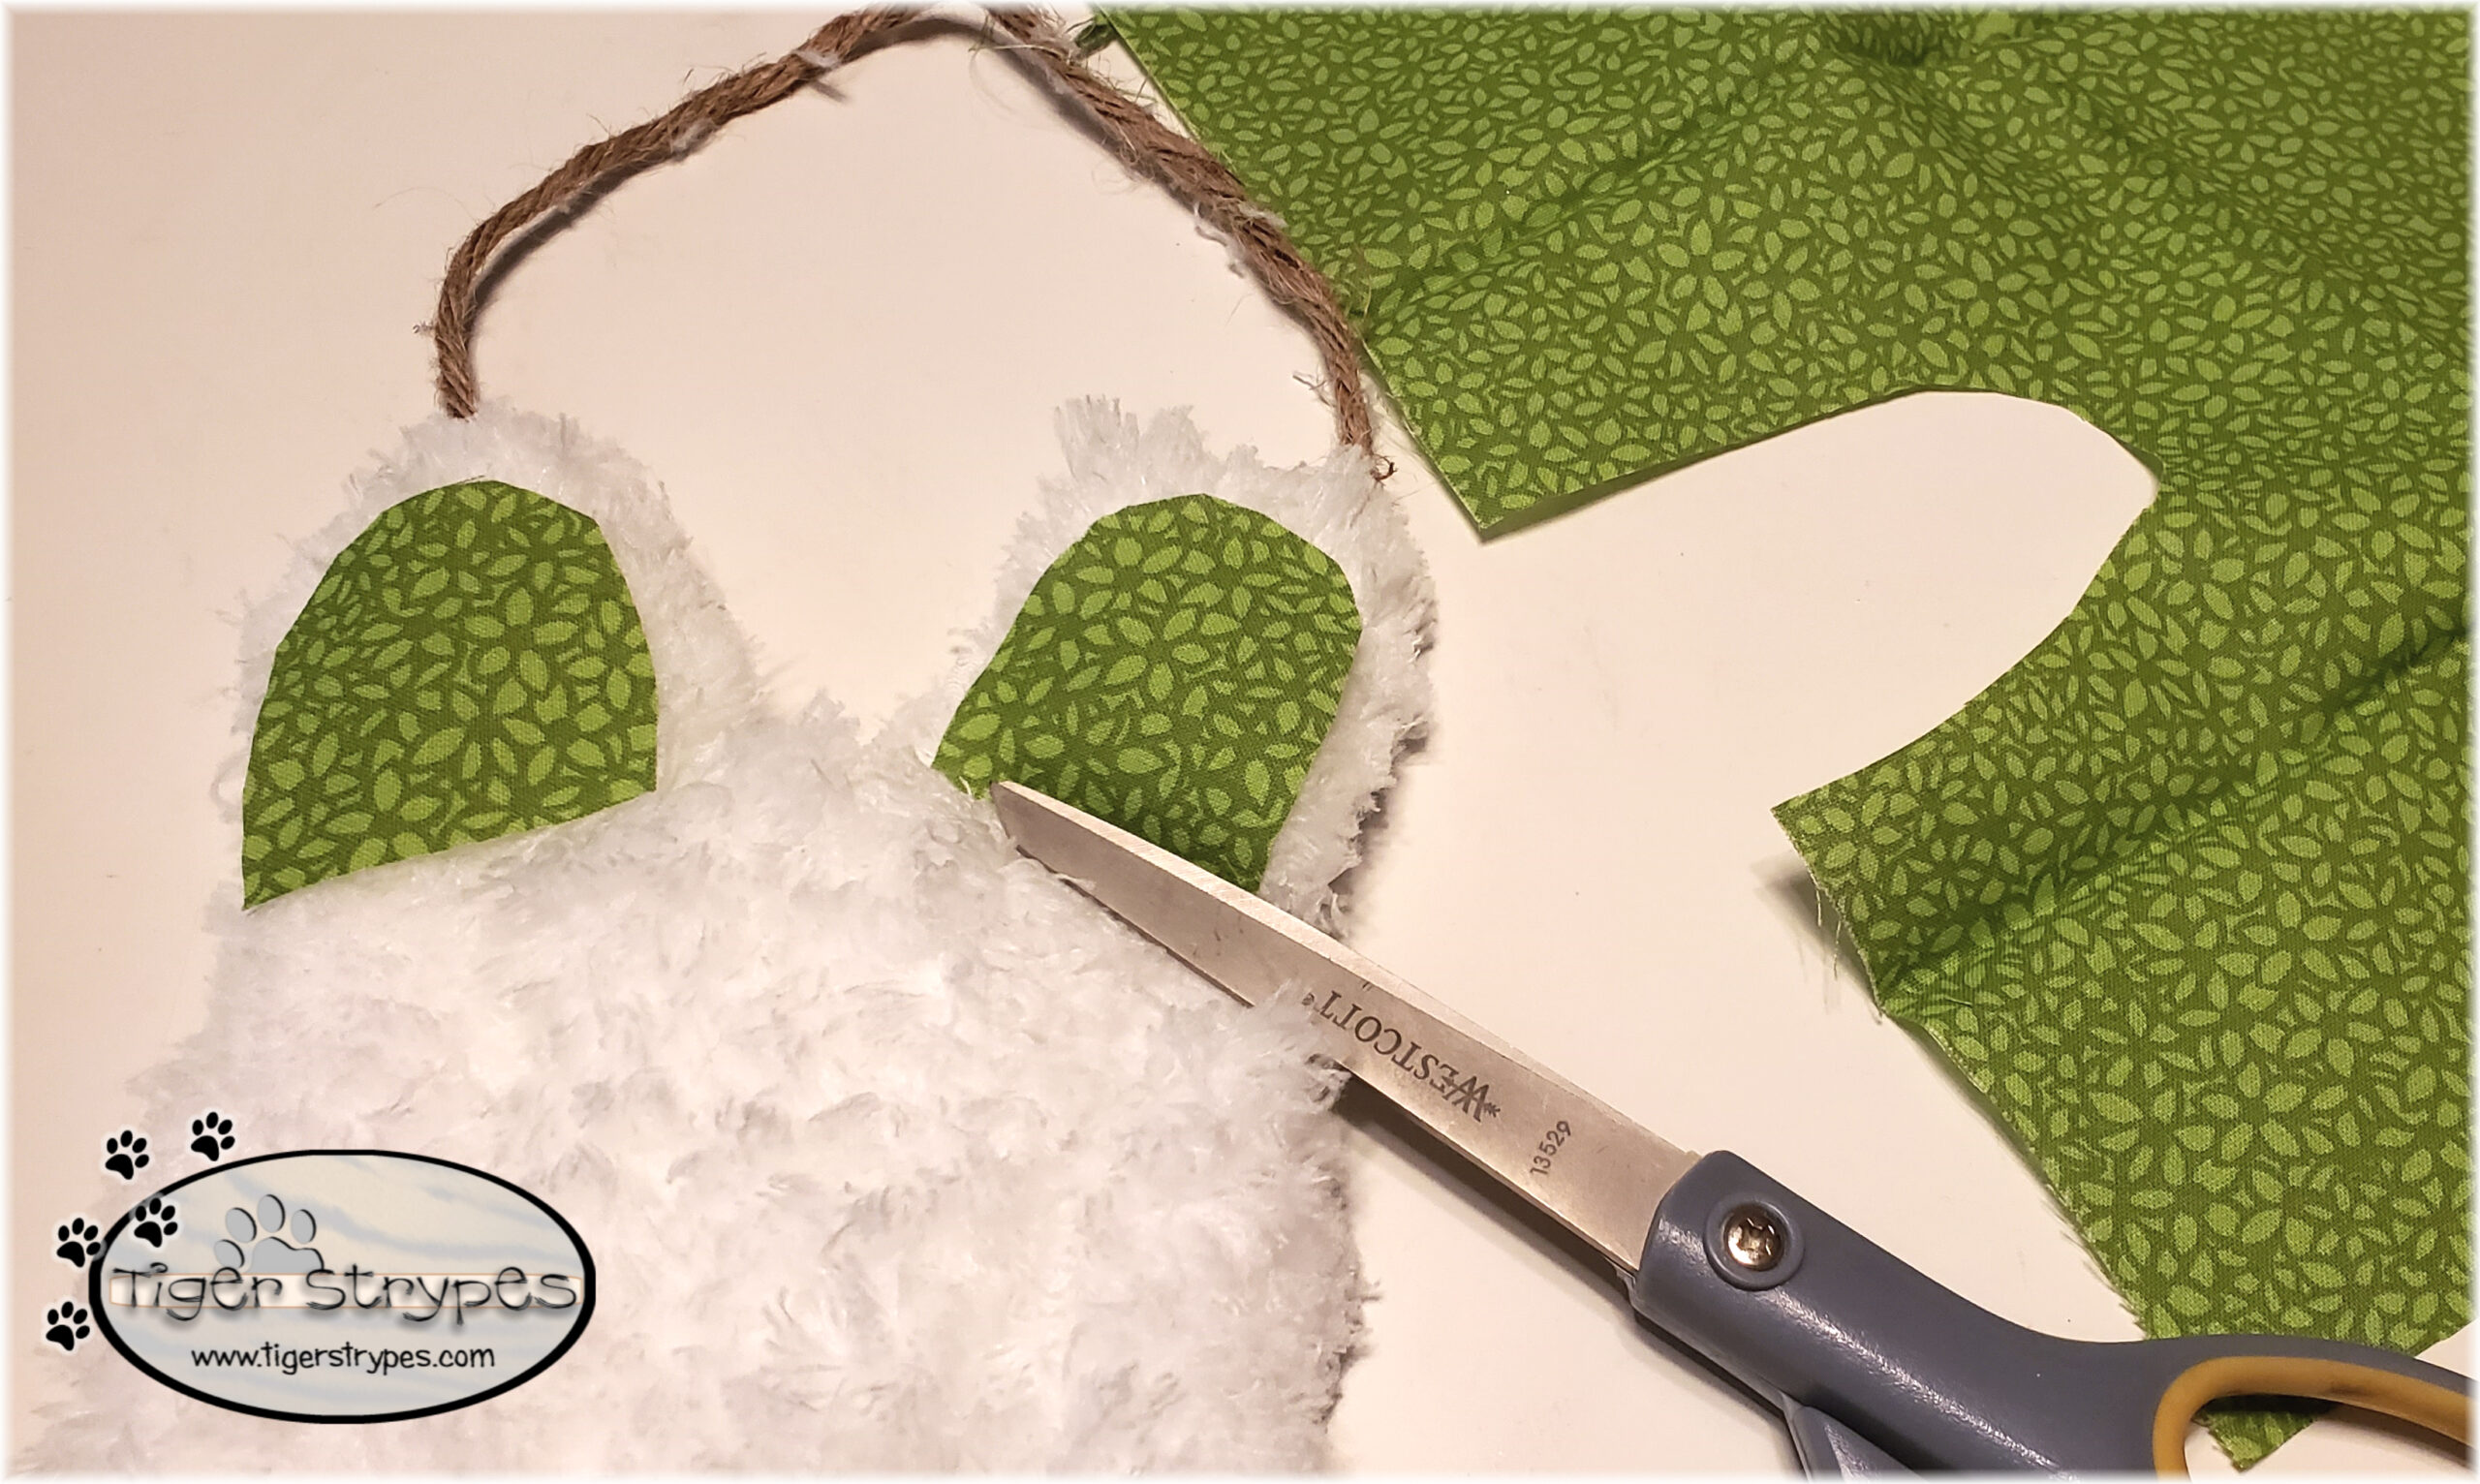
Once you have the piece attached, and the glue has dried, you can start trimming the mop refill around the edges of the metal bunny. Be warned that this task is super messy and you’ll want to do it near a trash can or in an area that can be easily cleaned up. Trim around to your discretion and be sure to flip it over and see where else needs a little clip. This is time consuming, but just know the end result will be worth it.
Once you have everything trimmed, you can use your material scrap to cut two pieces to be the inset of the ears. Color and design is totally up to you.
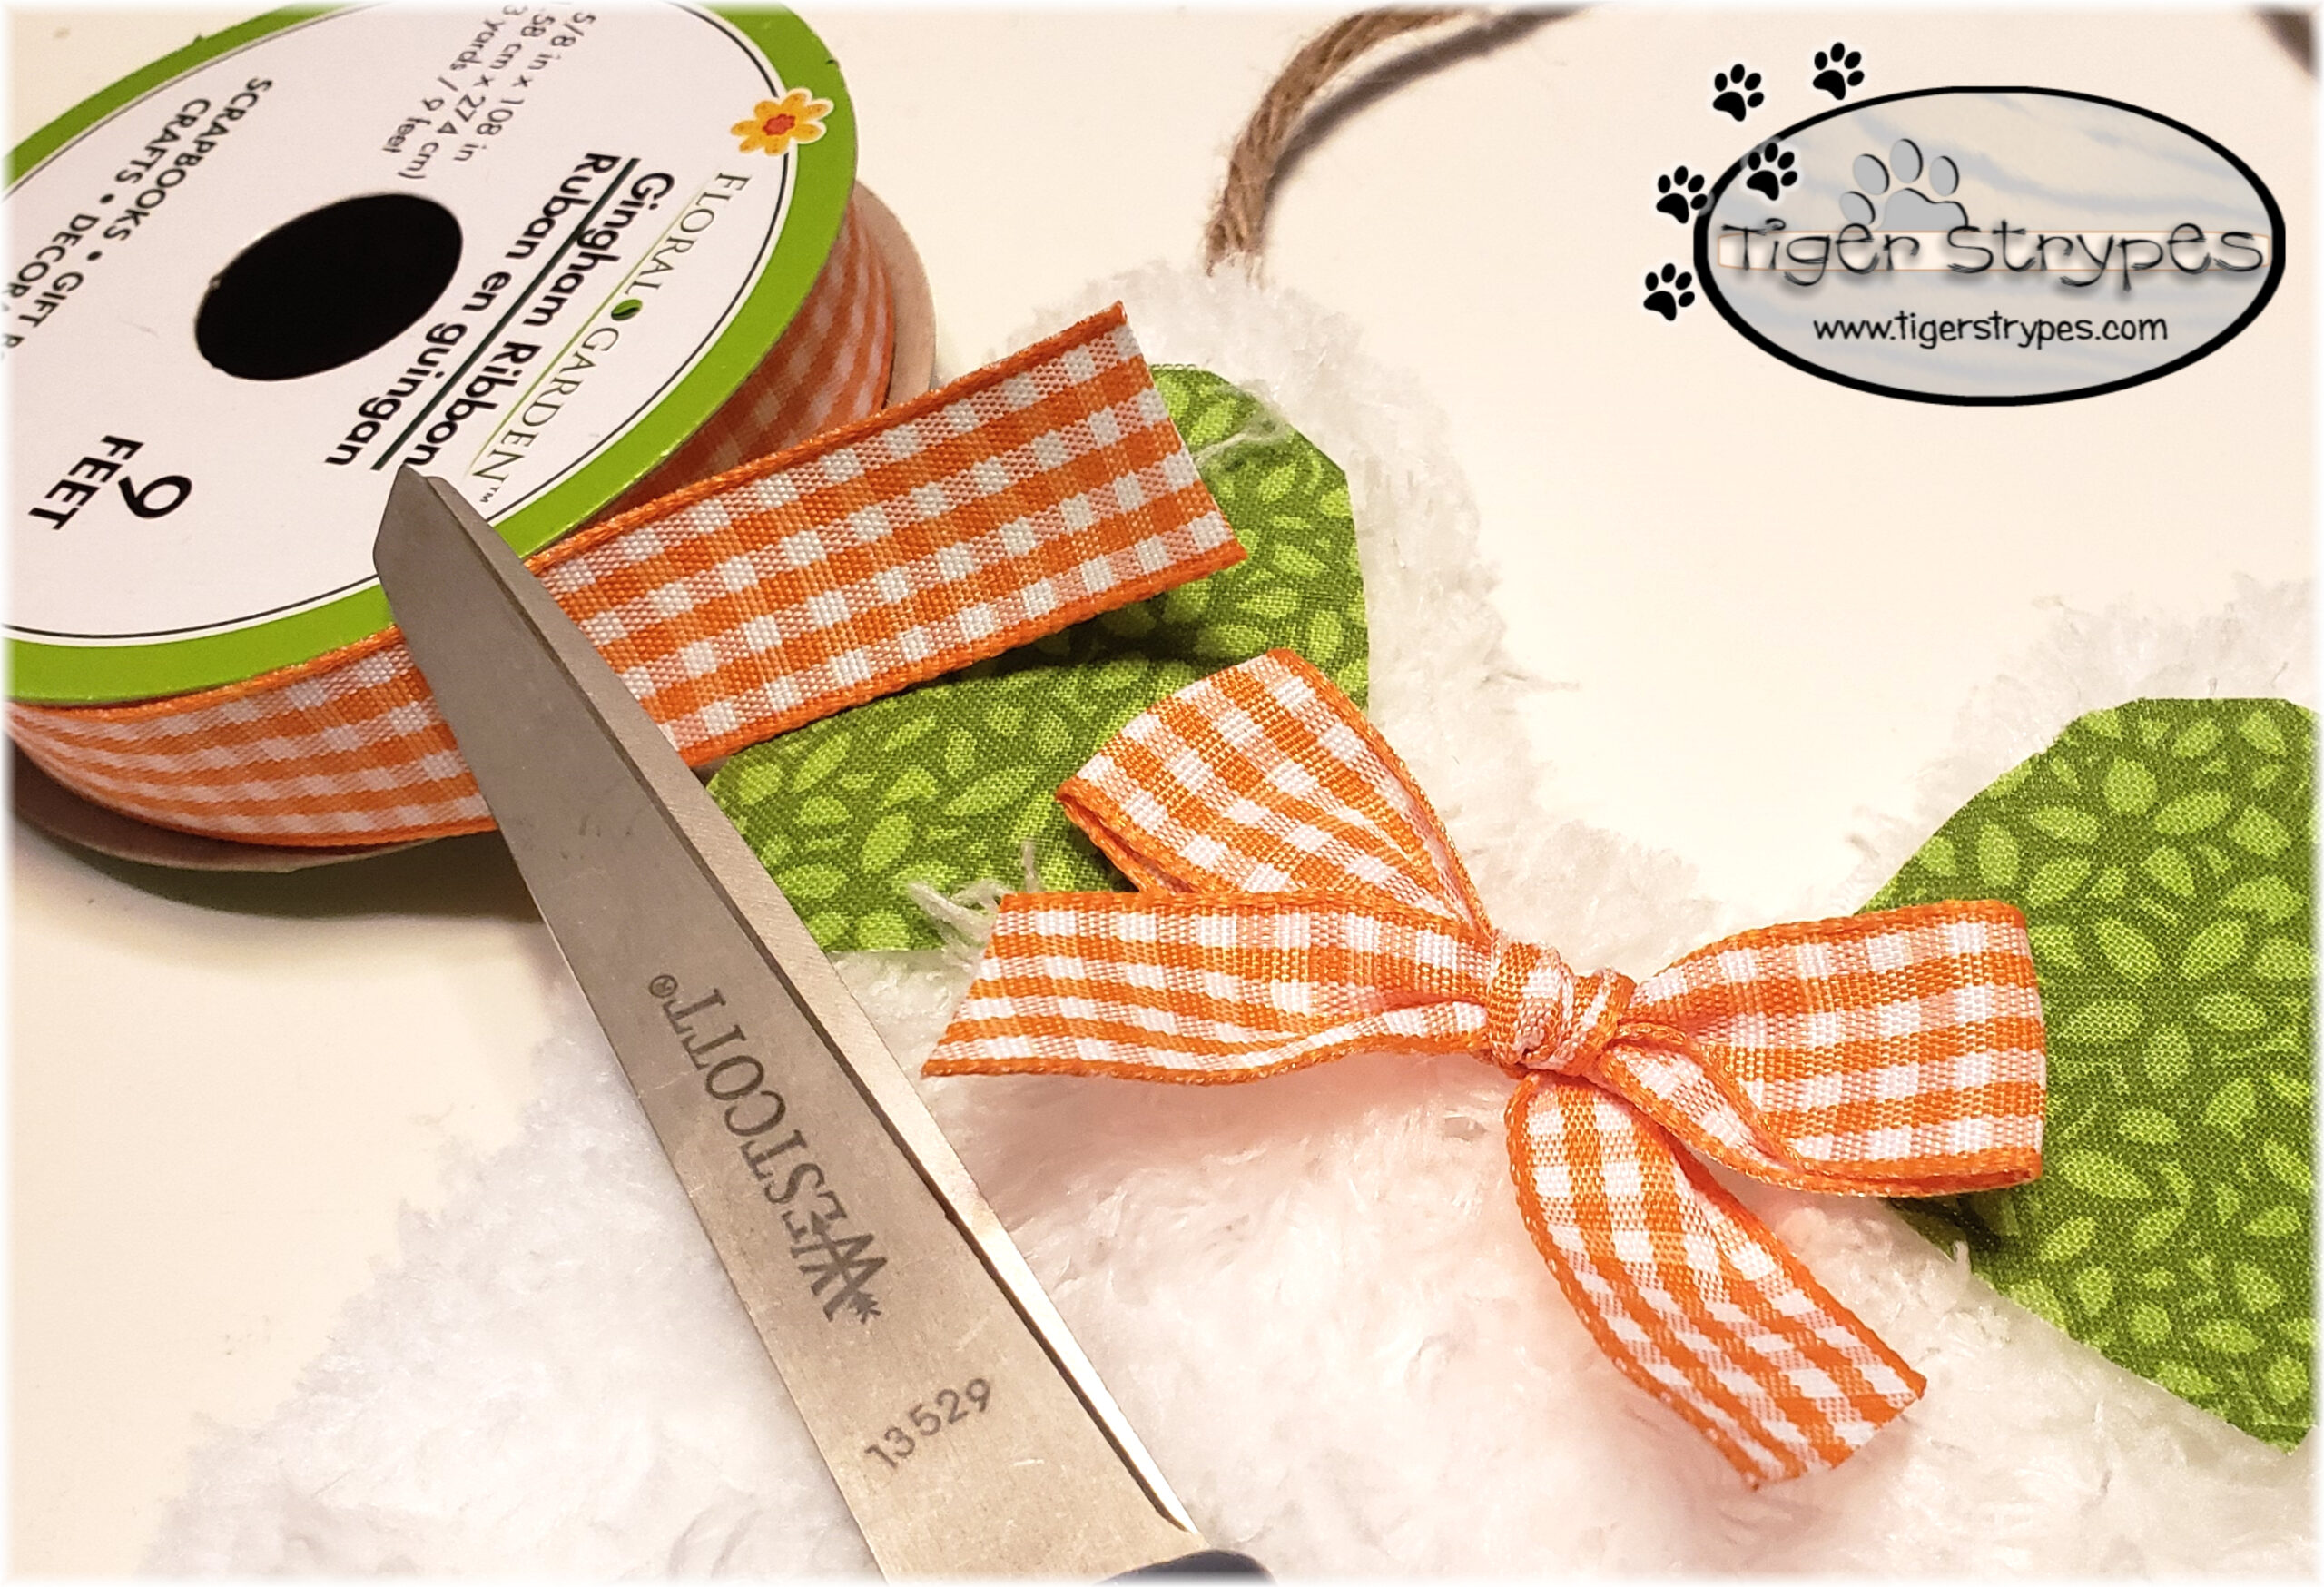
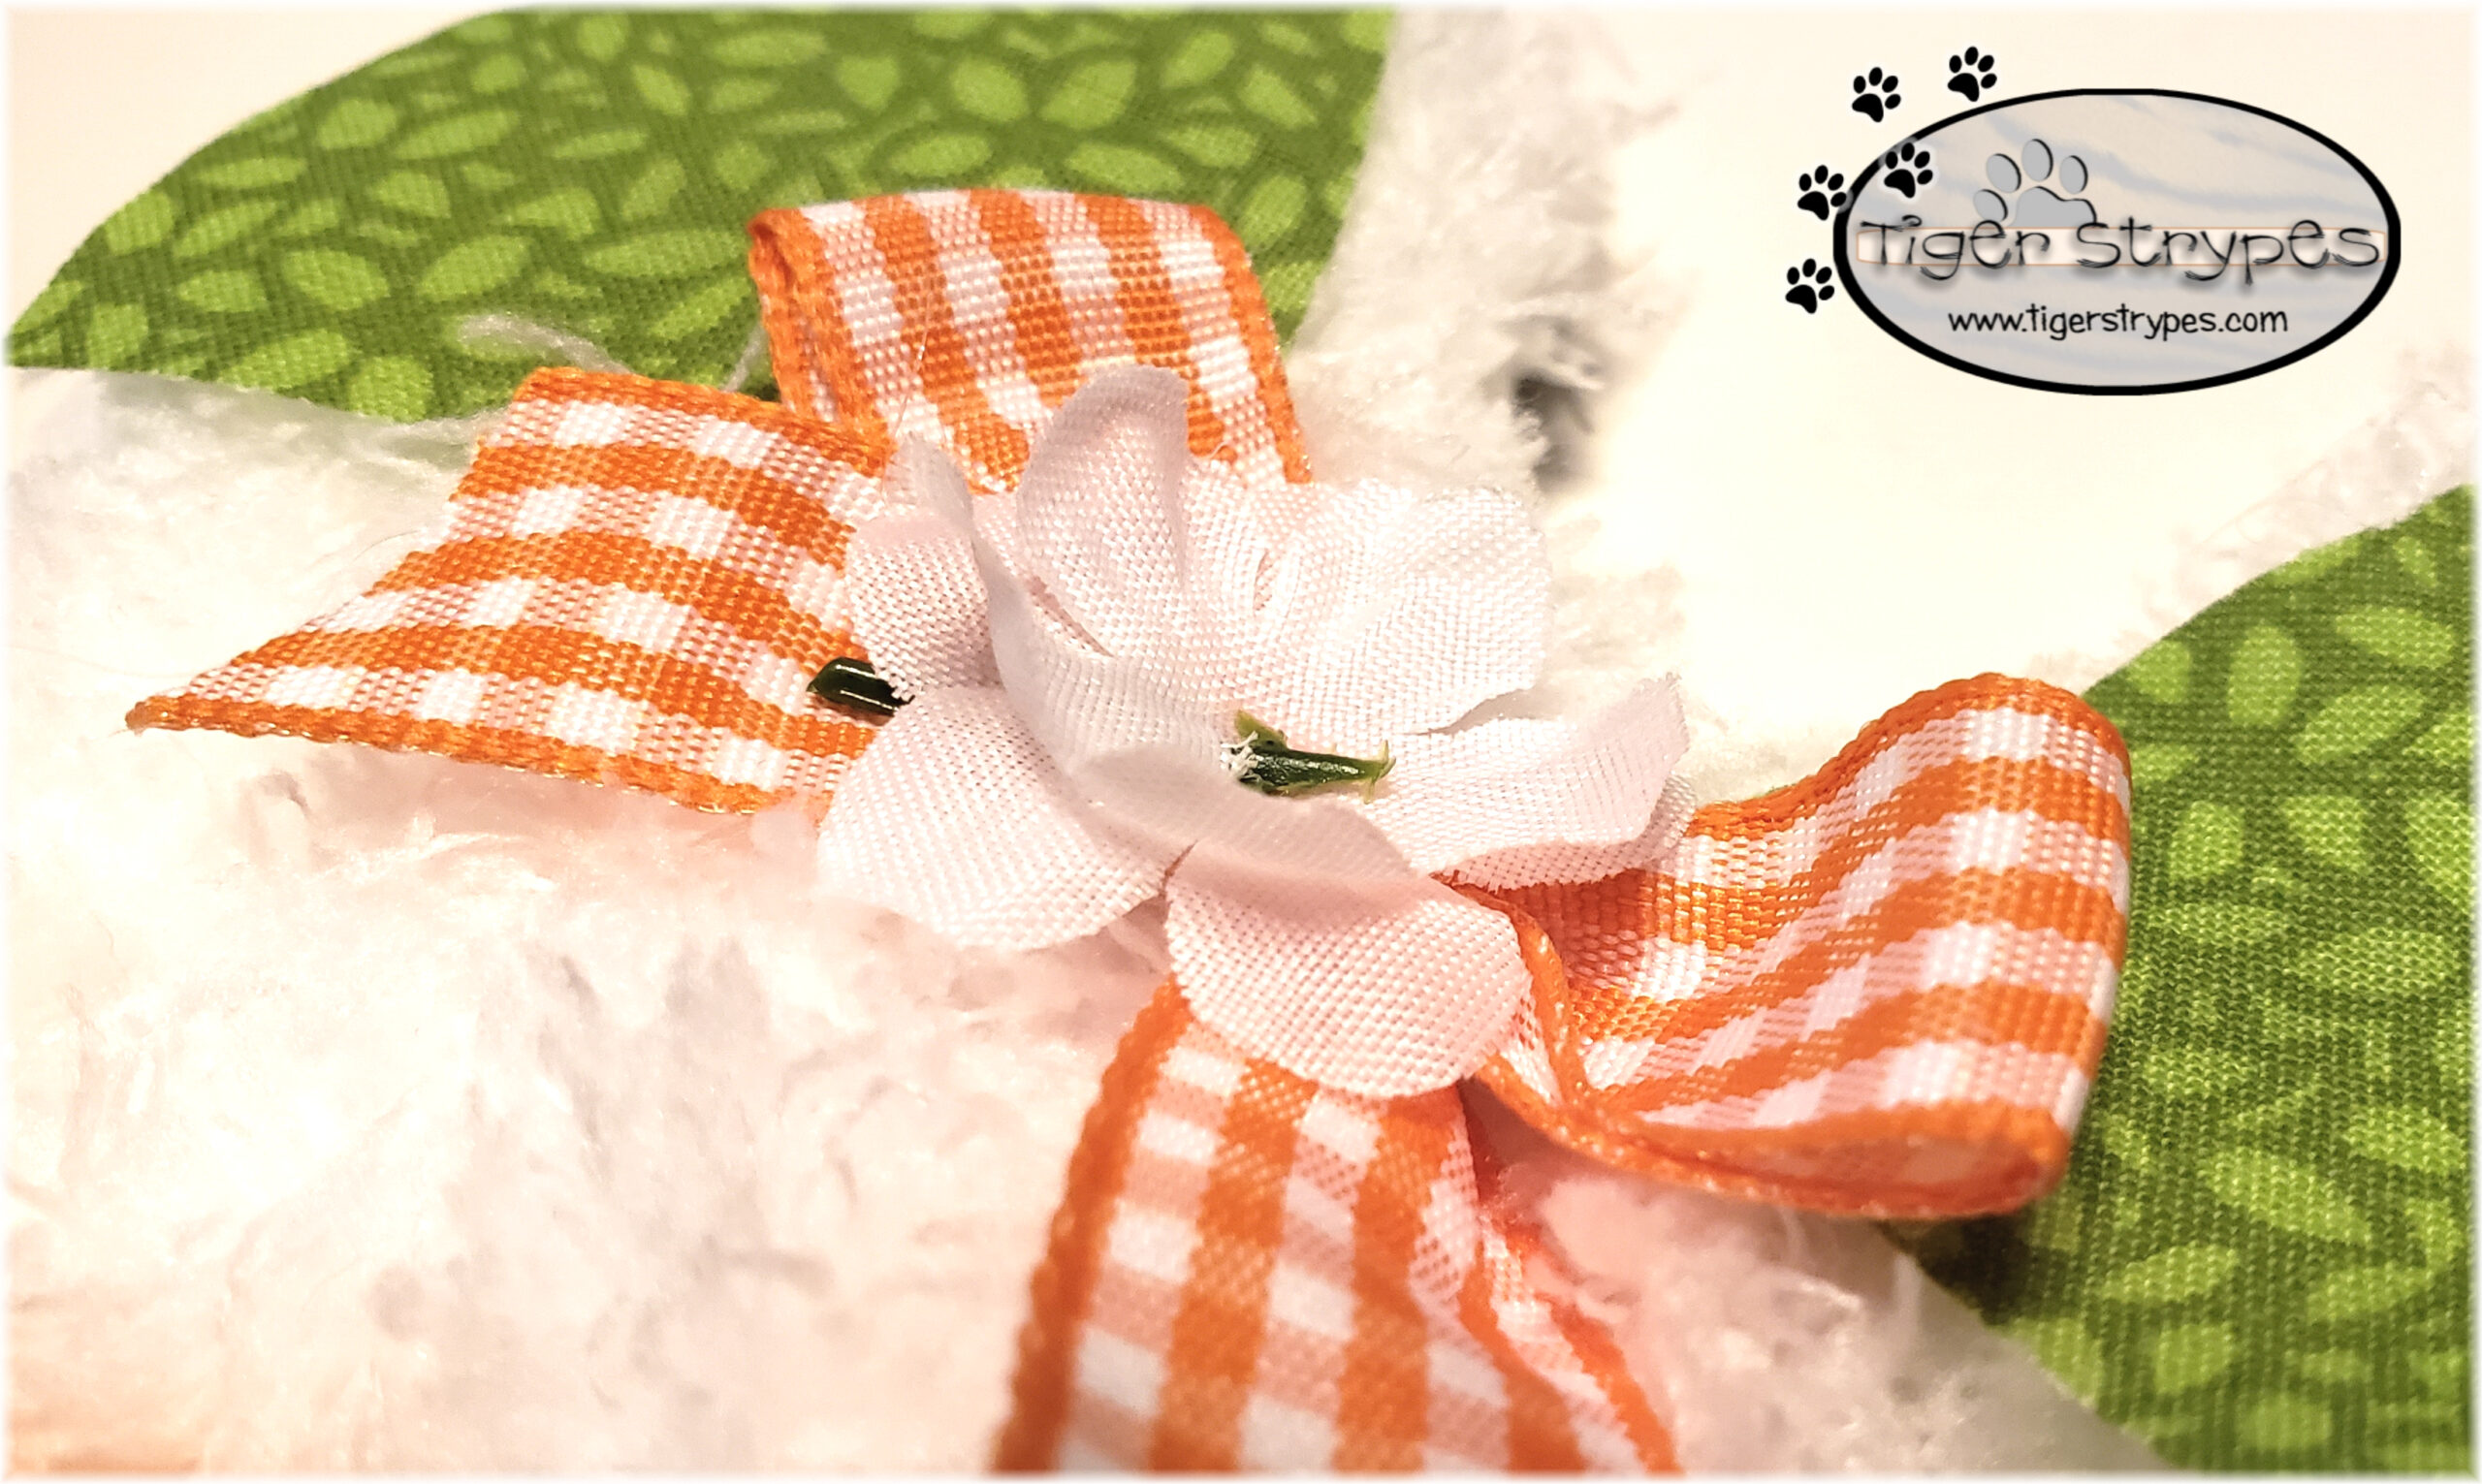
When the ears were dry, I added a bow and a piece from the artificial flowers (I ended up using a smaller one) to the top of the head. This just adds a bit of added décor to the piece. I made four (4) different ones, each with different colors, flowers and ribbon.
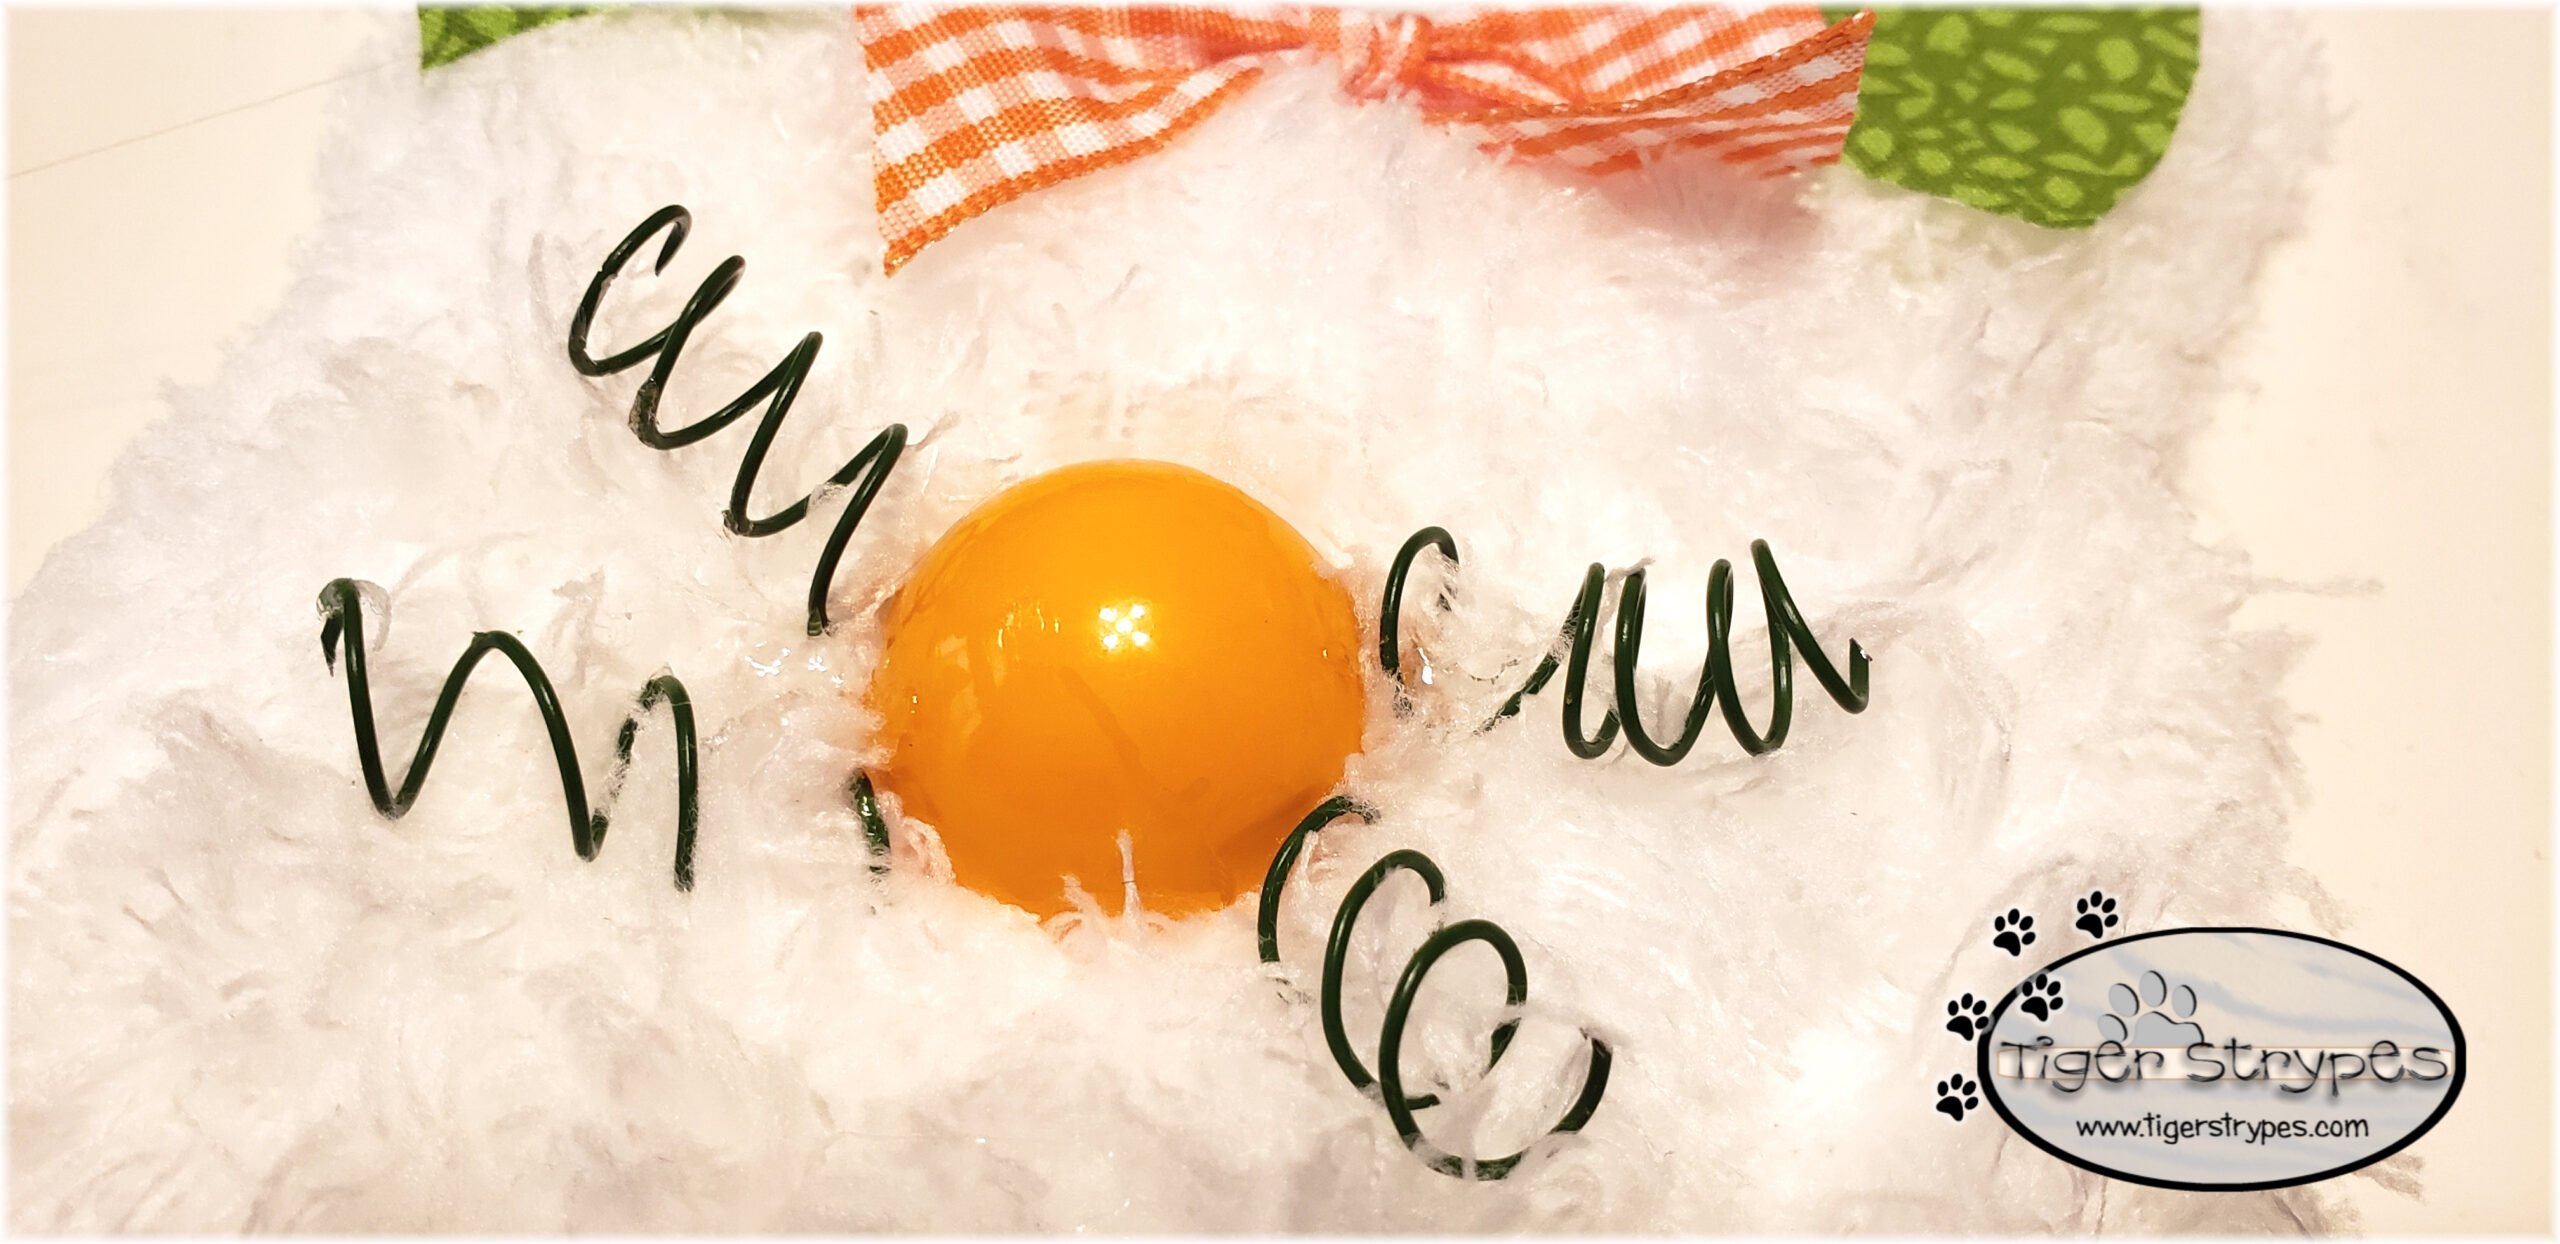
Next, I found an old button that I would never use for anything else, and figured it would work perfectly as the nose. I also used some craft wire and wrapped it around a pencil to form the whiskers. You’ll just need four (4) small pieces for this, or more if you want your bunny to have even more whiskers. Again, you can edit these steps to whatever you wish…that’s the fun of it.
Now, you can hang your bunny wherever you want, or give them out as gifts, like I did. Simple to make and can be changed up in so many ways.
What do you think? I hope you like it! Please take a minute to leave me a comment on what you would like to create, and maybe if you have any tips on how to do it different, or better!
Be sure to tweet, pin, share, etc. – thanks!!
“Jesus said to her, “I am the resurrection and the life. The one who believes in me will live, even though they die;”–John 11:25
 PLEASE SHARE THIS POST USING THE OPTIONS BELOW…THANKS!
Affiliate links for Amazon are used on my site. This means that when you click on a link, and make a purchase, I earn a commission for that purchase. There is no extra charge for you, it’s just their sites way of saying thank you for helping them get a customer. I use affiliate links to help fund my crafting budget, as well as help provide for our home.

This is the cutest little fuzzy Easter bunny! Love it!
Thank you, Linda! 🙂
What a super cute idea! I am always looking for things I can craft when I go to the Dollar Store!
I agree – finding inexpensive things and making them into something great, is always a blessing!
That is such an adorable DIY easter bunny craft to make with the kids. Will definitely try this out sometime.
Thanks, Angela. It was simple to do, but be warned, trimming the mop makes a mess! Ended up worth it, though.
What an adorable craft! My kids would love making these bunnies!
It’s fun to make. Just be warned that cutting the mop pad to shape makes a MESS!! It’s great to put outside for the birds to use for their nests, though. 🙂
This is such a great idea. It’s so adorable! I’m going to have to head to the store to find these. I would love to make it.
It was pretty easy to make. When I saw it online, I figured I had to try it out myself. Then I needed to share it! 🙂
This is so clever and absolutely adorable!! I wouldn’t have thought to use the mop head, brilliant!!
I just loved that it was so inexpensive to make! 🙂
This is adorable! I need to hop on over to the dollar store for some supplies! 🙂
Thanks, Daisy! They actually need to change the name of ours to a dollar and a quarter store. 😛
That is super cute! I love putting up decorations for Easter and am always on the lookout for more!
Thanks, Heidi! I just love making cute things for not a lot of $$! 🙂
This is really a cute idea. It would also be cute in an Easter basket. I use to do Easter scavenger hunts for my kids and I think they would have loved to have found this little treasure.
That’s a great idea, Grace! I have one left, so I might just do that for my son & his family! 🙂