
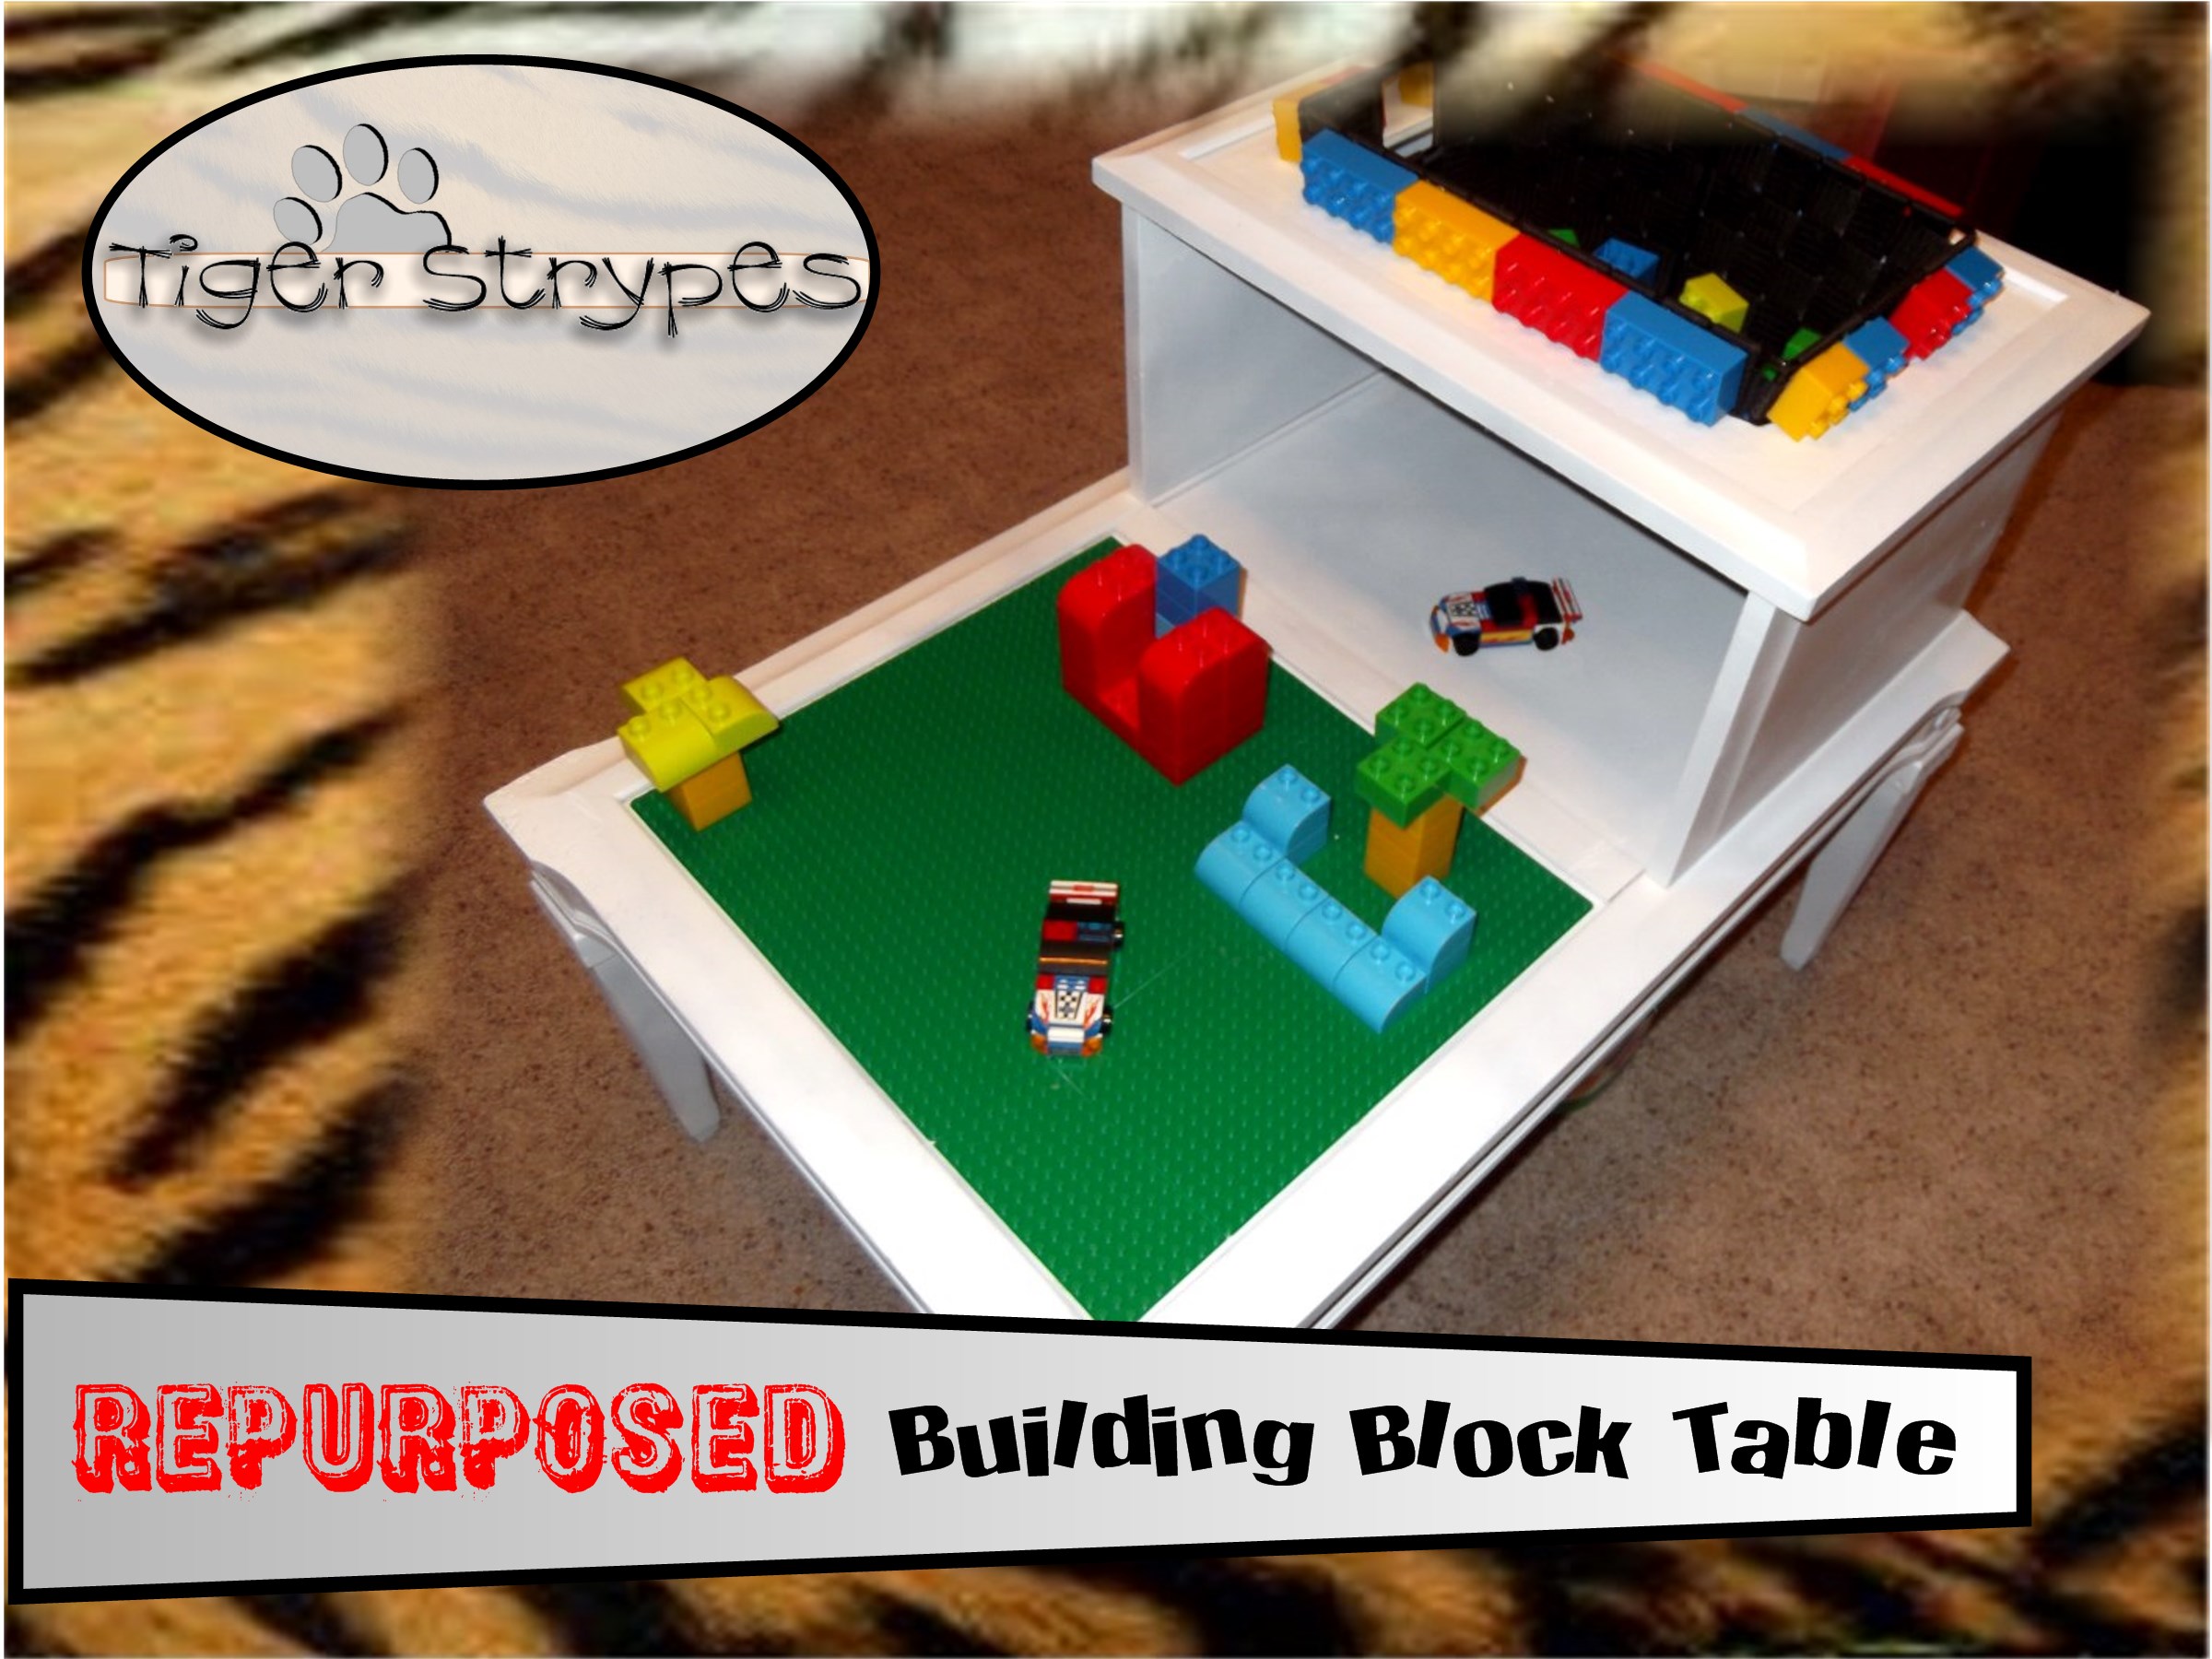
How To Build a “Repurposed Building Block Table“
I saw something like this on Pinterest, and thought it was adorable. I went around to local thrift shops looking for one of these tables. Probably should have gone to an antique shop, since these were popular when I was little! 🙂 I finally found someone on a local FB selling page that had one for only $5.00! SCORE!! I love to make old things look new, and to be able to be used for different purposes. This is one that would be perfect for a kid’s room, or even for a grandparent to use for when they have kids over to their house. It could also be used as just a regular table, when they aren’t playing on it.
I sure hope that you like it!! Have a blessed day, and please be sure to comment below, and share this great reuse craft!!
 “Repurposed Building Block Table“
Materials/Tools Used:
- Old 2-Tier Table
- Tools (Ruler, Saw, Sander, Etc.)
- Paint
- Basket
- Building Blocks (Regular and Flat)
- Glue Gun
- & Time!
Instructions:
Start by finding a 2-tier table that you think will work. Don’t worry about the condition or color, etc. since you can paint it whatever color you wish. Once you get it washed, if needed, head out to your work area and measure the top shelf with the basket you are going to use. This will tell you where to start the cut for putting this piece in the furniture.
When you have that marked, use a drill to create a starting point for where you will saw out the middle piece.
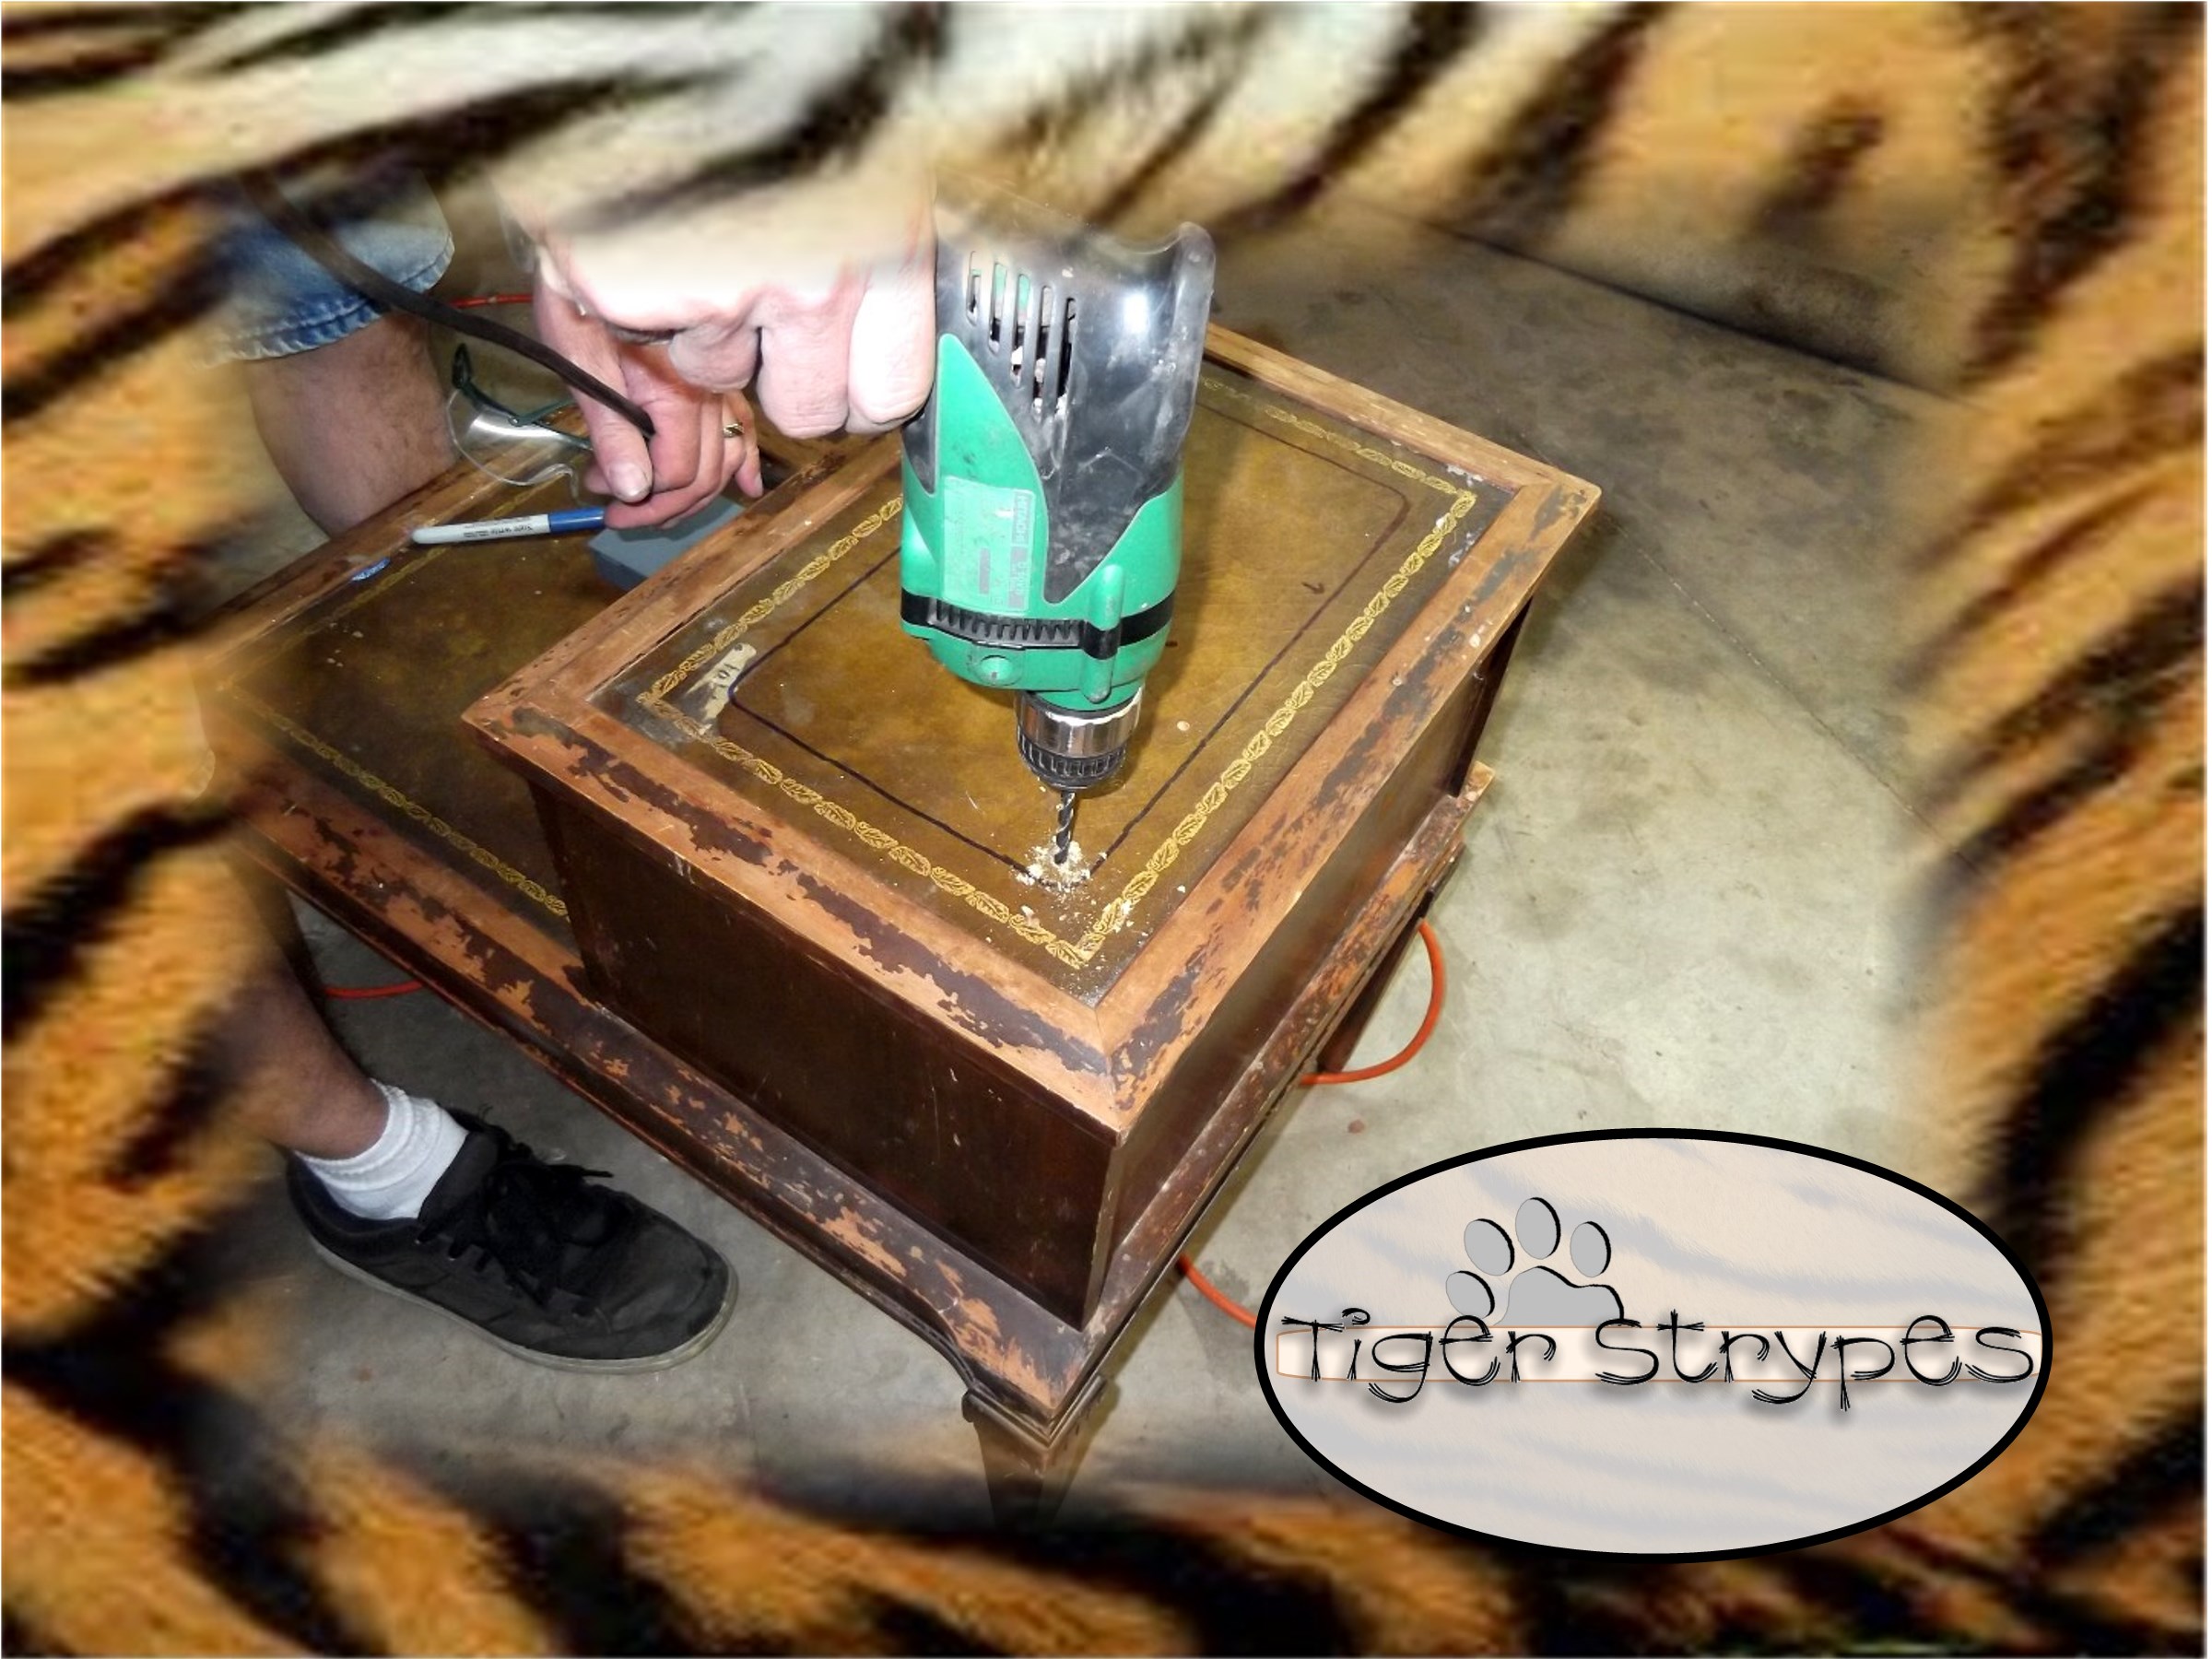
Now that you have that point drilled out, you can then begin sawing out the middle portion.

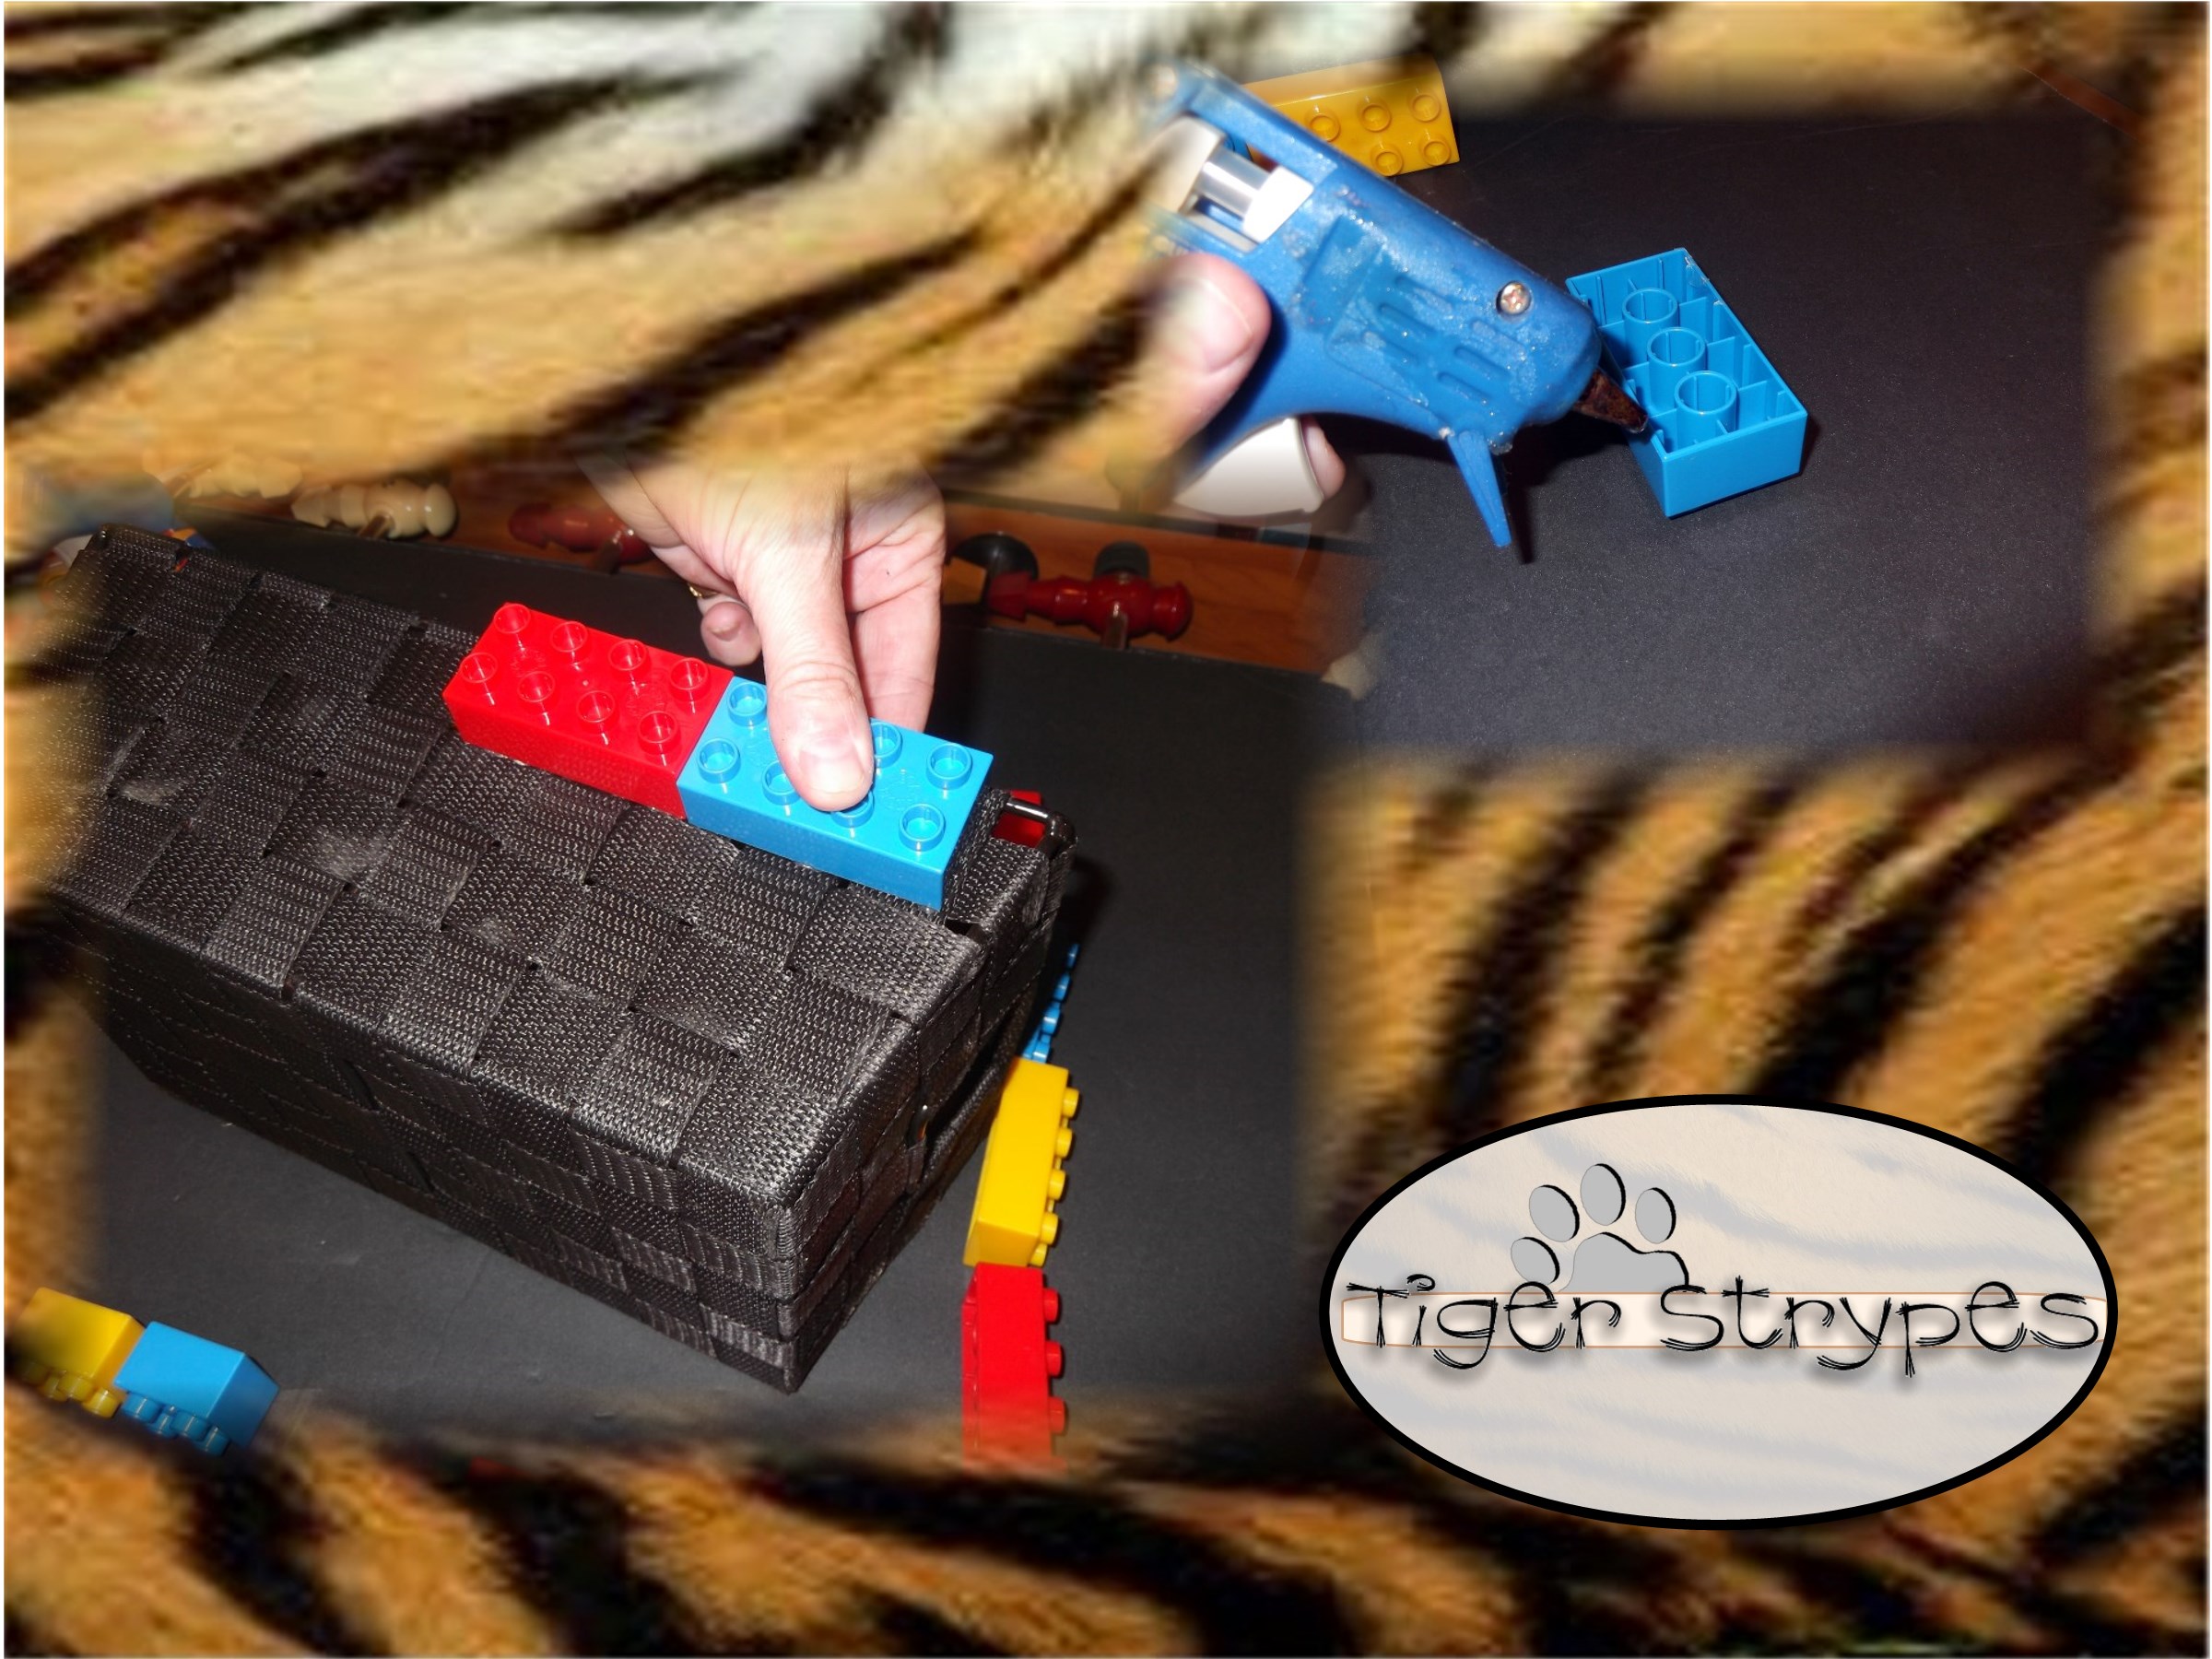
GREAT, the cut is now finished!! (NOTE: You might have to trim and shape this area a few times for your basket to fit – DON’T CUT IT TOO BIG, it’s best to cut small and then just cut more for it to fit with a bit of the top of the basket still being able to sit out of the hole). Now you can use a belt sander to sand the whole piece. This will help for the new paint to stick and clean up any bad parts of the piece (stickers, splinters, etc.)

When you have it sanded to your liking, you can being painting. I just decided to use spray paint, since this will be played with and not treated like a priceless piece of furniture. If you wish, use a regular paint and brush to do this part. I didn’t want it to take that much time. 🙂
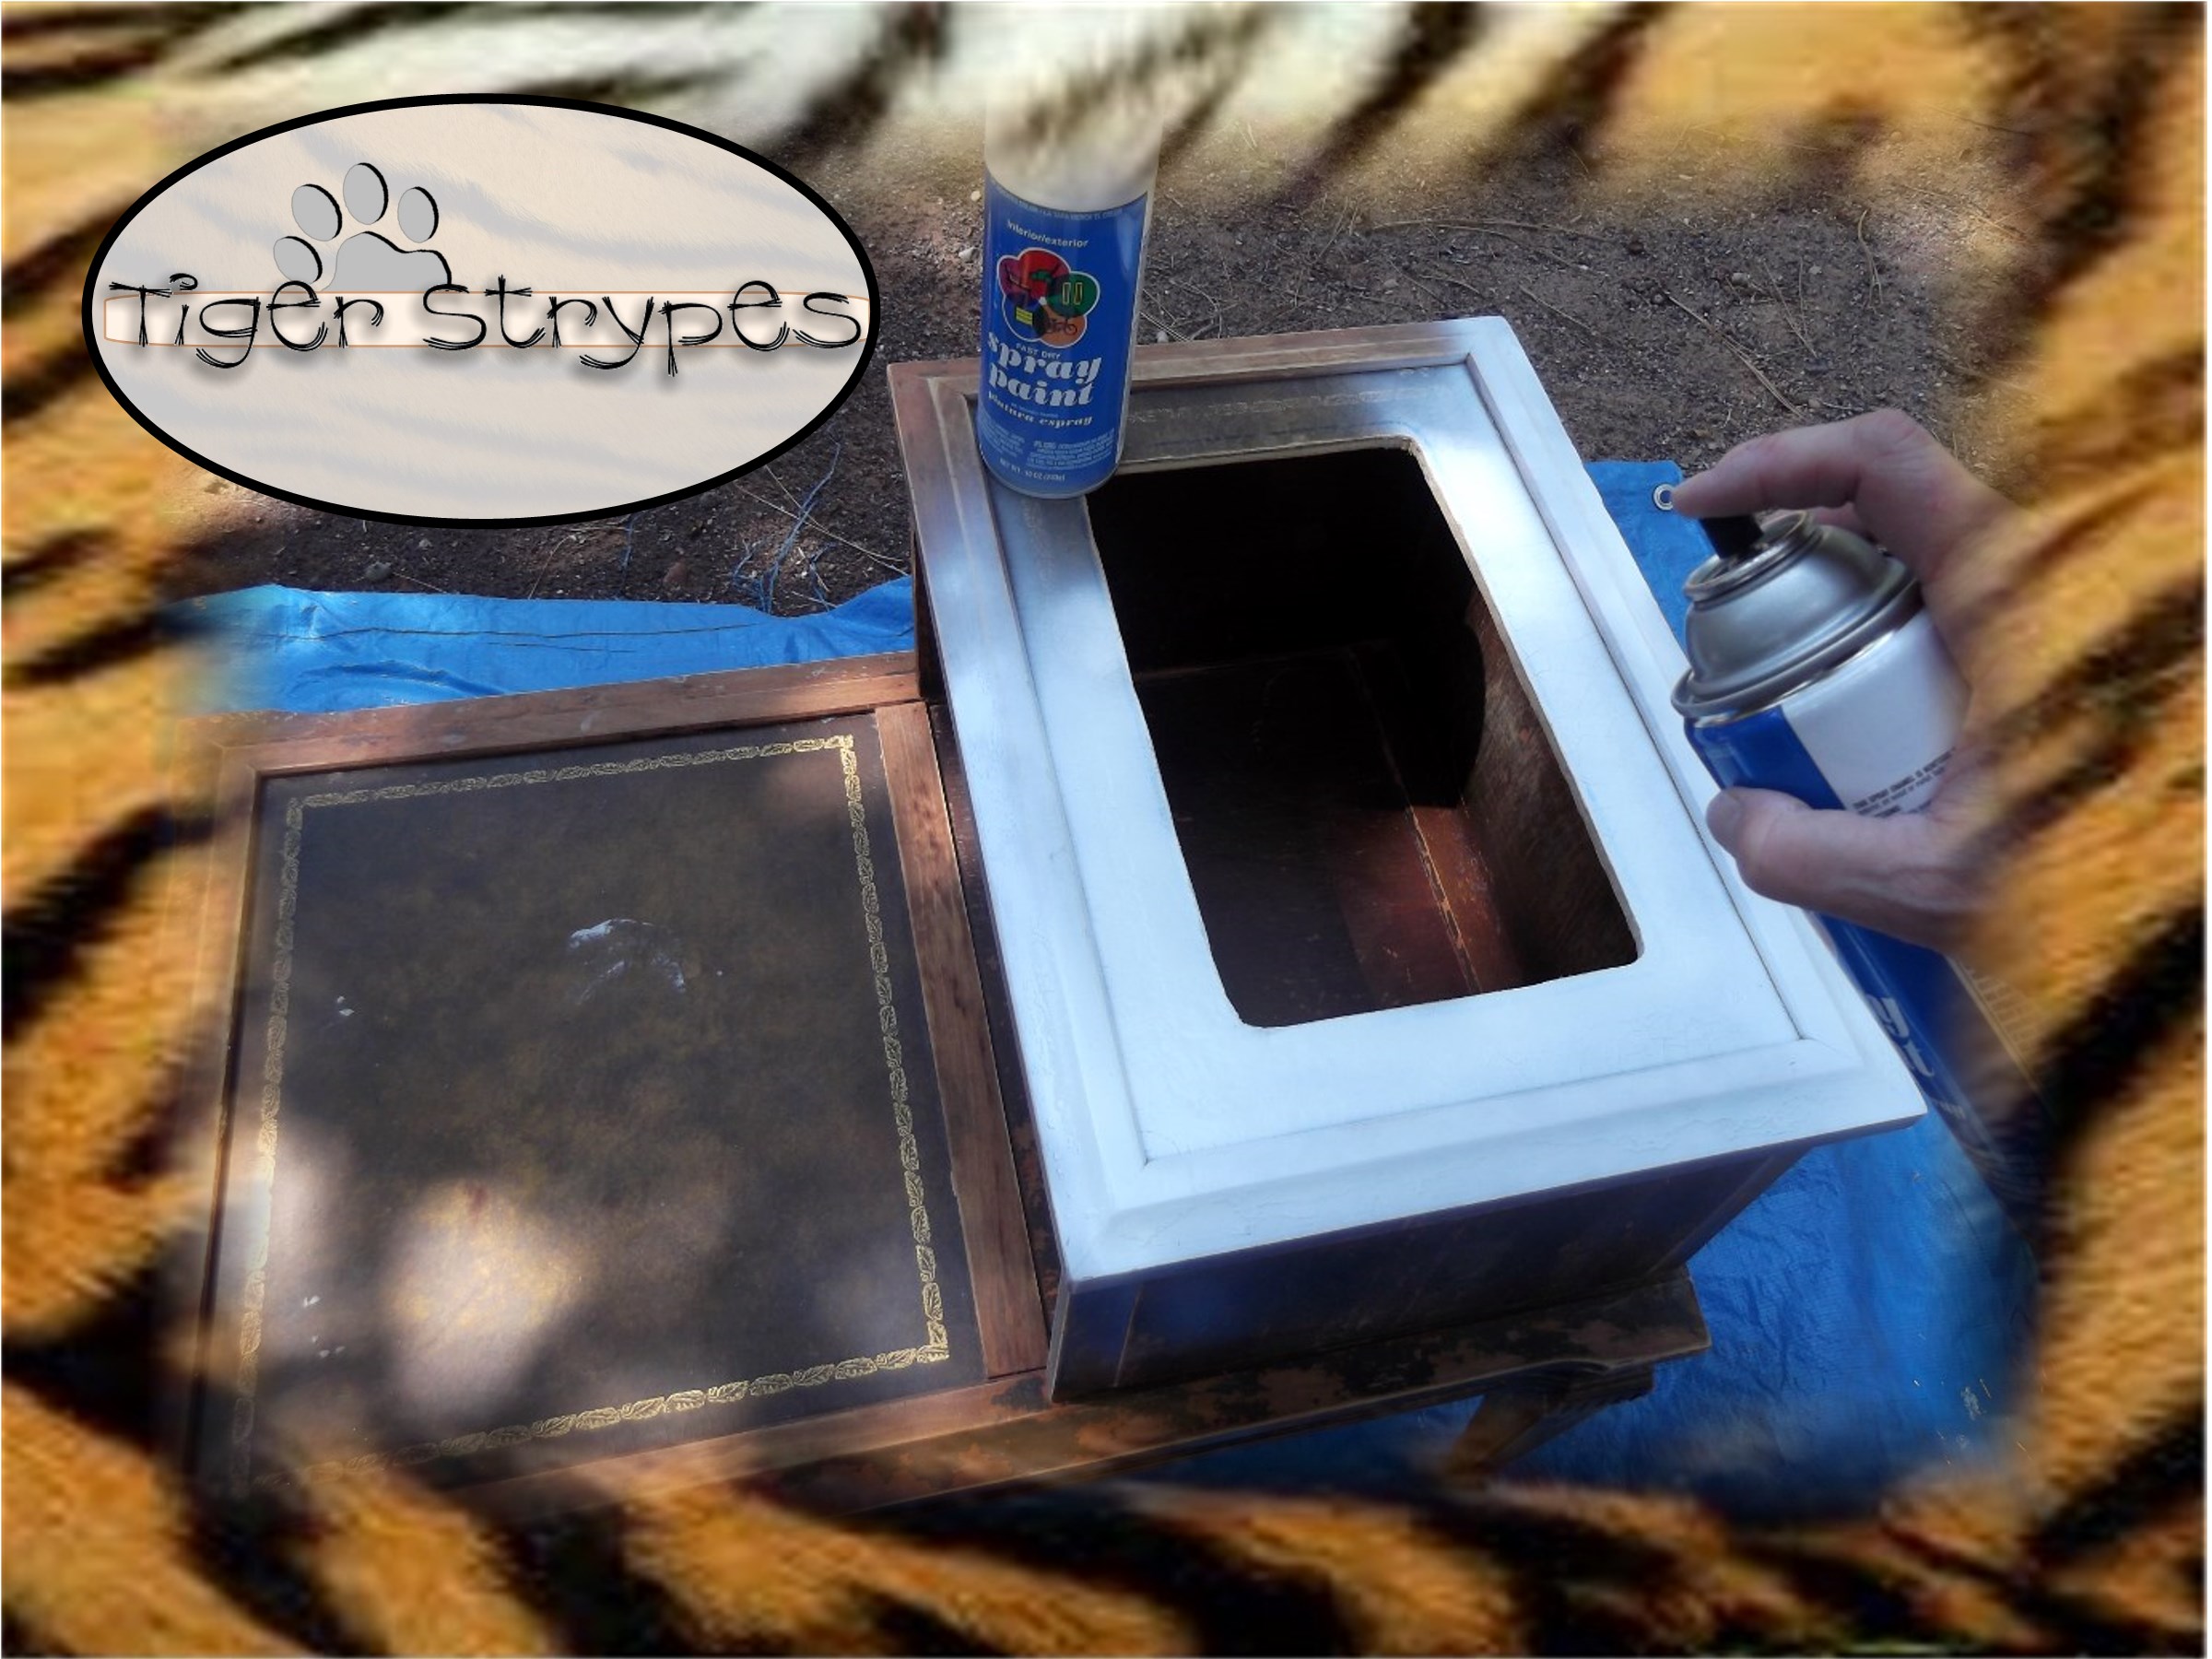
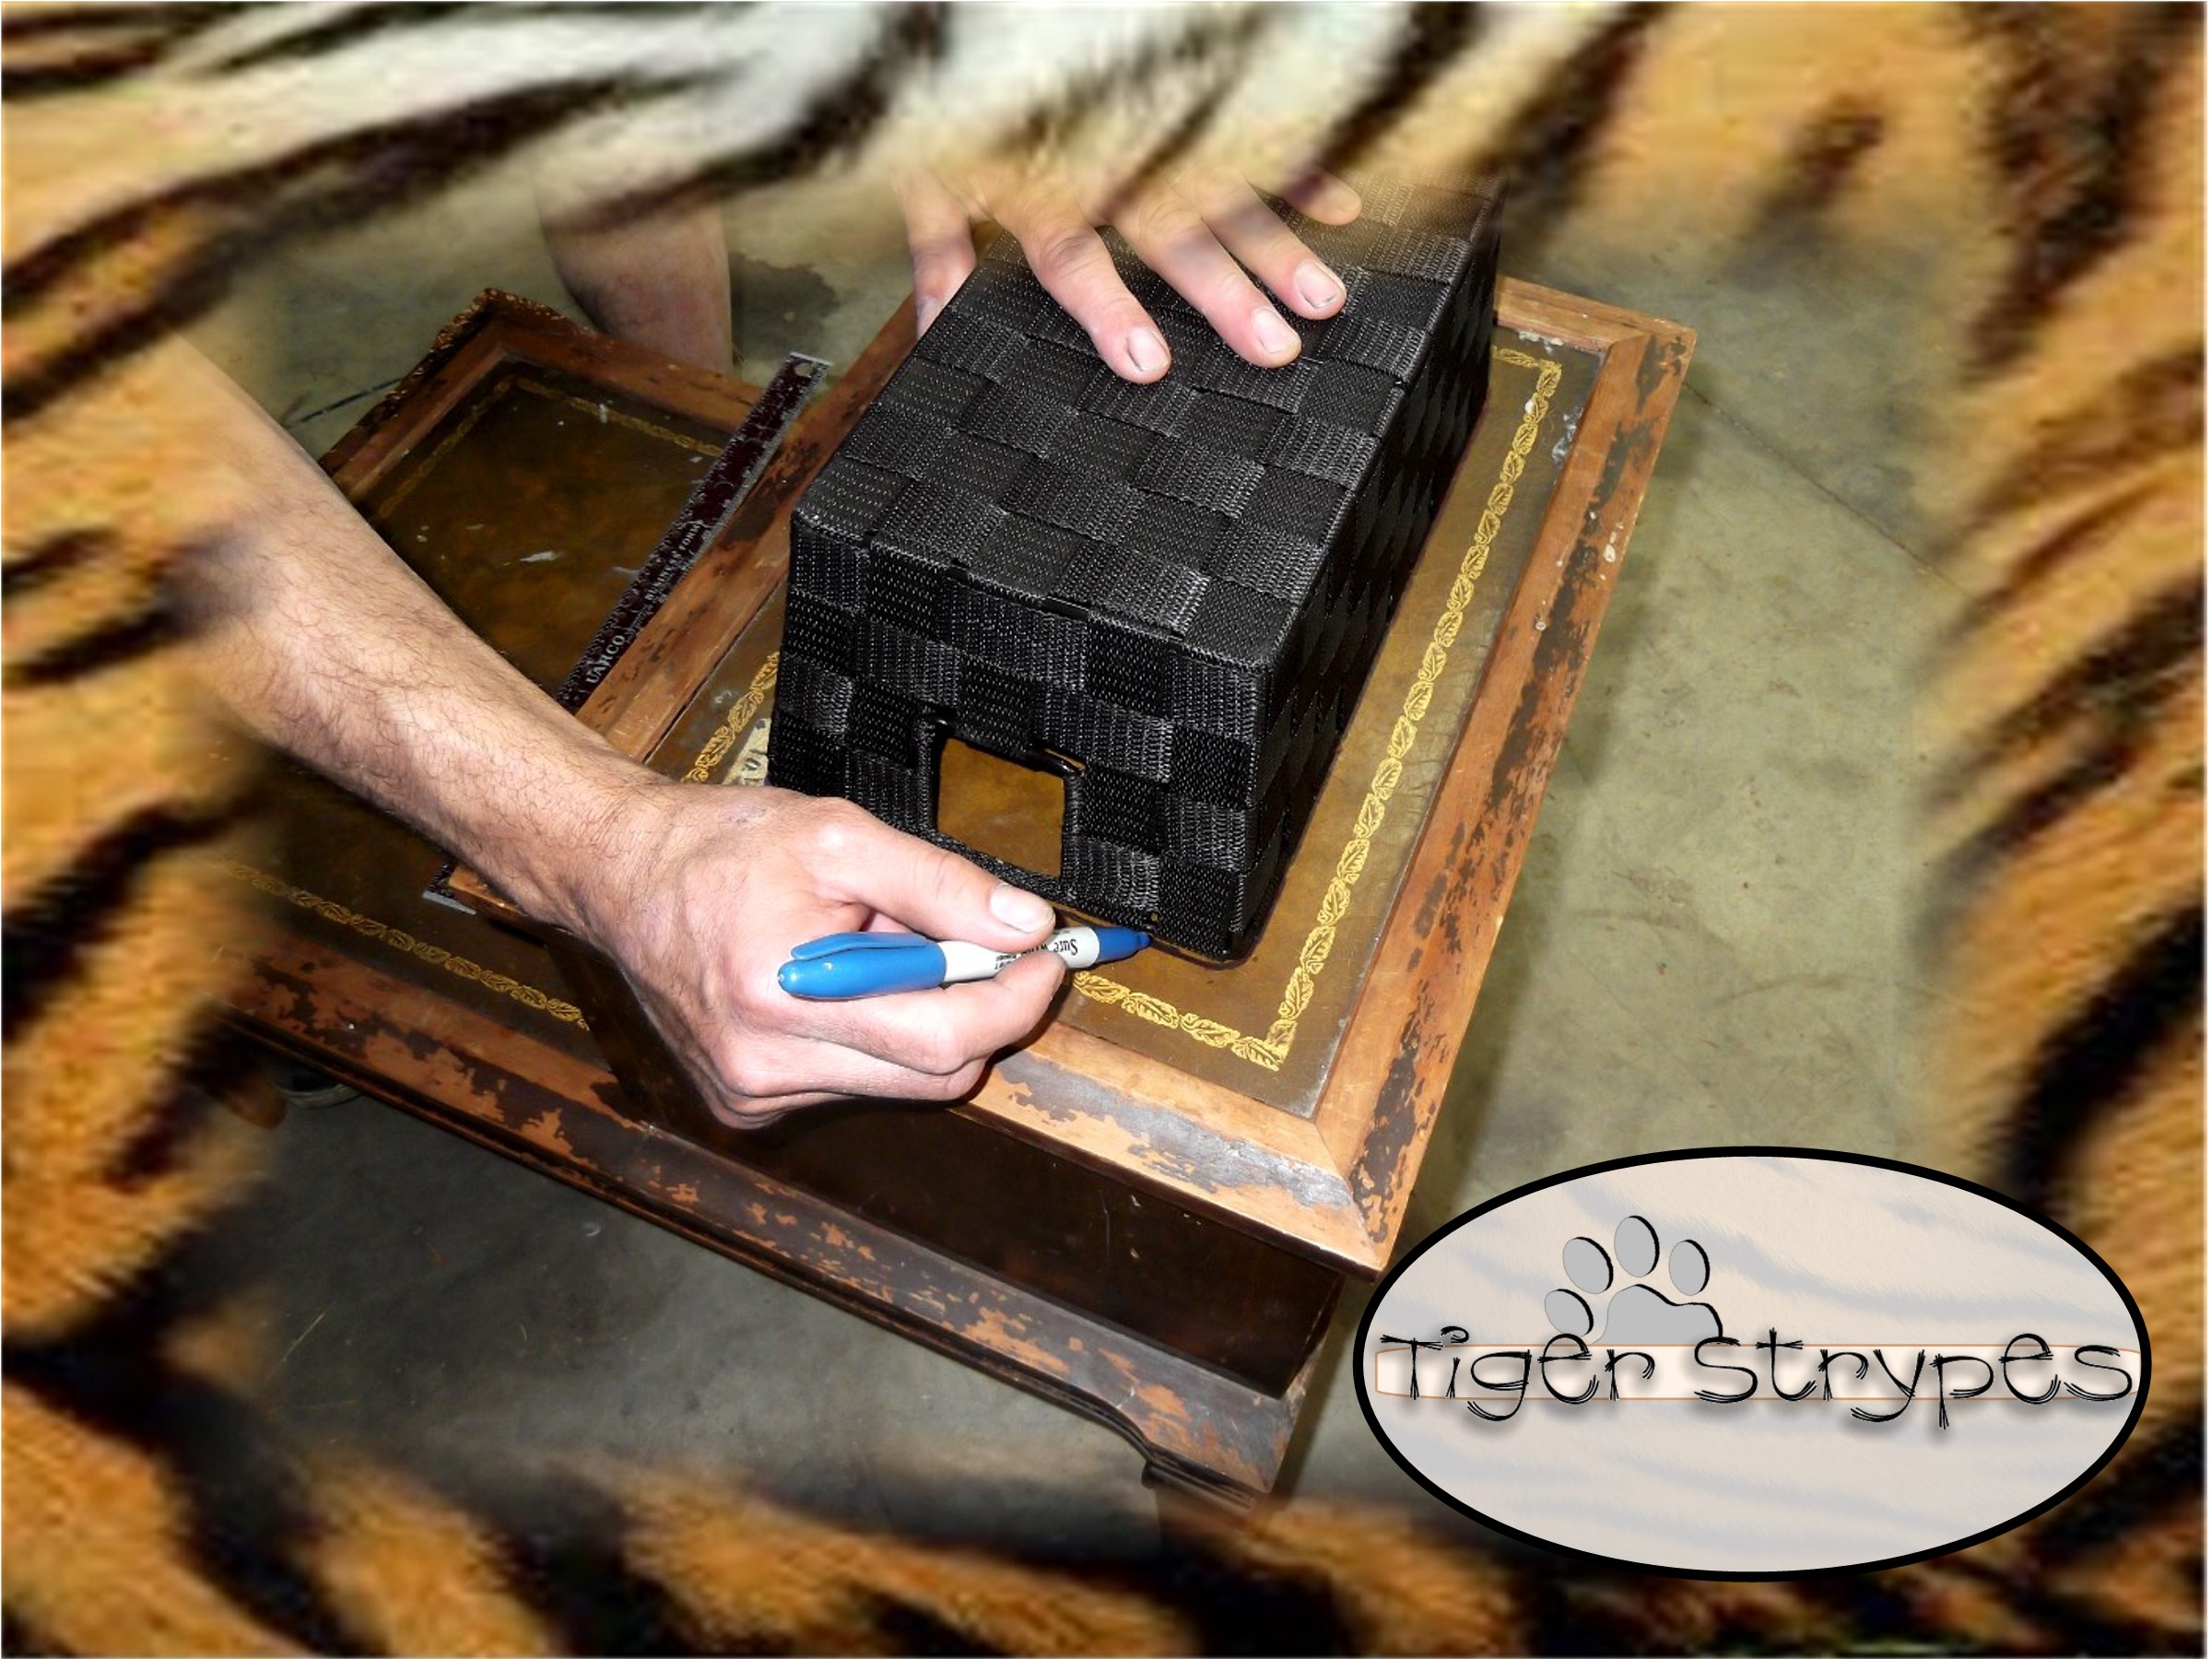
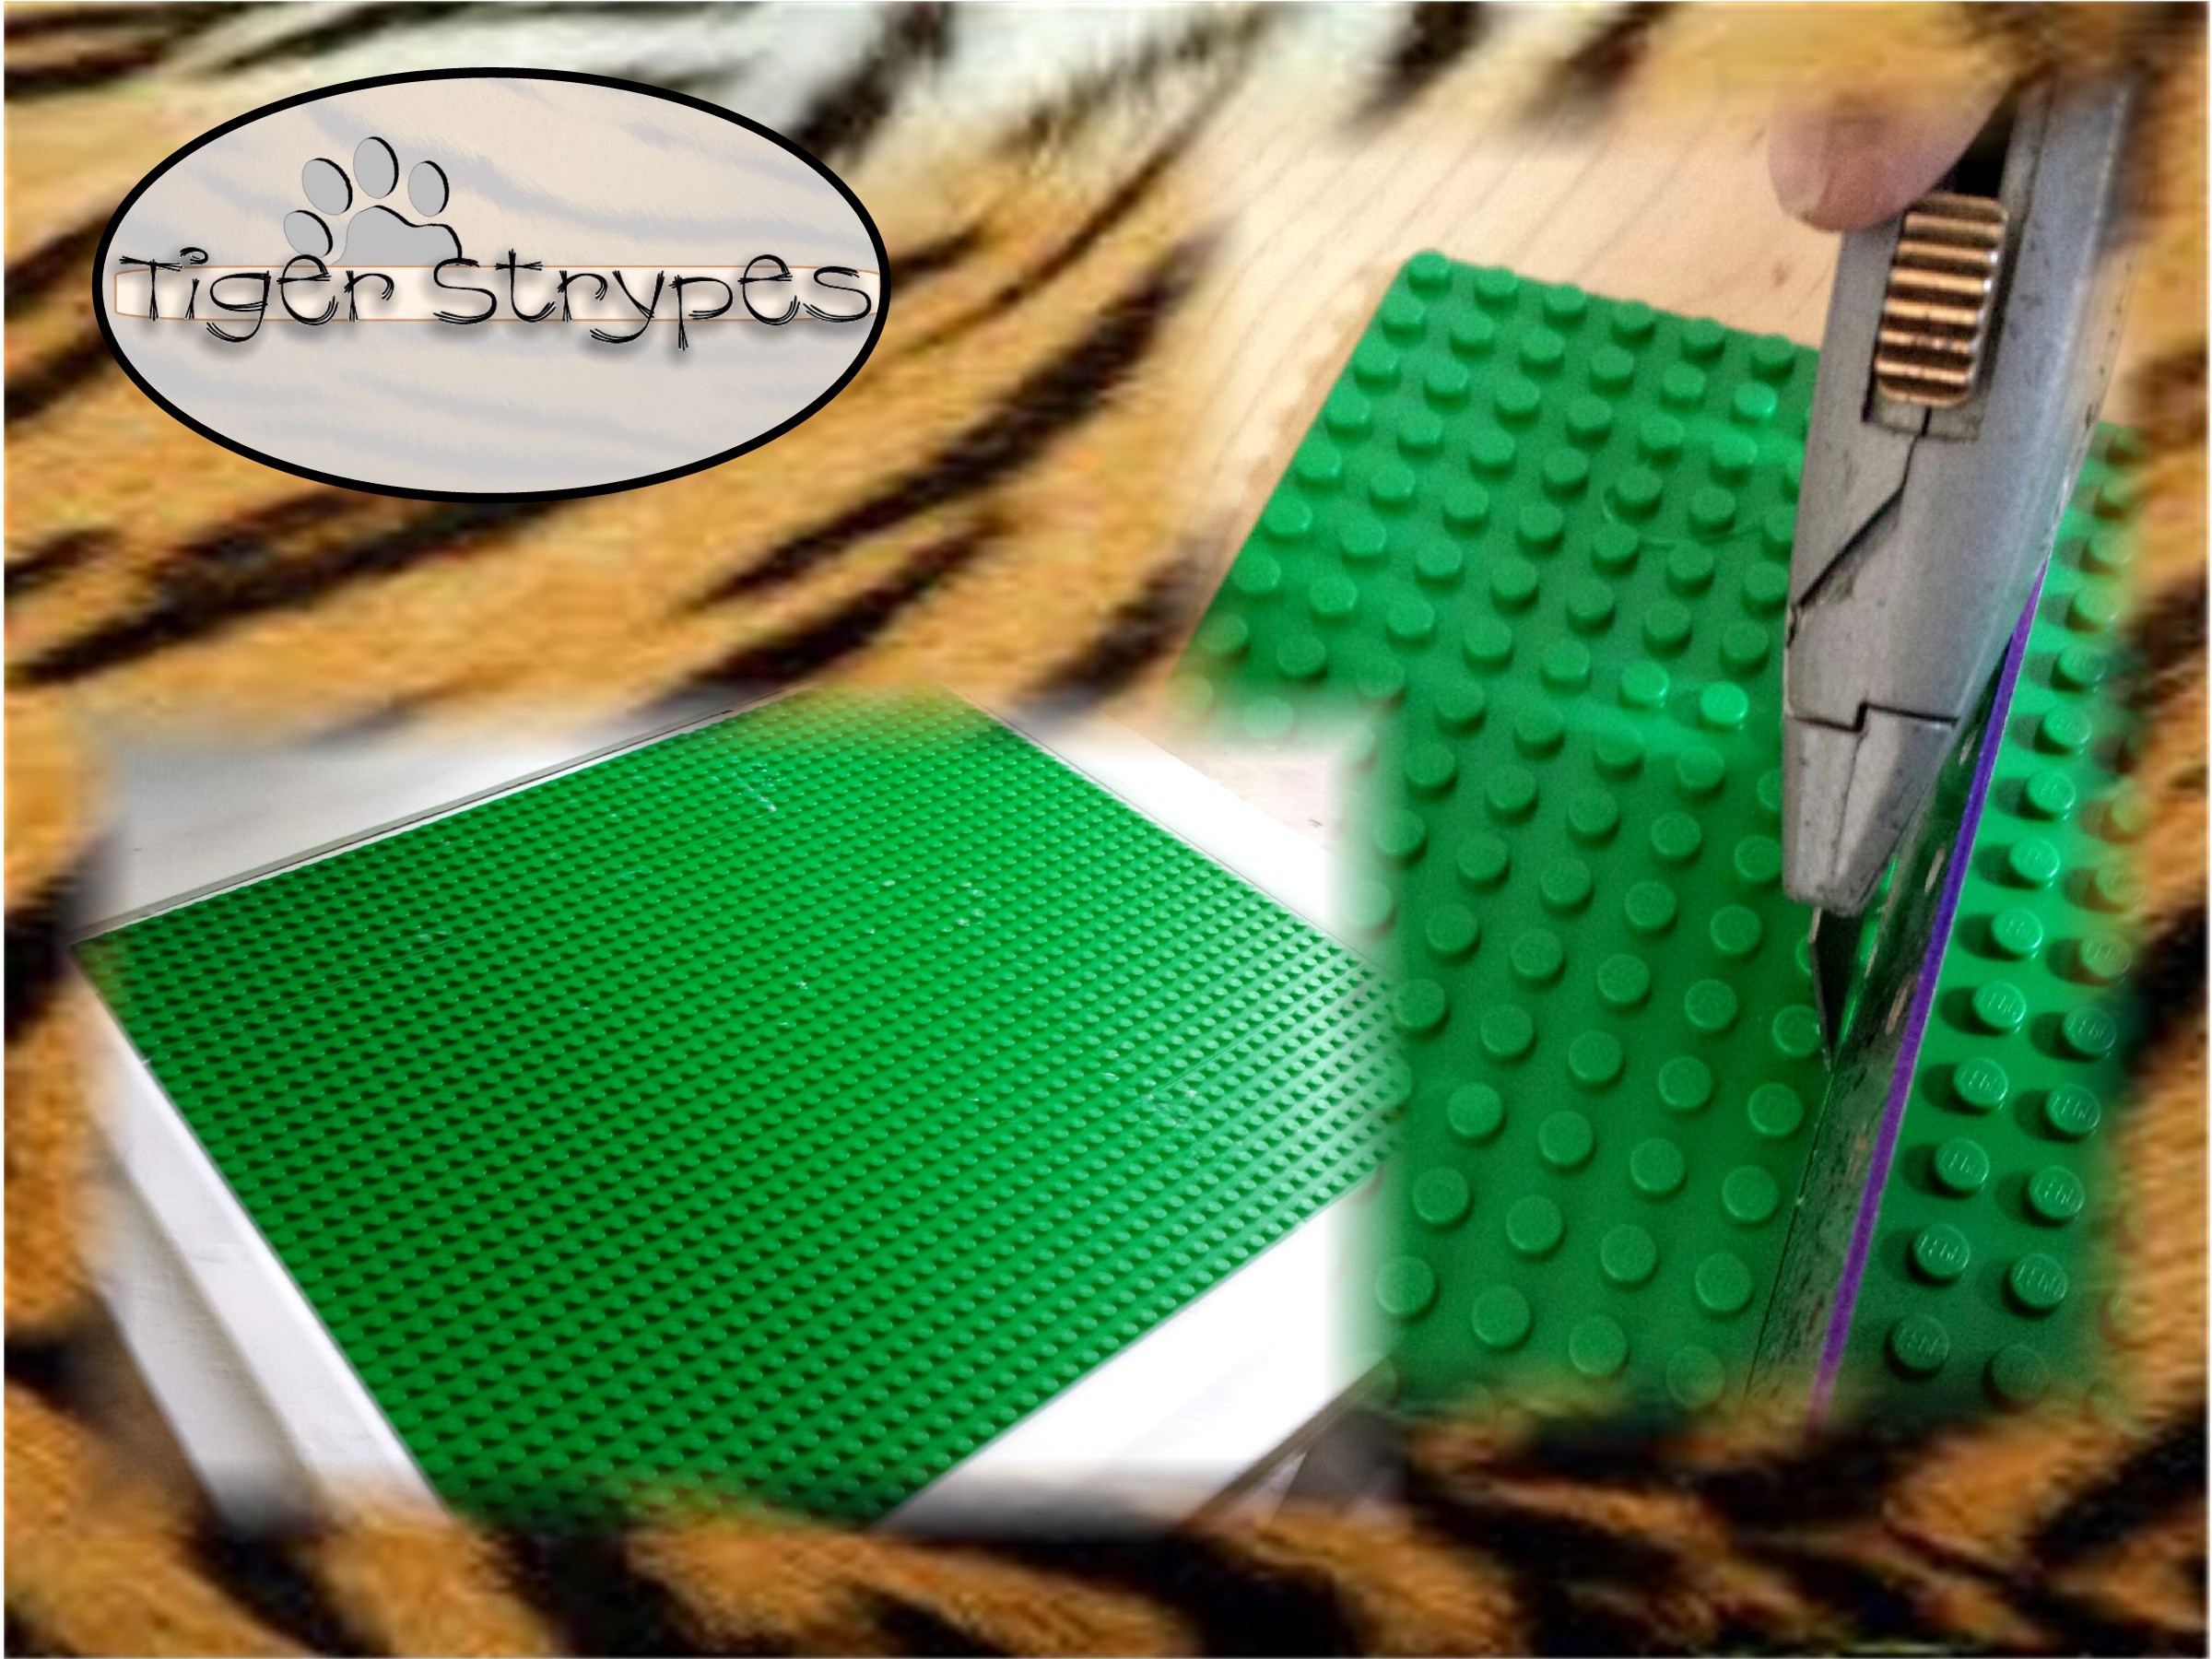
After you finish painting (you might need a few coats), just let it sit and dry overnight, or for a few days. Once it’s dry, you can start working with the flat building block sheets. I just measured and cut (2) 10″x10″ pieces to fit the whole front bottom portion. This will depend on the size of table and sheets you use, so don’t depend on those numbers for yours. 🙂 To trim the sheets, just use a ruler and a box cutter to go over the piece a few times and then snap it. You’ll want to make sure that you get a good cut by going over it a bit – it is kind of like doing stained glass with that little roller cutter, if you’ve ever seen that done – you have to make sure you get the line in there before snapping it, otherwise, it could come out jagged, etc. When you have all of the pieces cut, go ahead and glue them in, making sure to line up any separate pieces to line up, so that the building blocks will be able to go on them evenly.
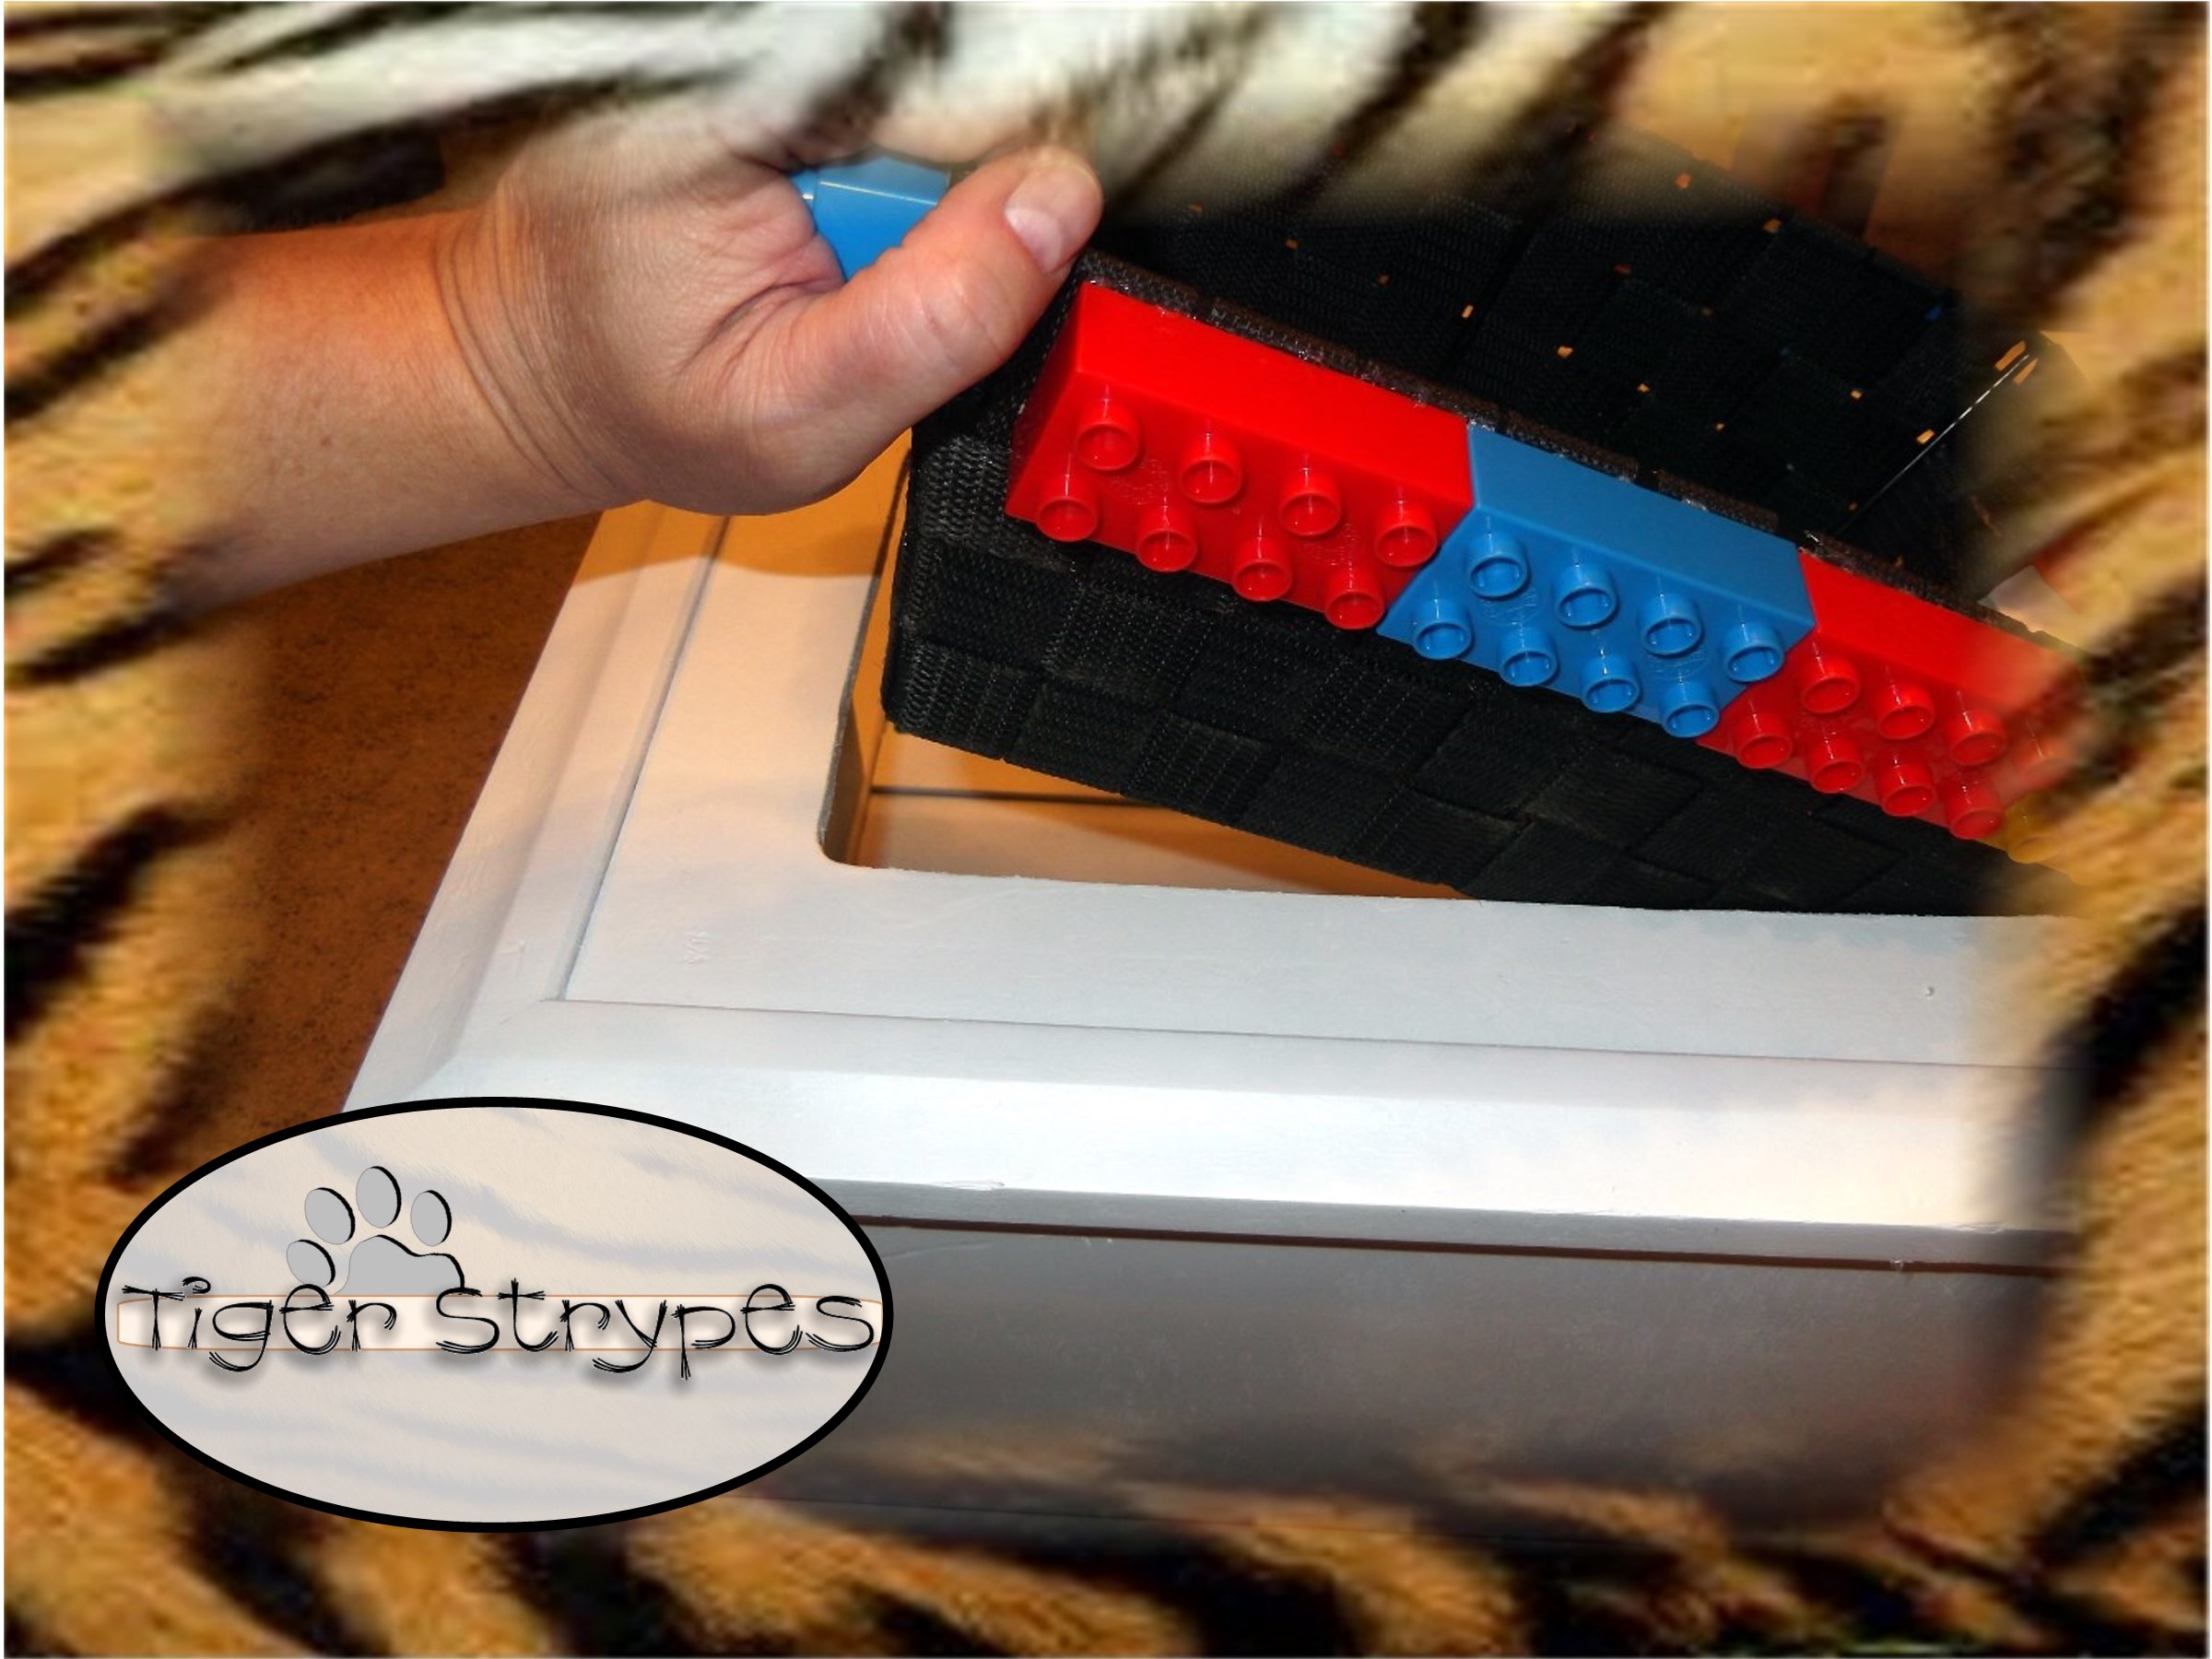
When I was done with that, I started working on embellishing my basket. I used the large size building blocks and glued them around the edge, making sure they were in a spot where they would not be used for the leverage of the basket sitting in the table, since that might not work out so well. :/
After you get all of the bricks on the basket as you wish, you can then insert it into the hole in the top of the table.
Now you can go ahead and build to your hearts delight and allow the kids to actually have fun with the furniture!!
Hope you like it! Please take a minute to leave me a comment and let me know what you would do different, or what you would add, etc. Be sure to tweet, pin, share, etc. – thanks!!
All pictures and text are my own and have not been copied in any way. I, Jamie Tomkins, own and operate Tiger Strypes Blog located at www.TigerStrypes.com. From time to time you’ll hear about my real life experiences or creations with products and/or services from companies and individuals. Let it be known that I have no affiliation with these said companies, and have not received compensation for reviewing or using their service/product. The information that I give regarding the product/service is based off my own personal experience, I do not guarantee that your experience will be the same.
PLEASE SHARE THIS POST USING THE OPTIONS BELOW…THANKS!!
*****************************************************************************************************


[…] Building Block Table from Jamie […]
I love how this came out! My kids would love me if I made them this table. We are big Lego fans over here. I’ll be on the hunt too now for a table. Pinning for later!
It was fun to make and great for an area where you want to have fun, but also look good some of the time! ha/ha
We had a table for building blocks when the kids were young. It’s a great idea. Thanks for sharing and co-hosting at the #HomeMattersParty ! 🙂
~Lorelai
Life With Lorelai
I can’t wait to be able to use it for Grandkids – WAY LATER in life! 🙂
I’ve seen these tables and think they’re such a great idea for kids. Thanks for sharing #HomeMattersParty
My son definitely loved his! 🙂
Wow, this is a great idea.LEGO-loving kids will love this kind of a table. #HomeMattersParty
Thanks Sahana – my son sure loved it!
wow, thats pretty cool, and I’m sure would be a dream gift for any smart, excited kid!! or adult! 🙂 Thanks for sharing at #homemattersparty with me and everyone this week! xx Bee
Thanks Bee – it was fun to make and is great for organizing!
That is really cool! My kids would love to have this in the living room for them to play on. Now I feel pretty confident I could do it too.
Thank you for sharing this with us on the #HomeMattersParty.
Thanks Crystal. It was pretty easy to make. My husband just helped, since I needed to take pictures. 🙂
I love this lego table! What a great idea for the kiddos! #HomeMattersParty
Thank you Michelle, my son loved it when he was a bit younger. 🙂
[…] Building Block Table from Jamie […]
[…] Building Block Table from Jamie […]
[…] Building Block Table from Jamie […]
[…] Building Block Table from Jamie […]
[…] Building Block Table from Jamie […]
[…] Building Block Table from Jamie […]
What a great little table! I have a few kids that would love that. Great job!
Thanks Kelli – it was fun to make with my husband as a project!! 🙂
I love it! My boys and daughter would totally be into this since they all love Lego Bricks. So crafty!
Thanks Carlee – it was fun to make!
That is so cool! My son has a TON of Legos and would love a table like this. It would be so perfect in his new room that I am decorating.
Did you ever make one? I love how it helps keep things organized!
That is adorable! My dad has a couple of tables like this in his house. I need to make one of these!
Thanks Pam – I love making new things from the old! 🙂
Hey Jamie! What an awesome project! My boys would totally love it. Made sure to pin it. Nice work!
Thanks for sharing Brittany!
This is so awesome!!! I love this!!! Thanks for sharing!
Thanks Rose!
That is adorable! Love to see you repurpose old things into something new!
Thanks Maggie! 🙂
Cute idea! My older kids are build-a-holics. This would be enough room for the smallest builder to have some private space. Always nice to make something for less than you could find in the store. Thanks for sharing.
It’s definitely a great way to make a play place look a bit better in the home! 🙂
This is awesome! My boys would have loved this when they were little! They loved building blocks!
Thanks Dawn – it was really fun to make!
What a great job! I always wanted a Lego table when the kids were little but they are so expensive.
I agree, the cost is ridiculous – just making your own is a big saver!